Difference between revisions of "Xenoarcheologist"
WickedCybs (talk | contribs) m (added a small section relating to joining mining or using the intrepid to go to an asteroid) |
m |
||
| (4 intermediate revisions by 3 users not shown) | |||
| Line 4: | Line 4: | ||
|stafftype = RESEARCH | |stafftype = RESEARCH | ||
|imagebgcolor = #eeeeff | |imagebgcolor = #eeeeff | ||
|img = Scientist.png | |img = Scientist-nbt.png | ||
|jobtitle = Xenoarcheologist | |jobtitle = Xenoarcheologist | ||
|access = [[Job_Guides#Research|Research]] | |access = [[Job_Guides#Research|Research]] | ||
|difficulty = Medium | |difficulty = Medium | ||
|qualifications = At least 30 years of age, PhD in Archaeology, Xenoarchaeology or Anomalous Materials. | |qualifications = At least 30 years of age, PhD in Archaeology, Xenoarchaeology or Anomalous Materials. | ||
|employers = [[Zeng-Hu Pharmaceuticals]], [[ | |employers = [[Zeng-Hu Pharmaceuticals]], [[NanoTrasen]], [[Zavodskoi Interstellar]] | ||
|superior = [[Research Director]] | |superior = [[Research Director]] | ||
|duties = Retrieve various artifacts from the asteroid | |duties = Retrieve various artifacts from the asteroid. Figure out their effects and applications. Be chased by spectral eels. | ||
|guides = | |guides = [[Guide to Piloting]], [[Guide to Away Missions]], this page | ||
}} | }} | ||
You are a '''Xenoarcheologist''', a scientist specialising in researching the remains of alien civilisations. You will unearth artifacts and anomalies, and link them together to form coherent stories. In order to do so, you will use the Intrepid, your trusty scientific shuttle, to fly to various exoplanets, outposts, and asteroids to dig up whatever you detect on your Alden-Saraspova counter. Once you've retrieved these objects, you can fly back to the Horizon, sit down in your lab, and start analysing your finds and figuring out what your anomalies do. | |||
== Starting Out == | |||
You start in the Research department. Your laboratory is within the research sub-level on Deck 1, and can be reached via a lift across from the departmental conference room. You will need to do two things before you head out; prepare your own gear and prepare the Intrepid. | |||
=== Your gear === | |||
Adjacent to your xenoarchaeology atrium is your EVA preparation. It contains four research voidsuits, two lockers, and a table with some steel, glass, and a toolbox. Assemble your voidsuit (you can get an oxygen tank from main EVA storage), and open a locker to get your gear. They are organised here in order of relative importance. | |||
* '''Excavation Gear-Belt''': The belt that will allow you to carry most of your equipment. Also lets you carry folders and photos! | |||
* '''GPS''': '''Essential.''' Tells you your position, allows you to track your position relative to other GPSes, allows you to track the location of the Intrepid, the Spark, and the Canary. '''DO NOT FORGET YOUR GPS.''' | |||
* '''Shortwave radio:''' Essential. Allows you to communicate with other expedition members if the Horizon is out of communication range (two overmap tiles away from the site). '''DO NOT FORGET YOUR RADIO.''' | |||
* '''Depth Analysis Scanner''': Absolute necessity. Tells you if the tile of rock in front of you contains something, and gives you information about it if it is the case. Detailed later in this guide. | |||
* '''Alden Saraspova Counter''': Absolute necessity. You click this and it tells you how far the closest Anomaly is from you. Use this information to progressively move closer. Make sure to scan rocks using the depth analysis scanner when within a tile. The last thing you want is to destroy the anomaly and the artifacts along with it. | |||
* '''Ore detector:''' Alt-click on this to bring up a menu where you can track all manner of ores... and artifacts! If you keep your ore detector in your hand or pocket, you can see tracked objects as green glowing dots on your field of view. | |||
* '''Mining drill:''' Absolute necessity. Helps you tunnel through pesky, non-anomalous rock. | |||
* '''Excavation Pick Set''': Absolute necessity. Contains the small picks you need to excavate your artifacts. They're all a different size, and dig a certain amount; this will be detailed later in this guide. | |||
* '''Wrench''': Needed to set the suspension field generator, which is necessary to collect artifacts. | |||
* '''Hand Pickaxe''': The largest excavation pick, does not fit in the excavation pick set. Digs 30cm. | |||
* '''Core Sampler''': Needed to take the rock samples you need for spectrometer analysis. Necessary for roleplay reasons. | |||
* '''Lantern''': A very useful light source. Has a wider, brighter light than your voidsuit helmet. | |||
* '''Measuring Tape''': Tells you how deep you already dug into your site. Useful when you lose track of your excavation. | |||
* '''Tracking Beacon''': When activated, allows locator devices to locate it by tuning on its frequency. Useful if you are in trouble (but you brought your GPS, right?), or if you simply lost your suspension field generator. Not a necessity at all and mostly a waste of space. | |||
* '''Locator Device''': Locates tracking beacons by tuning to their frequency. As useful as the beacon, which is to say not much. | |||
Some other gear you can carry includes: | |||
* '''Folder:''' Lets you put your forms, photos, and analysis reports in one easy location. Located on the desk in your lab, and in the research and development lab. | |||
* '''Camera:''' Why wouldn't you want to take photos? Alt-click on the camera to change its photo size. | |||
* '''Forms:''' These can be printed from a request console (you have one in your lab). Navigate to the "Forms" tab, scroll down to the Science section, and print out some anomaly assessment, artifact report, and other such forms you think might be useful. Put them in your belt for safekeeping. Your PDA has a pen in it which you can remove by right-clicking on it and selecting <code>Remove Stored Object</code>, so you have a pen at hand all the time. | |||
* '''Sample bags:''' A box is in the xenoarcheology lab; click and drag on the bag while it's in your hand to the item you want to put in the bag. | |||
* '''Hand labeler:''' Lets you label your finds. | |||
You also have two other important pieces of equipment; the '''suspension field generator''' [[File:Suspension field generator.png]] and the '''anomaly containers''' [[File:Anomaly container.png]]. A suspension field generator allows you to dig up an artifact without it falling and shattering; an anomaly container allows you to hold an anomaly safely without it activating or being tampered with. | |||
=== | === Preparing the Intrepid === | ||
''See also: [[Guide to Piloting]]'' | |||
[[File:Intrepid.png|thumb]] | |||
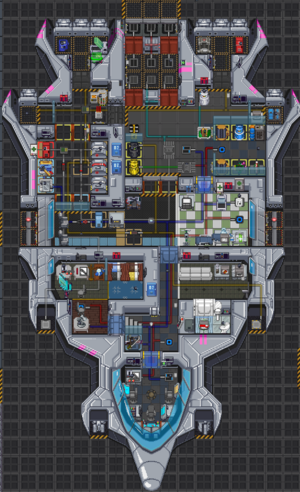
The Intrepid is the science department's shuttle, and as such is equipped with anything you might need to have a safe, productive expedition. Naturally, your equipment is going to need to go on the Intrepid in its cargo bay, before anything else. | |||
Head into the atmospherics compartment and turn the pump marked in brown on. Set the pressure to 5,000 kPa (you can max the pump out, but you don't need more than 5,000kPa). Now, go back into the main area and set the pump leading from the CO2 canister to the same value. Congrats, you're filling the Intrepid's thrusters! It's recommended, if you're going on a long voyage, to fill up the CO2 canister a bit more at Fuel Storage, next to the Intrepid Hangar, so you don't randomly run out of thrust. | |||
When you're taking off, make sure to turn on your thrusters at the '''engine console'''. A good value for the thruster limiters is 50-60%. You can also boost your '''acceleration limiter''' at the '''helm control console''', which allows you to move faster than the speed of nothing. | |||
If you lack confidence in your ability to drive, you can also ask a [[Bridge Crewman]] to pilot the Intrepid for you. Chances are they'll be happy to help! | |||
=== Where do I go again? === | |||
''' | Sometimes, Command or Engineering is lazy and either doesn't move the Horizon, or doesn't set up thrusters. In either case, it's your job to head to the away site of your choice and start spelunking! | ||
By default, the Intrepid doesn't come equipped with the coordinates for every away site in the sector. However, at the start of every round, a '''sensors readout''' will be printed at every command console on the Horizon. This sensor readout tells you the bearing, in angular degrees, of where the away sites are from the original location of the Horizon. If a mysterious asteroid is bearing 90 degrees, the Horizon moving to the right means the bearing will be different. Make sure to mark down the location of the Horizon at the start of the shift! | |||
You can get a sensor readout from the Pilot Room, which is to the right of the Intrepid Hangar. Walk right in and pick up the paper. If you are lazy, the [[Bridge Crewman]] can also fax you one. | |||
== | == Excavating == | ||
So you've touched down on the planet, you've cycled out, and you're ready to start looking! Good job. Use your Alden-Saraspova counter and your ore detector to pinpoint the locations of artifacts and anomalies. Once you've found a dig site, set down your lantern, folders, and bring out your picks. | |||
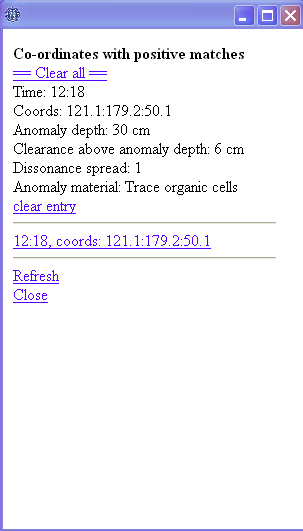
First, make sure that the tile you're looking to dig up contains an artifact or anomaly. Use your depth analysis scanner on the rock. If you've found something, your scanner will ping. Click on the scanner to bring up a screen that looks a bit like this: | |||
[[File:Xenoarch_depth.png]] | |||
* '''Time:''' The time at which the scan was made. For paperwork purposes. | |||
* '''Coordinates:''' Coordinates of the dig site. Also for paperwork purposes. | |||
* '''Anomaly depth:''' The depth at which your artifact resides. | |||
* '''Clearance above anomaly depth:''' The size of the cavity in which the artifact is. If you dig in it, you will get a strange rock, which I will talk about later. | |||
* '''Dissonance spread:''' 1 means it is an artifact, other numbers indicate an anomaly. | |||
* '''Anomaly material:''' Tells you roughly what your artifact is. Depending on this information, you will activate a specific field on your suspension field generator to collect the artifact. | |||
Now that you have this information, set up the suspension field generator to face the dig site. You need two free tiles around the site, so that you can put your generator on one and stand on the other one. Wrench it in place. Now's also a good time to take out your core sampler and click on the rock. Once you have the sample, you can eject it from the sampler and put it in a bag. | |||
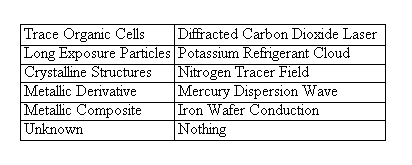
Now it's time to turn on your suspension field generator (you can dig before you turn on the generator, but it's nice to turn it on in case you forget). In the above depth analysis scanner reading, the anomaly material is trace organic cells. Below is a list of anomaly materials, and which field generator setting you need to swap to for each. | |||
[[File:Xenoarch_table.png]] | |||
As seen in the table, the field setting should be set to ''diffracted carbon dioxide laser''. Once you've done that, turn on the generator. | |||
Now for the most delicate part; digging up an artifact. Bring out your set of excavation picks. Shift-clicking to examine the picks themselves will reveal their length. | |||
[[File:Xenoarch_picks.png]] | |||
[[File: | |||
''' | Using the earlier depth analysis scanner as an example, the anomaly is 30cm deep into the rock. The clearance depth is 6cm. In the most basic terms, you'll need to dig '''24cm''', then use the '''6cm''' pick to properly unearth the artifact without damaging it. | ||
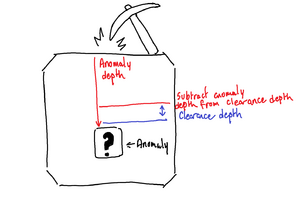
If that doesn't make sense, a useful guide is to the right. Imagine the clearance depth as the crust of rock that needs to be delicately handled before you can secure the artifact or anomaly. | |||
[[File:Excavation guide.png|thumb]] | |||
' | Once you've finished, turn off your suspension field generator, and enjoy your newfound artifact. A depth analysis scanner can also detect multiple artifacts on the same tile. Keep pinging! | ||
[[File:Xenoarch2.png]] | [[File:Xenoarch2.png]] | ||
If you locate an anomaly on a tile, once you've excavated all of the artifacts, you can clear out the rock with a hand pickaxe to unearth an anomaly. Make sure to store that anomaly in an anomaly container by click-dragging it to the container-- dragging it back without containment may have adverse effects on your health. | |||
Now that you've dug something up, you can haul it back to the Intrepid, or keep looking for artifacts. | |||
=== Strange rocks === | |||
[[File:Xenoarch_cavity.png]] | [[File:Xenoarch_cavity.png]] | ||
' | If you come up just a bit short of your excavation depth, you'll get a strange rock. While not being a total failure, a strange rock needs to be opened with a welder, which is one unnecessary step in the process. But the most important point here is that opening strange rocks quite often breaks the artifact itself, so, try to dig at the exact anomaly depth to avoid these kinds of issues. | ||
== | == Researching Anomalies == | ||
Once you've brought your anomaly back to the ship and safely sealed it within an isolation chamber, it's time to figure out what it does! First things first, don an anomaly suit (or your voidsuit) and rubber gloves, as found in xenoarcheology storage. They protect you from (most) anomalous effects. | |||
There are two types of anomalies that can generally be classified as special and dynamic. Special anomalies have unique abilities not shared with any of the dynamic anomalies; they are very distinct, and once they activate you'll likely know them when you see them. Dynamic anomalies, on the other hand, have random properties that activate from a certain trigger. You will have to activate the anomaly to know what effect it has. These effects are numerous and vary from extremely dangerous to extremely helpful. | |||
Thankfully, you're not flying completely blind. If you set your anomaly on the anomaly scanner, you can print a scan that gives you a vague idea of what trigger and effect the anomaly might have. This allows you to narrow down your testing. | |||
Below are a list of triggers and effects: | |||
{| class="wikitable sortable" | {| class="wikitable sortable" | ||
|- | |- | ||
! Triggers | ! Triggers | ||
|- | |- | ||
| Touch: || Touching the | | Touch: || Touching the anomaly with an ungloved hand. | ||
|- | |- | ||
| Water: || Splash some water on it and see if it activates. | | Water: || Splash some water on it and see if it activates. | ||
| Line 159: | Line 138: | ||
| Volatile: || Try percussive experimentation, hit it with blunt objects. Maybe a crowbar? | | Volatile: || Try percussive experimentation, hit it with blunt objects. Maybe a crowbar? | ||
|- | |- | ||
| Energy: || Try to hit it with an activated | | Energy: || Try to hit it with an activated stun baton, and try to shoot it with an emitter. See if it activates from either. | ||
|- | |- | ||
| Heat: || Increase the temperature in one of the Anomaly Isolation Chambers. | | Heat: || Increase the temperature in one of the Anomaly Isolation Chambers. | ||
|- | |- | ||
| Cold: || | | Cold: || Decrease the temperature in one of the Anomaly Isolation Chambers. | ||
|- | |- | ||
| | | Phoron: || Put it in a room with phoron in the air. | ||
|- | |- | ||
| Oxygen: || Put it in a room with | | Oxygen: || Put it in a room with oxygen in the air. | ||
|- | |- | ||
| Carbon Dioxide: || Put it in a room with CO2 in the air | | Carbon Dioxide: || Put it in a room with CO2 in the air. | ||
|- | |- | ||
| Nitrogen: || Put it in a room with | | Nitrogen: || Put it in a room with nitrogen in the air. | ||
|} | |} | ||
{| class="wikitable sortable" | {| class="wikitable sortable" | ||
|- | |- | ||
! Effects !! When you finally trigger an | ! Effects !! When you finally trigger an anomaly then you receive at least one, maybe two effects from the anomaly. If you are lucky it won't kill you immediately. | ||
|- | |- | ||
| EMP: || The | | EMP: || The anomaly releases an electromagnetic pulse that shuts down all electronic equipment within range. This includes synthetics, and mechanical organs. | ||
|- | |- | ||
| Cold: || Makes the room colder. | | Cold: || Makes the room much colder, very quickly. | ||
|- | |- | ||
| Cell Charge: || Charges all | | Cell Charge: || Charges all battery cells within range. Good for an [[IPC]]. | ||
|- | |- | ||
| Cell Drain: || Drains all | | Cell Drain: || Drains all battery cells within range. Bad for an IPC. | ||
|- | |- | ||
| Radiation Emitter: || Emits large amounts of radiation | | Radiation Emitter: || Emits large amounts of radiation. | ||
|- | |- | ||
| CO2: || Releases | | CO2: || Releases carbon dioxide. | ||
|- | |- | ||
| Nitrogen: || Releases | | Nitrogen: || Releases nitrogen. | ||
|- | |- | ||
| Oxygen: || Releases | | Oxygen: || Releases oxygen. | ||
|- | |- | ||
| Phoron: || Releases | | Phoron: || Releases phoron. Very dangerous. | ||
|- | |- | ||
| Good Feelings: || Emits brain altering waves that make you happy. | | Good Feelings: || Emits brain altering waves that make you happy. | ||
| Line 202: | Line 179: | ||
| Bad Feelings: || Emits brain altering waves that give you anxiety. | | Bad Feelings: || Emits brain altering waves that give you anxiety. | ||
|- | |- | ||
| Heal: || Heals | | Heal: || Heals organics. | ||
|- | |- | ||
| Hurt: || Hurts | | Hurt: || Hurts organics. | ||
|- | |- | ||
| Robot Heal: || Heals | | Robot Heal: || Heals synthetic characters. | ||
|- | |- | ||
| Robot Hurt: || Hurts | | Robot Hurt: || Hurts synthetic characters. | ||
|- | |- | ||
| Sleepy: || Makes everyone | | Sleepy: || Makes everyone tired. May also release nitrous oxide. | ||
|- | |- | ||
| Stun: || Temporarily | | Stun: || Temporarily stuns people. | ||
|- | |- | ||
| Teleport || Randomly | | Teleport || Randomly teleports people within the vicinity of the anomaly. | ||
|} | |} | ||
=== | === Anomaly batteries === | ||
You can siphon the effects from an anomaly into an anomaly power battery. When this battery is slotted into a device called an anomaly power utiliser, it will discharge the effect. Creating these tools are where the trigger and effect comes into play beyond the roleplay elements. | |||
To begin charging an anomaly power battery, you will have to activate the anomaly and put it into the exotic particle harvester pad. Insert the battery into the harvester and activate it. It will fill the battery with the effect. Many anomaly effects will drain the battery very quickly; you may have to use them carefully, and they work best for demonstrating the anomaly to your coworkers. | |||
== Spectrometry == | |||
So! You have spent some time digging and excavating, and now, you have around 6 different dig sites, maybe more. That’s good. Hopefully you organized and labelled them all. Now, take all the samples and head into the Spectrometry lab. | |||
[[File:Spectrometry lab.png]] | |||
Inside there is a coolant tank, a bucket, some nanopaste, and three spectrometers. Fill one of the spectrometers with as much coolant as it can take, then set the coolant flow rate to about 2u/sec. Take your first sample, take the rock sample from inside it, and put it in the spectrometer. | |||
Now, you have opened the spectrometer menu. Big scary screen at first, but simple to understand. | |||
[[File:Xenoarch_spectroconsole.png|350px]] | |||
'''Radiation:''' | * '''Scanner:''' Indicates the progress of the scan, and the "health" of the spectrometer. When it is too low, use nanopaste to fix it. | ||
* '''MASER:''' The most important stuff. Try to match you Current Wavelength with the Optimal Wavelength best as you can, since it is what makes the scan progress. | |||
* '''Environment / Internal:''' The speed at which the machine functions, and the heat it endures. The faster it goes, the hotter it is. | |||
* '''Radiation:''' Radiation spikes often happen during the scan, and can be hazardous to your health. Enabling Radiation Shielding actually pauses the scan's progress, so it's best to just keep your voidsuit on while you do analysis so you don't get radiation poisoning. | |||
* '''Cooling:''' As evident, keeps the internal temperature from overheating and destroying the sample. | |||
Begin the scan, and keep toggling the MASER wavelength to be in line with the optimal wavelength as best you can. The machine pings, ejects your rock sample, and prints the result of the scan. | |||
[[File:Xenoarch_specresults.png]] | [[File:Xenoarch_specresults.png]] | ||
Now, you have some techno- | Now, you have some techno-babble that will allow you to roleplay studying your artifacts. | ||
Also, if you run out of coolant, you can make more by combining Tungsten, Acetone, and Water at a chemistry dispenser. | |||
== Roleplaying == | |||
While the things you unearth can be genuinely mechanically useful, much of the fun of xenoarcheology is creating roleplay reasons for what the artifacts you found might have been. What do the spiked bands on this mysterious urn indicate? Could these rodent figures engraved in this gun be emblematic of the species that developed it, or are these perhaps just pets? Whatever you decide on, it's definitely more fun to have a partner in science, or even a clueless [[Security Officer]], to bounce theories off of. Don't be afraid to get creative, and remember; fill out those forms! | |||
{{ | {{Guides}} | ||
{{Jobs}} | {{Jobs}} | ||
[[Category:Guides|Xenoarchaeology, Guide to]] | [[Category:Guides|Xenoarchaeology, Guide to]] | ||
[[Category:Research]] | [[Category:Research]] | ||
Latest revision as of 10:12, 15 October 2023
| RESEARCH STAFF | |
 Xenoarcheologist |
Access: Research Qualifications: At least 30 years of age, PhD in Archaeology, Xenoarchaeology or Anomalous Materials. Employers: Zeng-Hu Pharmaceuticals, NanoTrasen, Zavodskoi Interstellar Supervisors: Research Director Duties: Retrieve various artifacts from the asteroid. Figure out their effects and applications. Be chased by spectral eels. Guides: Guide to Piloting, Guide to Away Missions, this page |
You are a Xenoarcheologist, a scientist specialising in researching the remains of alien civilisations. You will unearth artifacts and anomalies, and link them together to form coherent stories. In order to do so, you will use the Intrepid, your trusty scientific shuttle, to fly to various exoplanets, outposts, and asteroids to dig up whatever you detect on your Alden-Saraspova counter. Once you've retrieved these objects, you can fly back to the Horizon, sit down in your lab, and start analysing your finds and figuring out what your anomalies do.
Starting Out
You start in the Research department. Your laboratory is within the research sub-level on Deck 1, and can be reached via a lift across from the departmental conference room. You will need to do two things before you head out; prepare your own gear and prepare the Intrepid.
Your gear
Adjacent to your xenoarchaeology atrium is your EVA preparation. It contains four research voidsuits, two lockers, and a table with some steel, glass, and a toolbox. Assemble your voidsuit (you can get an oxygen tank from main EVA storage), and open a locker to get your gear. They are organised here in order of relative importance.
- Excavation Gear-Belt: The belt that will allow you to carry most of your equipment. Also lets you carry folders and photos!
- GPS: Essential. Tells you your position, allows you to track your position relative to other GPSes, allows you to track the location of the Intrepid, the Spark, and the Canary. DO NOT FORGET YOUR GPS.
- Shortwave radio: Essential. Allows you to communicate with other expedition members if the Horizon is out of communication range (two overmap tiles away from the site). DO NOT FORGET YOUR RADIO.
- Depth Analysis Scanner: Absolute necessity. Tells you if the tile of rock in front of you contains something, and gives you information about it if it is the case. Detailed later in this guide.
- Alden Saraspova Counter: Absolute necessity. You click this and it tells you how far the closest Anomaly is from you. Use this information to progressively move closer. Make sure to scan rocks using the depth analysis scanner when within a tile. The last thing you want is to destroy the anomaly and the artifacts along with it.
- Ore detector: Alt-click on this to bring up a menu where you can track all manner of ores... and artifacts! If you keep your ore detector in your hand or pocket, you can see tracked objects as green glowing dots on your field of view.
- Mining drill: Absolute necessity. Helps you tunnel through pesky, non-anomalous rock.
- Excavation Pick Set: Absolute necessity. Contains the small picks you need to excavate your artifacts. They're all a different size, and dig a certain amount; this will be detailed later in this guide.
- Wrench: Needed to set the suspension field generator, which is necessary to collect artifacts.
- Hand Pickaxe: The largest excavation pick, does not fit in the excavation pick set. Digs 30cm.
- Core Sampler: Needed to take the rock samples you need for spectrometer analysis. Necessary for roleplay reasons.
- Lantern: A very useful light source. Has a wider, brighter light than your voidsuit helmet.
- Measuring Tape: Tells you how deep you already dug into your site. Useful when you lose track of your excavation.
- Tracking Beacon: When activated, allows locator devices to locate it by tuning on its frequency. Useful if you are in trouble (but you brought your GPS, right?), or if you simply lost your suspension field generator. Not a necessity at all and mostly a waste of space.
- Locator Device: Locates tracking beacons by tuning to their frequency. As useful as the beacon, which is to say not much.
Some other gear you can carry includes:
- Folder: Lets you put your forms, photos, and analysis reports in one easy location. Located on the desk in your lab, and in the research and development lab.
- Camera: Why wouldn't you want to take photos? Alt-click on the camera to change its photo size.
- Forms: These can be printed from a request console (you have one in your lab). Navigate to the "Forms" tab, scroll down to the Science section, and print out some anomaly assessment, artifact report, and other such forms you think might be useful. Put them in your belt for safekeeping. Your PDA has a pen in it which you can remove by right-clicking on it and selecting
Remove Stored Object, so you have a pen at hand all the time. - Sample bags: A box is in the xenoarcheology lab; click and drag on the bag while it's in your hand to the item you want to put in the bag.
- Hand labeler: Lets you label your finds.
You also have two other important pieces of equipment; the suspension field generator ![]() and the anomaly containers
and the anomaly containers ![]() . A suspension field generator allows you to dig up an artifact without it falling and shattering; an anomaly container allows you to hold an anomaly safely without it activating or being tampered with.
. A suspension field generator allows you to dig up an artifact without it falling and shattering; an anomaly container allows you to hold an anomaly safely without it activating or being tampered with.
Preparing the Intrepid
See also: Guide to Piloting
The Intrepid is the science department's shuttle, and as such is equipped with anything you might need to have a safe, productive expedition. Naturally, your equipment is going to need to go on the Intrepid in its cargo bay, before anything else.
Head into the atmospherics compartment and turn the pump marked in brown on. Set the pressure to 5,000 kPa (you can max the pump out, but you don't need more than 5,000kPa). Now, go back into the main area and set the pump leading from the CO2 canister to the same value. Congrats, you're filling the Intrepid's thrusters! It's recommended, if you're going on a long voyage, to fill up the CO2 canister a bit more at Fuel Storage, next to the Intrepid Hangar, so you don't randomly run out of thrust.
When you're taking off, make sure to turn on your thrusters at the engine console. A good value for the thruster limiters is 50-60%. You can also boost your acceleration limiter at the helm control console, which allows you to move faster than the speed of nothing.
If you lack confidence in your ability to drive, you can also ask a Bridge Crewman to pilot the Intrepid for you. Chances are they'll be happy to help!
Where do I go again?
Sometimes, Command or Engineering is lazy and either doesn't move the Horizon, or doesn't set up thrusters. In either case, it's your job to head to the away site of your choice and start spelunking!
By default, the Intrepid doesn't come equipped with the coordinates for every away site in the sector. However, at the start of every round, a sensors readout will be printed at every command console on the Horizon. This sensor readout tells you the bearing, in angular degrees, of where the away sites are from the original location of the Horizon. If a mysterious asteroid is bearing 90 degrees, the Horizon moving to the right means the bearing will be different. Make sure to mark down the location of the Horizon at the start of the shift!
You can get a sensor readout from the Pilot Room, which is to the right of the Intrepid Hangar. Walk right in and pick up the paper. If you are lazy, the Bridge Crewman can also fax you one.
Excavating
So you've touched down on the planet, you've cycled out, and you're ready to start looking! Good job. Use your Alden-Saraspova counter and your ore detector to pinpoint the locations of artifacts and anomalies. Once you've found a dig site, set down your lantern, folders, and bring out your picks.
First, make sure that the tile you're looking to dig up contains an artifact or anomaly. Use your depth analysis scanner on the rock. If you've found something, your scanner will ping. Click on the scanner to bring up a screen that looks a bit like this:
- Time: The time at which the scan was made. For paperwork purposes.
- Coordinates: Coordinates of the dig site. Also for paperwork purposes.
- Anomaly depth: The depth at which your artifact resides.
- Clearance above anomaly depth: The size of the cavity in which the artifact is. If you dig in it, you will get a strange rock, which I will talk about later.
- Dissonance spread: 1 means it is an artifact, other numbers indicate an anomaly.
- Anomaly material: Tells you roughly what your artifact is. Depending on this information, you will activate a specific field on your suspension field generator to collect the artifact.
Now that you have this information, set up the suspension field generator to face the dig site. You need two free tiles around the site, so that you can put your generator on one and stand on the other one. Wrench it in place. Now's also a good time to take out your core sampler and click on the rock. Once you have the sample, you can eject it from the sampler and put it in a bag.
Now it's time to turn on your suspension field generator (you can dig before you turn on the generator, but it's nice to turn it on in case you forget). In the above depth analysis scanner reading, the anomaly material is trace organic cells. Below is a list of anomaly materials, and which field generator setting you need to swap to for each.
As seen in the table, the field setting should be set to diffracted carbon dioxide laser. Once you've done that, turn on the generator.
Now for the most delicate part; digging up an artifact. Bring out your set of excavation picks. Shift-clicking to examine the picks themselves will reveal their length.
Using the earlier depth analysis scanner as an example, the anomaly is 30cm deep into the rock. The clearance depth is 6cm. In the most basic terms, you'll need to dig 24cm, then use the 6cm pick to properly unearth the artifact without damaging it.
If that doesn't make sense, a useful guide is to the right. Imagine the clearance depth as the crust of rock that needs to be delicately handled before you can secure the artifact or anomaly.
Once you've finished, turn off your suspension field generator, and enjoy your newfound artifact. A depth analysis scanner can also detect multiple artifacts on the same tile. Keep pinging!
If you locate an anomaly on a tile, once you've excavated all of the artifacts, you can clear out the rock with a hand pickaxe to unearth an anomaly. Make sure to store that anomaly in an anomaly container by click-dragging it to the container-- dragging it back without containment may have adverse effects on your health.
Now that you've dug something up, you can haul it back to the Intrepid, or keep looking for artifacts.
Strange rocks
If you come up just a bit short of your excavation depth, you'll get a strange rock. While not being a total failure, a strange rock needs to be opened with a welder, which is one unnecessary step in the process. But the most important point here is that opening strange rocks quite often breaks the artifact itself, so, try to dig at the exact anomaly depth to avoid these kinds of issues.
Researching Anomalies
Once you've brought your anomaly back to the ship and safely sealed it within an isolation chamber, it's time to figure out what it does! First things first, don an anomaly suit (or your voidsuit) and rubber gloves, as found in xenoarcheology storage. They protect you from (most) anomalous effects.
There are two types of anomalies that can generally be classified as special and dynamic. Special anomalies have unique abilities not shared with any of the dynamic anomalies; they are very distinct, and once they activate you'll likely know them when you see them. Dynamic anomalies, on the other hand, have random properties that activate from a certain trigger. You will have to activate the anomaly to know what effect it has. These effects are numerous and vary from extremely dangerous to extremely helpful.
Thankfully, you're not flying completely blind. If you set your anomaly on the anomaly scanner, you can print a scan that gives you a vague idea of what trigger and effect the anomaly might have. This allows you to narrow down your testing.
Below are a list of triggers and effects:
| Triggers | |
|---|---|
| Touch: | Touching the anomaly with an ungloved hand. |
| Water: | Splash some water on it and see if it activates. |
| Acid: | Splash some acid on it and see if it activates. |
| Volatile: | Try percussive experimentation, hit it with blunt objects. Maybe a crowbar? |
| Energy: | Try to hit it with an activated stun baton, and try to shoot it with an emitter. See if it activates from either. |
| Heat: | Increase the temperature in one of the Anomaly Isolation Chambers. |
| Cold: | Decrease the temperature in one of the Anomaly Isolation Chambers. |
| Phoron: | Put it in a room with phoron in the air. |
| Oxygen: | Put it in a room with oxygen in the air. |
| Carbon Dioxide: | Put it in a room with CO2 in the air. |
| Nitrogen: | Put it in a room with nitrogen in the air. |
| Effects | When you finally trigger an anomaly then you receive at least one, maybe two effects from the anomaly. If you are lucky it won't kill you immediately. |
|---|---|
| EMP: | The anomaly releases an electromagnetic pulse that shuts down all electronic equipment within range. This includes synthetics, and mechanical organs. |
| Cold: | Makes the room much colder, very quickly. |
| Cell Charge: | Charges all battery cells within range. Good for an IPC. |
| Cell Drain: | Drains all battery cells within range. Bad for an IPC. |
| Radiation Emitter: | Emits large amounts of radiation. |
| CO2: | Releases carbon dioxide. |
| Nitrogen: | Releases nitrogen. |
| Oxygen: | Releases oxygen. |
| Phoron: | Releases phoron. Very dangerous. |
| Good Feelings: | Emits brain altering waves that make you happy. |
| Bad Feelings: | Emits brain altering waves that give you anxiety. |
| Heal: | Heals organics. |
| Hurt: | Hurts organics. |
| Robot Heal: | Heals synthetic characters. |
| Robot Hurt: | Hurts synthetic characters. |
| Sleepy: | Makes everyone tired. May also release nitrous oxide. |
| Stun: | Temporarily stuns people. |
| Teleport | Randomly teleports people within the vicinity of the anomaly. |
Anomaly batteries
You can siphon the effects from an anomaly into an anomaly power battery. When this battery is slotted into a device called an anomaly power utiliser, it will discharge the effect. Creating these tools are where the trigger and effect comes into play beyond the roleplay elements.
To begin charging an anomaly power battery, you will have to activate the anomaly and put it into the exotic particle harvester pad. Insert the battery into the harvester and activate it. It will fill the battery with the effect. Many anomaly effects will drain the battery very quickly; you may have to use them carefully, and they work best for demonstrating the anomaly to your coworkers.
Spectrometry
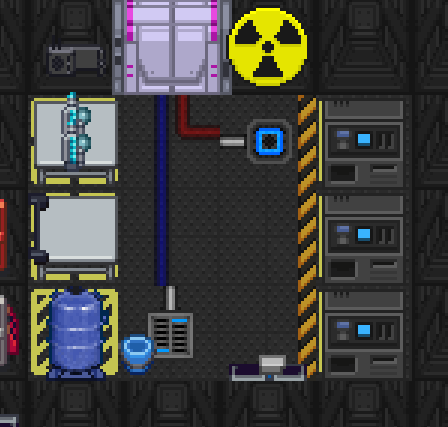
So! You have spent some time digging and excavating, and now, you have around 6 different dig sites, maybe more. That’s good. Hopefully you organized and labelled them all. Now, take all the samples and head into the Spectrometry lab.
Inside there is a coolant tank, a bucket, some nanopaste, and three spectrometers. Fill one of the spectrometers with as much coolant as it can take, then set the coolant flow rate to about 2u/sec. Take your first sample, take the rock sample from inside it, and put it in the spectrometer.
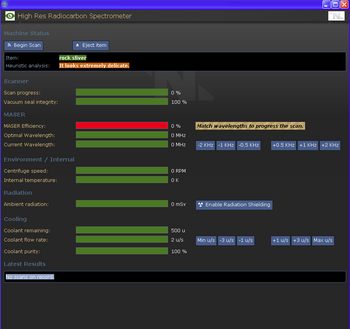
Now, you have opened the spectrometer menu. Big scary screen at first, but simple to understand.
- Scanner: Indicates the progress of the scan, and the "health" of the spectrometer. When it is too low, use nanopaste to fix it.
- MASER: The most important stuff. Try to match you Current Wavelength with the Optimal Wavelength best as you can, since it is what makes the scan progress.
- Environment / Internal: The speed at which the machine functions, and the heat it endures. The faster it goes, the hotter it is.
- Radiation: Radiation spikes often happen during the scan, and can be hazardous to your health. Enabling Radiation Shielding actually pauses the scan's progress, so it's best to just keep your voidsuit on while you do analysis so you don't get radiation poisoning.
- Cooling: As evident, keeps the internal temperature from overheating and destroying the sample.
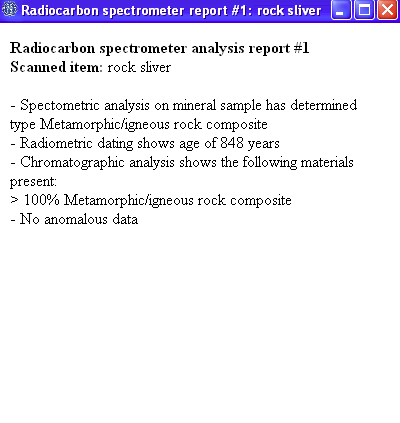
Begin the scan, and keep toggling the MASER wavelength to be in line with the optimal wavelength as best you can. The machine pings, ejects your rock sample, and prints the result of the scan.
Now, you have some techno-babble that will allow you to roleplay studying your artifacts.
Also, if you run out of coolant, you can make more by combining Tungsten, Acetone, and Water at a chemistry dispenser.
Roleplaying
While the things you unearth can be genuinely mechanically useful, much of the fun of xenoarcheology is creating roleplay reasons for what the artifacts you found might have been. What do the spiked bands on this mysterious urn indicate? Could these rodent figures engraved in this gun be emblematic of the species that developed it, or are these perhaps just pets? Whatever you decide on, it's definitely more fun to have a partner in science, or even a clueless Security Officer, to bounce theories off of. Don't be afraid to get creative, and remember; fill out those forms!
Jobs on Aurora
| |
| Command | Captain - Executive Officer - Head of Security - Chief Engineer - Research Director - Chief Medical Officer - Operations Manager |
| Command Support | Corporate Liaison - Consular Officer - Bridge Crewman |
| Security | Security Officer - Warden - Investigator - Security Cadet |
| Engineering | Engineer - Atmospheric Technician - Engineering Apprentice |
| Medical | Surgeon - Physician - First Responder - Psychologist - Pharmacist - Medical Intern |
| Research | Scientist - Xenobiologist - Xenobotanist - Lab Assistant |
| Operations | Hangar Technician - Shaft Miner - Machinist |
| Service | Assistant - Off-Duty Crewman - Passenger - Bartender - Chef - Chaplain - Librarian - Janitor - Botanist - Corporate Reporter |
| Non-human | AI - Cyborg - Personal AI |
| Special | Merchant - Ghost Roles |
