Guide to Piloting
Who can fly what?
Before reading through this guide, it can be useful to know who can fly what aboard the Horizon. This is the list of various spacecraft available to the crew, including the Horizon itself, and who can fly each.
- Spark - Miners, Xenoarcheologists, Xenobotanists, Xenobiologists, Bridge Crew, Operations Manager, Research Director, Executive Officer, Captain
- Quark - Xenoarcheologists, Xenobotanists, Xenobiologists, Bridge Crew, Research Director, Executive Officer, Captain
- Intrepid & Canary - Bridge Crew, Xenoarcheologists, Xenobotanists, Xenobiologists, Operations Manager, Research Director, Executive Officer, Captain
- Horizon - Bridge Crew, Executive Officer, Captain
The rest of command can fly the Intrepid and Spark on a case by case basis, where the character's background should have a justifiable reason for it.
While some roles may have the knowledge and ability to fly a certain spacecraft, it is best practice to leave the flying to the dedicated pilot of that craft. For instance, the Intrepid should be piloted by Bridge Crewmen and Xenoarcheologists if possible. The Spark should be piloted by Miners, the Quark by the Xenoarchaeologist, and the Canary by Bridge Crew. Even if your character is capable of piloting a craft due to their role, that does not necessarily give them permission to do so. Try to keep each craft for its intended pilots or purpose.
If your character's role is not listed under a vessel or possible exception list, then generally speaking your character cannot possess piloting knowledge for that craft. Confer with administrators beforehand if you wish to have a character who can pilot a vessel despite not being one of the listed roles.
Overmap

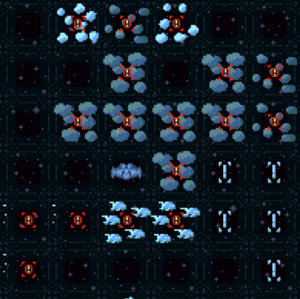
The overmap is functionally a z-level portraying the sector of space surrounding the ship. Every round, the ship begins on a random part of a randomized overmap, and by flying the ship across the overmap, you'll encounter various events and objects on it.
Some of the events you can expect to encounter are:
- Dust clouds: Clouds of high-speed dust that can collide into your windows and hull, wearing it down.
- Asteroid fields: Belts of meteors that have a tendency to slam into your ship, destroying hull around the site of impact. Even worse, some meteors can have EMP effects on impact, discharging your electrical equipment.
- Ion storms: Passing through these will scramble the laws of any bound synthetic, or an AI.
- Electrical storms: These will discharge and automatically turn off any electrical equipment (including APCs or an SMES) on the ship. Naturally, without electricity, your ship can't be controlled and will begin to drift.
- Carp shoals: Huge swarms of ferocious space-faring carnivores, eager to break through your windows to get a taste of sweet sapient flesh.
- Dark matter: Passing through these briefly scrambles ship gravity, leaving you to float aimlessly if you're not buckled to a chair or railing.
- Points of interest: Anything from planets, drifting derelicts, stations, sensor relays, and even other ships. Exploration is one of the goals of the Horizon, after all, and most ships are generally neutral to your presence in the sector... generally.
Piloting A Ship

The first rule of piloting ships is to remember Newton's first law; an object in motion stays in motion, unless acted on by external forces. Air resistance, friction, and gravity don't exist in the vacuum of space, so a ship is going to keep going in the direction you pushed it in originally unless you perform a reverse-burn by pressing ■ to stop it.
Ships on Aurora work by drifting. If you want to move your ship, you start by using ⭮ to turn clockwise, or ⭯ to turn counter-clockwise. Hovering over these buttons on your ship console will tell you which direction the helm is going to turn in. Once you are turned in the appropriate direction, press ↑ to execute a burn. Once again, keep in mind Newton's first law. If you turn your ship 90 degrees to the right and burn in that direction, simply turning your ship 180 more degrees to the right isn't going to make the ship stop moving in its original direction. To move in a new direction, you must reverse-burn, then burn forward in your new direction.
For a ship to even begin to move, however, it needs to have thrust. What this means is that the thrusters, those funny little nozzles at the back of a ship, must be a) powered on and b) have fuel inside of them. The Horizon has thrusters that use a mixture of phoron and oxygen to propel the ship, and it is the job of the Atmospheric Technicians to prepare the thrusters at the start of the round. Every other ship, like the Spark and Intrepid, will use CO2 to propel themselves.
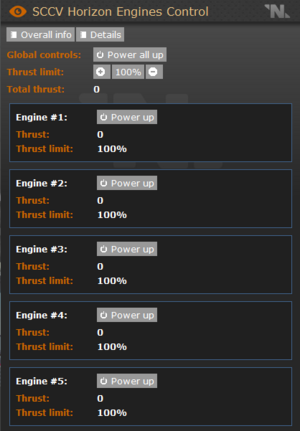
To power on the thrusters, you'll need to open up the engine control console. Then, you can use the global controls to power up all the engines. Success! Now your ship has thrust! You can also control the amount of thrust the nozzles are receiving by editing the thrust limiter at the top of the window; this is useful if you want to save fuel.

A Quick Helm Console Overview
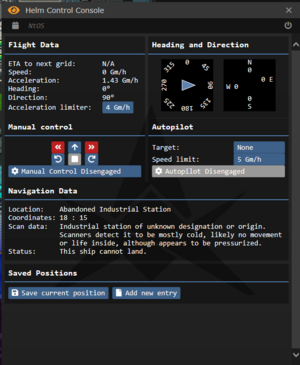
To make a ship move faster, it's recommended you edit the acceleration limiter under the flight data heading; a nice number to start with is 5. Unless your atmos techs are really cooking with gas, the Horizon isn't going to move faster than about three (3) gigameters per hour (Gm/h). Smaller shuttles, like the Intrepid and Spark, can move along way faster.
ETA to next grid is, as of 4/25/2023, finicky after an update to the speed of the thrusters. The best way to determine how far you are from the next grid is to see where your ship icon on the overmap is positioned in relation to the grid of the sectors.
Your speed will tell you just how fast your ship is going. Your heading tells you the degree of the direction in which you're going, a la nautical navigation. You can easily navigate to a point of interest if you have its bearing, which should be on the sensor readout printed at every command console at the start of the round.
If you want to register where you found a point of interest, you can Save Current Position or Add New Entry to keep the data on your helm console for easy navigating back.
Autopilot
DO NOT USE AUTOPILOT.
Yes, really. If autopilot is activated, it will do exactly what it says; pilot the ship on its own. The problem is is that it will take you to the programmed destination through every hazard in the way. Autopilot will also constantly be correcting its speed to stay on-target by burning forward, reverse-burning, and then burning more, which will use up a ton of fuel and thrust.
Once again; DO NOT USE AUTOPILOT.
Sensors
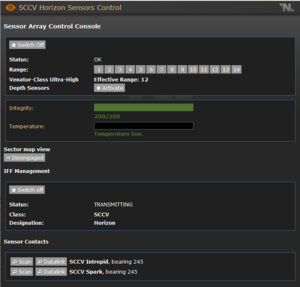
To detect hazards and points of interest, all ships are equipped with a complex sensor array that shows the area in a varying range around the ship. In order to properly navigate the sector, it is first recommend you switch on the sensors.

Next, set the sensor range to something median. 4 is usually recommended because it won't actively increase the temperatures of the sensor array, and allows you to get a good look at what's around you. The sensors will begin to gradually increase their range, as indicated by which number is highlighted in green on the UI. Also available on some ships is the ultra-high class depth sensors, which will let you see through the hazards around you at the cost of heating up the sensors much quicker.
If your sensors heat up too much, indicated by the temperature gauge, they'll begin to take damage. If your sensors are destroyed, this means you're left blind in the middle of space, and an engineer will have to fix the array. Don't let your sensors heat up too much!
Once the sensors are online, they will begin to ping their surroundings, opening up a view of the map to you. When the sensors detect a point of interest, like a planet or another vessel, your chat will alert you that a "Bogey" has been detected, and give you a rough estimate of its bearing. While you remain in sensor range of the point of interest, your sensors will scan the "Bogey", and eventually identify to you what it is.
Shuttle Maintenance
As previously stated, the thrusters require fuel in the form of gas to move around the overmap. Atmospheric Technicians will handle fuelling the Horizon, but other ships can be fueled by simply connecting a canister of CO2 to a connector. Normally, Hangar Technicians handle the refueling of shuttles. Ship hulls can be repaired in the same way regular walls can, with welders or construction materials.
To move from z-level to z-level (or to transition from map to map), shuttles like the Intrepid or Spark require secondary thrust. This is the fuel that allows them to take off from the hangar on to the surface of a planet; usually it's phoron, but other ships might use hydrogen.
Secondary thrust fuel is stored in the light grey fuel port on every shuttle. To open it, use a crowbar on the port, click on it with an empty hand, and remove the tank. These tanks can be refilled at the fuel bay in the hangar, although it is best to leave this to technicians.
It's also important to remember that shuttles do not have an infinite supply of power or air. While undocked, a shuttle's APC and SMES will gradually drain (and depending on the equipment used, it'll drain even faster). This is usually not a huge concern, as shuttles tend to come with a large supply of power to last the entire round. However, losing power can become a problem if you fly into an overmap hazard that destroys your SMES or discharges it (and sometimes it's not just an overmap hazard). Additionally, while most shuttles naturally transfer air with the Horizon after landing, during flight they utilize connect air tanks to supply the atmosphere. These air tanks can be replenished in the air station between the Intrepid and Quark hangars. Waste canisters can also be emptied here, should the shuttle have one such as the Intrepid.
Luckily, the Intrepid has a generator on hand that can be fed with fuel (usually phoron, uranium, or graphite), and will power the APC if you're in trouble. To properly set it up, it needs to be wrenched down on a wire node connected to your shuttle's APC and turned on.
Also; roles with pilot access typically have access to the shuttle's APC, such as miners have access to the Spark's APC.. Handy if you run into an electrical storm by accident!
Away Sites
The primary purpose of the SCCV Horizon is to travel the Orion Spur in search of more phoron deposits. Because you can't mine space, or look for artifacts in the void, crewmembers will need to go to away sites to claim them for the SCC. To accommodate this, the Horizon has four shuttles; the Spark, a mining pod, the Quark, a research shuttle, the Intrepid, an expeditionary shuttle, and the Canary, a scouting shuttle. However, this isn't to say that miners can't accompany scientists and vice versa; if you're going to the same spot, why waste the fuel?
Unless by explicit command order, the shuttles can't be grounded, and it's not even strictly necessary to tell command where you're going. It's nice, however, to give the bridge a heads-up before you leave, and maybe tell them where you are in case of certain disaster. Shaft miners can generally go it alone in the Spark to an away site, and Xenoarchaeologists are capable of taking the Quark or Intrepid and setting out alone. However, a large expedition may dictate that Command should send a dedicated pilot, such as Bridge Crewmen, to supervise the ship while the away team is out. Worth noting, however, is that Command staff should not accompany expeditions to away sites unless they are necessary for its success.
Asteroids
Asteroids contain a plethora of minerals and anomalous artifacts for both the aspiring shaft miner and xenoarchaeologist. Worth noting, however, is that they may also contain hostile lifeforms such as space carp, space sharks, and even nastier beasts. Traverse at your own risk!
Derelicts
Remains of ships and stations that have long been decommissioned, for some reason or another. Holding anything from old corporate equipment to experiments gone wrong, these may not have the mineral wealth of asteroids, but contain interesting things for the crew to uncover.
Planets
Exoplanets, much like asteroids, can contain mineral wealth or mysterious artifacts. Unlike asteroids, they can have a variety of atmospheric conditions, from human-habitable to full of nitrous oxide. It's best to use a gas analyzer before you take off your helmet or turn off your internals.
Emergency!
The most important aspects for the survival of a ship consists of three things:
- a functional navigational system
- working thrusters
- power to keep both operational
If you lack one of these, they need to take priority to be fixed, otherwise you might drift directly into more hazards that directly jeopardize your health. On the Horizon it's likely you'll have a capable engineering team at your back, but smaller shuttles in danger may require your ingenuity and quick thinking.
If you're in a dangerous situation, such as piloting directly into meteors, it's important to remember not to panic. Now that you're not panicking, it's important to try and move away from the hazard you're in. If you can't move away from the hazard, it's time to troubleshoot.
- Are your engines on? Make sure to check the console and power them up.
- Do you have enough fuel to move? If not, you're going to need to find the canister of another gas (perhaps oxygen?) to make sure the ship can get away from its current danger.
- Is there power to the ship? If not, it's time to set up the generator, or reactivate the APC by swiping your ID and getting direct access to its controls.
- Is your cockpit vented? You do have a voidsuit, right? If not, the Intrepid has a few accessible softsuit cyclers in both the front and the back of the ship-- put those on and move into the vacuum, soldier. You can fix the venting later.
- Something's in your ship that shouldn't be! Your trusty kinetic accelerator or expedition shotgun should do the job. Failing that, a toolbox or other blunt object does just as well. If someone is attacking you, well, that's a different problem.
A final note; the shuttles have a long-range holopad that can be used to talk to the Horizon, assuming you're in their sensor range or you've datalinked with the bridge. If you're in a pretty hairy situation, asking for aid to be teleported over or for Mom the ship to come pick you up is never a bad idea.