Difference between revisions of "Guide to Shields"
Jump to navigation
Jump to search
m |
|||
| (8 intermediate revisions by 3 users not shown) | |||
| Line 1: | Line 1: | ||
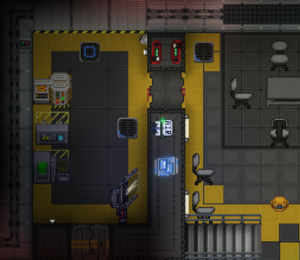
[[File:SetupShields-ShieldRoom.png|thumb|The shield room in engineering.]] | |||
The shields, as the name implies, protects the [[SCCV Horizon]] from all manner of outer space hazards, such as carp, dust, meteors, and rarely, enemy fire. The shield room is located next to [[Engineering]]'s break room, on deck three. | |||
' | == Setting It Up == | ||
Setting the shields is one of the easiest jobs that an [[Engineer]] is tasked with. It's simply a matter of knowing the values to set the SMES, capacitor, and generator to. | |||
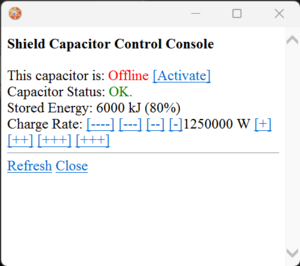
[[File:Shield capacitor.png|thumb|The shield capacitor.]] | |||
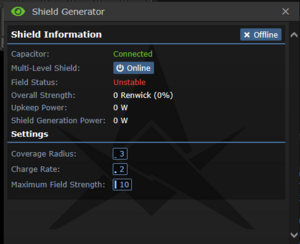
[[File:Shield gen.png|thumb|The shield generator.]] | |||
# Set the SMES in the shield room to maximum input (1,500,000 watts), and the output to 1,400,000 watts. This is not a hard rule, and you can lower the values a bit if you want. | |||
# Using the <code>+++</code> button, set the '''shield capacitor''' to 1,250,000 watts. Click <code>Activate</code>. | |||
# Now, check out the '''shield generator'''. Set the coverage radius to 100. A coverage radius of 100 will cover all of the Horizon in a mostly-skintight blue bubble. | |||
# The '''charge rate''' can be set anywhere from 3 to 5. | |||
# The '''maximum field strength''' can be set from 3 to 6. Using higher values is reserved for rounds where both engines are running, and there's an immediate external danger to the Horizon. | |||
Congrats! Shields should be spooling up. Assuming you have used a three-megawatt [[Supermatter]] setup, the shields will run mostly stable for the entire round. | |||
! | |||
==Shield Tips and Troubleshooting== | |||
* Sections of shield that are destroyed (by carp bumping into them, meteors hitting them, [[Security Officer|Security Officers]] slapping them with a maglight, etc.) do not regenerate automatically. In order to restore the shield to its full integrity over the ship, you have to power off the shield generator and turn it on again. For obvious reasons, it's strongly recommended you don't do this when the Horizon is on a [[Guide to Piloting|tile full of hazards]]. | |||
* You can use a wrench on the capacitor and generator to move them anywhere you'd like. There may be an extremely rare case where it is recommended to seal something on the ship within a bubble, but in that case, you're probably best off using the emergency shields in Engineering Hard Storage instead. | |||
* It is also worth noting that shields '''do not seal atmosphere'''. Don't try using them to hold a breach. | |||
* The shields can be easily sabotaged by snipping the wire nodes underneath them and the SMES they're attached to. Check the wires using your T-ray scanner if the shields aren't working. | |||
* Shields can also drain a lot of power; if they're not turning on, check that you have any of the engines set up properly. It may be that another appliance on the ship is draining the power you need, or your engine isn't functioning at full capacity. | |||
{{Guides}} | |||
[[Category:Guides]] | |||
[[ | |||
Latest revision as of 10:23, 15 October 2023
The shields, as the name implies, protects the SCCV Horizon from all manner of outer space hazards, such as carp, dust, meteors, and rarely, enemy fire. The shield room is located next to Engineering's break room, on deck three.
Setting It Up
Setting the shields is one of the easiest jobs that an Engineer is tasked with. It's simply a matter of knowing the values to set the SMES, capacitor, and generator to.
- Set the SMES in the shield room to maximum input (1,500,000 watts), and the output to 1,400,000 watts. This is not a hard rule, and you can lower the values a bit if you want.
- Using the
+++button, set the shield capacitor to 1,250,000 watts. ClickActivate. - Now, check out the shield generator. Set the coverage radius to 100. A coverage radius of 100 will cover all of the Horizon in a mostly-skintight blue bubble.
- The charge rate can be set anywhere from 3 to 5.
- The maximum field strength can be set from 3 to 6. Using higher values is reserved for rounds where both engines are running, and there's an immediate external danger to the Horizon.
Congrats! Shields should be spooling up. Assuming you have used a three-megawatt Supermatter setup, the shields will run mostly stable for the entire round.
Shield Tips and Troubleshooting
- Sections of shield that are destroyed (by carp bumping into them, meteors hitting them, Security Officers slapping them with a maglight, etc.) do not regenerate automatically. In order to restore the shield to its full integrity over the ship, you have to power off the shield generator and turn it on again. For obvious reasons, it's strongly recommended you don't do this when the Horizon is on a tile full of hazards.
- You can use a wrench on the capacitor and generator to move them anywhere you'd like. There may be an extremely rare case where it is recommended to seal something on the ship within a bubble, but in that case, you're probably best off using the emergency shields in Engineering Hard Storage instead.
- It is also worth noting that shields do not seal atmosphere. Don't try using them to hold a breach.
- The shields can be easily sabotaged by snipping the wire nodes underneath them and the SMES they're attached to. Check the wires using your T-ray scanner if the shields aren't working.
- Shields can also drain a lot of power; if they're not turning on, check that you have any of the engines set up properly. It may be that another appliance on the ship is draining the power you need, or your engine isn't functioning at full capacity.


