Difference between revisions of "Bluespace Drive"
Furrycactus (talk | contribs) (Guide to the Bluespace Drive) |
Furrycactus (talk | contribs) m (Guide to the Bluespace Drive) |
||
| Line 97: | Line 97: | ||
As for modifying the drive itself, perhaps one might consider how best to allow for a more precise way of injecting 1000 moles into the Phoron line. Or, how to manage the intake of your custom moderator gas mix. | As for modifying the drive itself, perhaps one might consider how best to allow for a more precise way of injecting 1000 moles into the Phoron line. Or, how to manage the intake of your custom moderator gas mix. | ||
{{Engineering}} | |||
{{Guides}} | |||
[[Category:Engineering]] | |||
[[Category:Guides]] | |||
[[Category:Pages]] | |||
Latest revision as of 10:37, 19 January 2025
What is it?
The Bluespace Drive - also known as the C-Goliath Drive - is a highly sophisticated piece of machinery, and its importance and impact on the history of the modern Orion Spur cannot be understated. Developed by NanoTrasen, it allows a spacefaring vessel to fold space around itself using the Bluespace dimension, and is powered by Phoron. It allows for a ship to jump across distances without making use of the thrusters. While it is somewhat capable of being operated in its starting configuration, it performs at its best when operated in partnership between Engineers and Atmospheric Technicians, and this should be the goal whenever possible.
Basic Guide
Overview
The Bluespace Drive combines principles from both Engineering and Atmospherics. In order to be activated, the Bluespace Drive requires Phoron gas, and a moderator gas mixture. It also requires two layers of shielding - inner and outer - to be powered and active.
By default, you are provided with a canister of Phoron gas for fuel, and a canister of Boron gas to serve as the moderator, but they are not particularly effective on their own. The drive has a base amount of Phoron fuel required for the drive to work at all, and the moderator gas mix is responsible for influencing the power of the jump itself and determines the distance able to be achieved.
For simplicity's sake, the drive requires a minimum of 1000 moles of Phoron per jump in the fuel line, but any moles in excess of this number are also consumed for no additional gain. Meanwhile, the more moles of gas provided in the moderator line, the more power you achieve for the jump's distance. However, not all gasses are worth the same power per mole, and the temperature of the moderator gas/mix plays a role, too.
Layout
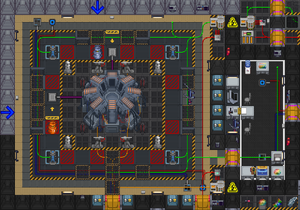
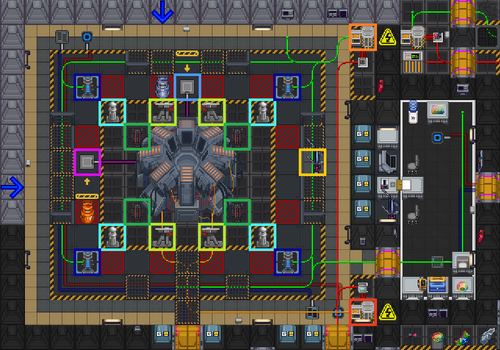
- Bluespace Drive Control Console: This console allows for energising the drive, purging the charge from the drive, setting the rotational direction of an intended jump, and for initiating the jump. Without it, the drive is little more than a very expensive hunk of metal.
- Warper Receivers (Tesla Coils): These devices exist to ground any electrical discharges from the Bluespace Drive.
- Field Generators: The generators that project the moderately hazardous Inner Shield wall around the Bluespace Drive. They contain the bluespace-field-driver singularity during a jump. The shield that they project is hazardous, and can fling you away from them with potentially life-threatening injuries! Do not stand adjacent to them!
- Emitters: Heavy-duty industrial lasers that provide thermal energy to the Field Generators. These must all be active to power the Inner Shield wall.
- Shield Generators: The generators that project the safe Outer Shield wall, insulating the crew from the hazardous repelling effects of the more volatile Inner Shield projected by the Field Generators.
- Phoron Fuel Port: The connector port where the Phoron gas required for the drive to function is loaded in.
- Moderator Gas/Mix Port: The connector port where the Moderator gas/mixture that powers the drive's jump distance is loaded in.
- Inner Shield Circuit SMES: The SMES unit that stores and distributes charge to the Emitters that power the Inner Shield wall's Field Generators.
- Main Circuit SMES: The SMES unit that stores and distributes charge to the Outer Shield wall's Shield Generators, and the room's APC.
Round-start Setup
- Max the Input/Output ratings on the Inner Shield Circuit SMES and Main Circuit SMES.
- Wrench down the Warper Receivers (Tesla Coils) and the Shield Generators.
- Wrench and weld down the Field Generators and the Emitters.
- Secure the canister of Phoron onto the Phoron Fuel Port.
- Secure the canister of Boron onto the Moderator Gas/Mix Port.
- Activate the Emitters.
- Activate the Field Generators. Make sure to move away from them as soon as you turn them on, as the active shield can violently repel you!
- Unlock the Shield Generators with your ID card and turn them on. NOTE: This can only be done by an Engineer or Chief Engineer/Captain.
- Interface with the Bluespace Drive Control Console, and Energize the drive.
- Set the rotation of the jump on the dial, in absolute galactic degrees. NOTE: This is easiest to do by clicking once on the dial, typing in the number, and hitting Enter. Click-dragging the dial is imprecise and difficult to see.
- Announce the jump and ensure no personnel are outside the ship! Being outside the ship during a Bluespace jump will instantly KILL you!
- Activate the Jump button. The drive will take approximately 30 seconds to energize the field, then it will jump automatically. Do not panic when you see the singularity appear, unless you've somehow not put both shields up and it's not tethered to the drive.
- After the jump has concluded, De-energize the drive with the console. Make sure to wear welding goggles for this, as there'll be a flash that can blind you!
- Disable the output on the Inner Shield Circuit SMES and wait for the Inner Shield wall to dissipate.
- Disable the Shield Generators to allow the Outer Shield wall to dissipate.
The primary pitfall of this Round-start setup is that it's frankly not very good. Typically it only allows the Horizon to jump a single tile on the overmap. This is not particularly useful, and the cost in Phoron and Boron is steep for such little pay-of. But, it technically provides a means for the ship to move in an emergency where it can't be piloted normally, albiet an extremely costly, tedious, inefficient one. It's generally never worth doing.
Emergency Procedures
In the event that the drive must be shut down for an emergency, or to abort a jump, this can be accomplished in two ways; de-energizing the drive, or dumping the gasses, both doable via the console. However, electing to dump the gasses will render those gasses lost, so this is not recommended outside of extreme circumstances, and it is recommended to at least pump out the Phoron beforehand so it's not wasted.
However! Shutting down the drive while in operation can have consequences. Whichever method you use, when aborting a jump in-progress, the energy stored within the core will disperse and cause a bluespace flash across the ship. While the risk to life and limb is low, it can cause temporary disruption to the sight and hearing of the crew. If time allows, the crew should be informed of an emergency jump abortion in advance. This includes you, too! Make sure you wear welding goggles before you do this, or you'll be blinded!
Advanced Information
Calculations
The information below contains technical information in regards to moderator gas mixes, and is the purview of Atmospheric Technicians.
As mentioned previously, the jump distance that a drive can achieve is determined by the power of a moderator gas/mix. Power is determined by the number of moles, their temperature, and the gas type itself. Each gas has its own power factor, which determines how much power-per-mole it can provide. Additionally, higher temperatures offer better results, with diminishing returns after a point. This offers us the following calculations.
- Power = Moles x Gas Power Factor x Temperature
- Distance = Power/1000
NOTE: You can mix different gasses together for the moderator gas/mix; these calculations assume you are using a single gas moderator.
As for specific gasses, below is a table listing various gasses, their power factor, and whether they are readily available on the Horizon or not.
| Gas | Amount (moles) | Achieved Power | Available on the Horizon (Y/N) |
|---|---|---|---|
| Phoron | 1.00 | 1.00 | Y |
| Hydrogen | 1.00 | 0.70 | Y |
| Deuteruim | 1.00 | 1.67 | N |
| Tritium | 1.00 | 1.68 | N |
| Nitrogen | 1.00 | 0.30 | Y |
| Nitrous Oxide | 1.00 | 0.50 | Y |
| Oxygen | 1.00 | 0.90 | Y |
| Carbon Dioxide | 1.00 | 0.24 | Y |
| Sulphur Dioxide | 1.00 | 1.20 | N |
| Chlorine | 1.00 | 1.00 | N |
| Helium | 1.00 | 1.60 | Y |
| Boron | 1.00 | 1.69 | Y |
Modification and Experimentation
With all that information out of the way, you might be wondering how to actually utilise it in an effective way. Admittedly, much of the experimentation with a Bluespace Drive lies in trying out various gas moderator compositions in Atmospherics. As with most of Atmospherics, most of the fun is in experimentation! With the information given to you here, go forth and try out various mixes and gas compositions.
As for modifying the drive itself, perhaps one might consider how best to allow for a more precise way of injecting 1000 moles into the Phoron line. Or, how to manage the intake of your custom moderator gas mix.
Engineering Department
| |
| Head of Department | Chief Engineer |
| Personnel | Engineer - Atmospheric Technician |
| Useful Guides | Guide to Atmospherics - Supermatter Engine - Guide to the INDRA - Guide to Thrusters - Telecommunications - Integrated Electronics |

