Difference between revisions of "Sandbox2:Lavillastrangiato"
| Line 1: | Line 1: | ||
<!-- __NOCACHE__ --> | |||
<!-- Do not touch the above line --> | |||
<center>{{Navbox New Player Guides}}</center> | |||
{{toc_right}} | |||
'''If you are an experienced Space Station 13 player, familiarize yourself with Aurora's lore at [[New Player Lore Guide]] and see the [[Character Creation]] guide.''' | |||
==BYOND== | Welcome to Space Station 13, a game that offers rich player interaction and, on this server and many others, a unique roleplay experience! This guide assumes you are completely new to Space Station 13 and its controls. This guide will attempt to take you step-by-step through setting up your BYOND account, the incredibly unintuitive controls of SS13, and what to expect from your first round. | ||
==Downloading BYOND== | |||
[[File:Pager.png|right|400px]] | [[File:Pager.png|right|400px]] | ||
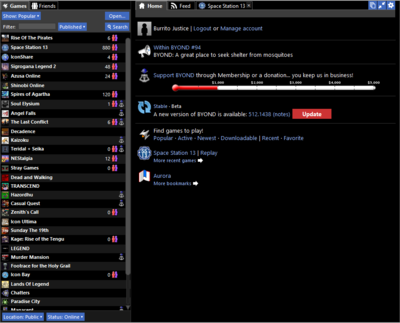
BYOND - Build Your Own Net Dream - is the <s>awful, archaic, and probably cursed</s> engine that SS13 uses, and it must be downloaded in order to join any server. | BYOND - Build Your Own Net Dream - is the <s>awful, archaic, and probably cursed</s> engine that SS13 uses, and it must be downloaded in order to join any server. To download BYOND, visit [http://www.byond.com/download/ the BYOND website]. A BYOND account also must be created before you can join any servers. | ||
After installing BYOND and creating an account, click the field next to ''Filter'' and type in "Space Station 13". The hub entry should appear, and you will likely see a list of servers! You can scroll down until you see Aurorastation, or you can click [https://aurorastation.org/ Board The Aurora] on this link. This will automatically open BYOND and take you to the server. | |||
After installing BYOND and creating an account, click the field next to ''Filter'' and type in "Space Station 13". The hub entry should appear, and you will likely see a list of servers | |||
===You're In!=== | ===You're In!=== | ||
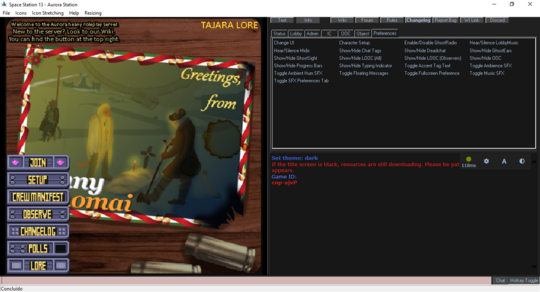
If you've successfully joined the server, you'll see the blank ''Dream Seeker'' screen. | If you've successfully joined the server, you'll see the blank ''Dream Seeker'' screen. After roughly thirty seconds, the window will open and you'll be presented with a split-screen interface. On the left side, you'll see the server's title screen with clickable options, and on the right side, you'll see a set of commands (also known as verbs) and the chat log. | ||
[[File:Greetings.png|540px]] | [[File:Greetings.png|right|540px]] | ||
If the left side is blank, it means that the server is still streaming resources to your computer, which may take a minute or two. However, this is a one-time process that usually only occurs the first time you join the server. | If the left side is blank, it means that the server is still streaming resources to your computer, which may take a minute or two. However, this is a one-time process that usually only occurs the first time you join the server. | ||
== | ==Before You Join== | ||
Now that you've officially joined the server, here are some important tips that can help you before you join your first round. | |||
#'''Make sure you've [https://aurorastation.org/rules.html read the rules!]''' | #'''Make sure you've [https://aurorastation.org/rules.html read the rules!]''' Failing to do so can result from a swift exit from the server. | ||
# | #'''Check your settings (if you want).''' If the lobby music is particularly loud, you can turn it off in the <code>Preferences</code> at the top right of your screen, under <code>Hear/Silence Lobby Music</code>. A bunch of other sound-toggling settings are here as well, should you desire to turn them off. | ||
#This is a roleplay server, | #'''This is a roleplay server.''' On an HRP server, an attempt is made to cultivate a more serious, dramatic atmosphere, though that doesn't mean there can't be humor or strange happenings afoot. Make sure that your character and their actions are believable for the [[New Player Lore Guide|setting]]. | ||
#Your first round may be rough. | #'''Your first round may be rough.''' Feel free to ask your fellow players for help in the OOC channel (accessible by hitting F2), or in the Local OOC channel, found in the <code>OOC</code> tab in the upper-right part of your screen. Local OOC will broadcast an OOC message to those around you, and is useful if you need to advise someone you're AFK or you need help with something. Failing all this, consider asking the staff team for help! In the <code>Admin</code> tab, click <code>Adminhelp</code> to send a message to the staff that are currently online. | ||
With that out of the way, we can continue to character creation! | With that out of the way, we can continue to character creation! | ||
==Your First Character== | ==Your First Character== | ||
'' | ''[[Character Creation|Click here to read the full guide on character creation.]]'' | ||
On the left side of the screen, you'll see a menu of options, including <code>Setup</code>. Click on this to open the character creation window, which should look similar to the picture | |||
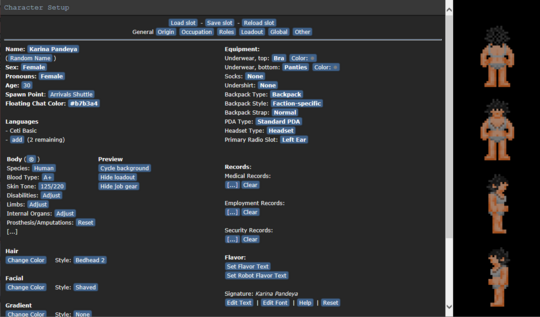
On the left side of the screen, you'll see a menu of options, including <code>Setup</code>. Click on this to open the character creation window, which should look similar to the picture below. For now, the only button at the top you need to worry about is the <code>Save Slot</code> button at the top of the pop-up, which you should click regularly to avoid losing your progress. Below the save slot button, you'll see a row of buttons that allow you to customize your character's appearance and attributes. Keep in mind that your character should fit in with the server's setting! | |||
[[File:Character.png|center|540px]] | |||
==Your First Round== | |||
''[https://map.aurorastation.org/#/ Click here for an up-to-date map of the server.]'' | |||
Once you've created your character, click <code>Save Slot</code>. You can close out of the character creation pop-up, and click <code>Join</code> if the round is ongoing, as noted by the Round Time display in the <code>Status</code> tab. If the round hasn't started up, you'll click <code>Ready</code> instead. | |||
[[ | Clicking <code>Join</code> will bring up a list of jobs you can join as. If you've been following the [[Character Creation]] guide up to this point, you may note that a good job to start as is [[Janitor]], [[Assistant]], or [[Hangar Technician]]. | ||
If you join after a round has started, you will spawn in the residential elevators, on the lowest deck of the [[SCCV Horizon]]. If you have joined as a janitor, your closet where you can pick up your gear is located just past the elevator, on the left side of your screen. If you have joined as a hangar technician, go south from the elevators, left at the Intrepid hangar, south until you reach the stairs, and through the brown doors to reach the Operations hangar. If you have joined as an assistant, you have no set department and you can generally go wherever you would like. | |||
==Controls and Interface== | |||
Space Station 13 has an expansive, archaic system of controls that are unintuitive at first glance. As you become more accustomed to the interface, you'll grow more used to the controls the way they are. | |||
To start, you can press your <code>Tab</code> key to toggle Hotkey Mode, which allows you to use your keyboard for more shortcut buttons rather than typing commands into your hotbar. To move, you press your arrow keys or WASD. To speak, you can press <code>T</code> or type <code>/say "Your text here."</code> in your hotbar. With pretty much everything in Space Station 13, interacting with something involves clicking it; you click on items to pick them up, and you can press <code>Q</code> to drop them. | |||
= | <div class="toccolours mw-collapsible mw-collapsed"> | ||
===General Controls=== | |||
<div class="mw-collapsible-content"> | |||
{| class="wikitable" | |||
! colspan="2" style="text-align: center;" | Interface keys | |||
|- | |||
! style="text-align: center;" | Key | |||
! style="text-align: center;" | Description | |||
|- | |||
| Tab || Hotkey Toggle | |||
|- | |||
| F1 || Adminhelp | |||
|- | |||
| F2 || Talk in OOC | |||
|- | |||
| Shift+F2|| Screenshot | |||
|- | |||
| F3|| Say | |||
|- | |||
| F4|| Me | |||
|- | |||
| F5|| aSay (Admin only) | |||
|- | |||
| F6 || Player panel view (Admin only) | |||
|- | |||
| F7|| Admin-PM (Admin only) | |||
|- | |||
| F8 || Invismin (Admin only) | |||
|- | |||
| F12|| Hide inventory | |||
|- | |||
| Ctrl + Shift || Show options | |||
|} | |||
{| class="wikitable" | |||
! colspan="2" style="text-align: center;" | In-game keys | |||
|- | |||
! style="text-align: center;" | Key | |||
! style="text-align: center;" | Description | |||
|- | |||
| ↑ ''or'' w || Move north | |||
|- | |||
| ↓ ''or'' s || Move south | |||
|- | |||
| → ''or'' d || Move east | |||
|- | |||
| ← ''or'' a || Move west | |||
|- | |||
| ↑ + Ctrl || Face north | |||
|- | |||
| ↓ + Ctrl || Face south | |||
|- | |||
| → + Ctrl || Face east | |||
|- | |||
| ← + Ctrl || Face west | |||
|- | |||
| J || Toggle gun mode | |||
|- | |||
| H || Holster | |||
|- | |||
| 1 || Help intent | |||
|- | |||
| 2 || Disarm intent | |||
|- | |||
| 3 || Grab intent | |||
|- | |||
| 4 || Harm intent | |||
|- | |||
| ctrl + Left click || Drag object / mob | |||
|- | |||
| shift + Left click || Examine object / mob | |||
|- | |||
| Left-click + Drag to a tile/table || Crawl while on the floor and climb onto tables. | |||
|} | |||
</div></div> | |||
<div class="toccolours mw-collapsible mw-collapsed"> | |||
===Shortcut Controls=== | |||
<div class="mw-collapsible-content"> | |||
{| class="wikitable" | |||
! colspan="2" style="text-align: center;" | Key Shortcuts | |||
|- | |||
! style="text-align: center;" | Keys | |||
! style="text-align: center;" | Description | |||
|- | |||
| Shift + Click || Used to examine things when you are a mob. AI uses it to interact with some objects. | |||
|- | |||
| Alt + Click || Used to check the things on a turf when you are a mob. AI uses it to shock doors. | |||
|- | |||
| Ctrl + Click || Used to drag objects as a mob. AI uses it to bolt doors. | |||
|- | |||
| Middle Mouse || Switches active hand. | |||
|- | |||
| Ctrl + Alt + Click || Used to quickly interact with certain objects as a mob. | |||
|- | |||
| , . || Go up and down Z-levels respectively. | |||
|} | |||
</div></div> | |||
<div class="toccolours mw-collapsible mw-collapsed"> | |||
===Communication Controls=== | |||
<div class="mw-collapsible-content"> | |||
====Languages==== | |||
To speak a language, prefix your message with ',' or '#' (by default, you can change this in global settings.) Then after that prefix, add a language key, and then your message. For example, if you wanted to say "Hello World!" in Freespeak, you'd say ",3 Hello World!" or "#3 Hello World!" It is also possible to whisper by typing 'Whisper "Hello."' or for short, say ":w Hello." | |||
{| class="wikitable" | |||
! colspan="2" style="text-align: center;" | In-chat | |||
|- | |||
! style="text-align: center;" | Key | |||
! style="text-align: center;" | Description | |||
|- | |||
| ,0 (Default) || Ceti Basic | |||
|- | |||
| ,1 || Sol common | |||
|- | |||
| ,2 || Tradeband | |||
|- | |||
| ,3 || Freespeak | |||
|- | |||
| ,s || Sign Language | |||
|- | |||
| ,q || [[Dionaea|Rootsong]] (Dionaea) | |||
|- | |||
| ,o || [[Unathi|Sinta'Unathi]] (Unathi) | |||
|- | |||
| ,p || [[Unathi|Sinta'Azaziba]] (Unathi) | |||
|- | |||
| ,k || [[Skrell|Nral'malic]] (Skrellian) | |||
|- | |||
| ,j || [[Tajara|Siik Maas]] (Tajaran) | |||
|- | |||
| ,w || [[Tajara|Siik Tajr]] (Tajaran) | |||
|- | |||
| ,i || [[Tajara|Nal'rasan]] (Tajaran) | |||
|- | |||
| ,9 || [[Vaurca|Hivenet]] (Vaurcae) | |||
|- | |||
| ,6 || Encoded Audio Language (All Synths) | |||
|- | |||
| ,d || Drone (Only Drones) | |||
|- | |||
| ,b || Robot Talk (Only Cyborgs & AI) | |||
|- | |||
| ,g || Changeling (Antagonist) | |||
|- | |||
| ,f || Cult (Antagonist) | |||
|- | |||
| ,x || Cortical Link (Antagonist) | |||
|- | |||
| ,a || Hivemind (They do not exist, Xenomorph, Antagonist) | |||
|- | |||
| [[Languages|For more information on the many Aurora languages, go here.]] | |||
|} | |||
{| class="wikitable" | |||
</div></div> | |||
<div class="toccolours mw-collapsible mw-collapsed"> | |||
===Radio Controls=== | |||
<div class="mw-collapsible-content"> | |||
To speak on a radio channel, type in the corresponding radio prefix, then your message. For example, to say "Help I'm being attacked!" on common, you'd type in ";Help I'm being attacked!" Likewise, if you wanted to say "Security to maint!" on the security channel, you'd say ":s Security to maint!" | |||
You can also use voiced emotes or languages over the radio by placing the correct prefix or language key after the radio prefix. So ":c,1 Hello World!" would say "Hello World!" over the Command channel, in the Sol Common language. Likewise, ";! screams!" would show "Urist McYourname screams!" over the common channel. | |||
It is possible to sing using "% tra la laaaa", which will insert musical note symbols around your speech for you. | |||
{| class="wikitable" | |||
! colspan="2" style="text-align: center;" | In-chat | |||
|- | |||
! style="text-align: center;" | Prefix | |||
! style="text-align: center;" | Description | |||
|- | |||
| ,b || Robot Talk (Private Station-bound Synth channel) | |||
|- | |||
| :c || [[Job Guides#Command|Command]] | |||
|- | |||
| :s || [[Job Guides#Security|Security]] | |||
|- | |||
| :u || [[Job Guides#Supply|Supply]] | |||
|- | |||
| :e || [[Job_Guides#Engineering_and_Maintenance|Engineering]] | |||
|- | |||
| :m || [[Job Guides#Medical|Medical]] | |||
|- | |||
| :n || [[Job Guides#Research|Science]] | |||
|- | |||
| :v || [[Job Guides#Service|Service]] | |||
|- | |||
| :h || Headset's Default Department | |||
|- | |||
| ; || General radio | |||
|} | |||
</div></div> | |||
[[File:Interface1.png|right]] | [[File:Interface1.png|right]] | ||
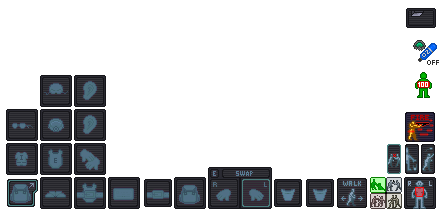
If you've just spawned in, you may notice you have an expansive interface all along the bottom of your screen. This section will help you understand what these icons are and why. | |||
For the most part, to interact with something, you click on it. | |||
===Inventory=== | ===Inventory=== | ||
The middle and left side of your screen is your inventory and item slots. From top to bottom, left to right, they are: | The middle and left side of your screen is your inventory and item slots. From top to bottom, left to right, they are: | ||
#Main Inventory | #Main Inventory: Accessed by pressing the toggle button in the bottom left corner. | ||
##Helmet, right ear | ##Helmet, right ear | ||
##Glasses, mask, left ear | ##Glasses, mask, left ear | ||
Revision as of 07:44, 6 September 2023
| New Player Section | ||
|---|---|---|
| This is a navbox. Pressing the links below takes you to the respective pages.
This specific navbox is tailored to new player guides and very important pages across the wiki for newcomers. | ||
| Character Starters | Getting Started · New Player Lore Guide · Character Creation · Jobs | |
| Background Starters | Interstellar Travel · The Universe · Bluespace · Technology · SCCV Horizon | |
| Faction Starters | Corporations · Main Human Factions | |
| Alien Whitelist Starters | Skrell · Synthetics · Tajara · Dionae · Unathi · Vaurca | |
If you are an experienced Space Station 13 player, familiarize yourself with Aurora's lore at New Player Lore Guide and see the Character Creation guide.
Welcome to Space Station 13, a game that offers rich player interaction and, on this server and many others, a unique roleplay experience! This guide assumes you are completely new to Space Station 13 and its controls. This guide will attempt to take you step-by-step through setting up your BYOND account, the incredibly unintuitive controls of SS13, and what to expect from your first round.
Downloading BYOND
BYOND - Build Your Own Net Dream - is the awful, archaic, and probably cursed engine that SS13 uses, and it must be downloaded in order to join any server. To download BYOND, visit the BYOND website. A BYOND account also must be created before you can join any servers.
After installing BYOND and creating an account, click the field next to Filter and type in "Space Station 13". The hub entry should appear, and you will likely see a list of servers! You can scroll down until you see Aurorastation, or you can click Board The Aurora on this link. This will automatically open BYOND and take you to the server.
You're In!
If you've successfully joined the server, you'll see the blank Dream Seeker screen. After roughly thirty seconds, the window will open and you'll be presented with a split-screen interface. On the left side, you'll see the server's title screen with clickable options, and on the right side, you'll see a set of commands (also known as verbs) and the chat log.
If the left side is blank, it means that the server is still streaming resources to your computer, which may take a minute or two. However, this is a one-time process that usually only occurs the first time you join the server.
Before You Join
Now that you've officially joined the server, here are some important tips that can help you before you join your first round.
- Make sure you've read the rules! Failing to do so can result from a swift exit from the server.
- Check your settings (if you want). If the lobby music is particularly loud, you can turn it off in the
Preferencesat the top right of your screen, underHear/Silence Lobby Music. A bunch of other sound-toggling settings are here as well, should you desire to turn them off. - This is a roleplay server. On an HRP server, an attempt is made to cultivate a more serious, dramatic atmosphere, though that doesn't mean there can't be humor or strange happenings afoot. Make sure that your character and their actions are believable for the setting.
- Your first round may be rough. Feel free to ask your fellow players for help in the OOC channel (accessible by hitting F2), or in the Local OOC channel, found in the
OOCtab in the upper-right part of your screen. Local OOC will broadcast an OOC message to those around you, and is useful if you need to advise someone you're AFK or you need help with something. Failing all this, consider asking the staff team for help! In theAdmintab, clickAdminhelpto send a message to the staff that are currently online.
With that out of the way, we can continue to character creation!
Your First Character
Click here to read the full guide on character creation.
On the left side of the screen, you'll see a menu of options, including Setup. Click on this to open the character creation window, which should look similar to the picture below. For now, the only button at the top you need to worry about is the Save Slot button at the top of the pop-up, which you should click regularly to avoid losing your progress. Below the save slot button, you'll see a row of buttons that allow you to customize your character's appearance and attributes. Keep in mind that your character should fit in with the server's setting!
Your First Round
Click here for an up-to-date map of the server.
Once you've created your character, click Save Slot. You can close out of the character creation pop-up, and click Join if the round is ongoing, as noted by the Round Time display in the Status tab. If the round hasn't started up, you'll click Ready instead.
Clicking Join will bring up a list of jobs you can join as. If you've been following the Character Creation guide up to this point, you may note that a good job to start as is Janitor, Assistant, or Hangar Technician.
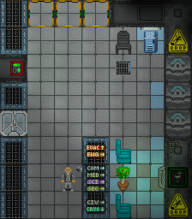
If you join after a round has started, you will spawn in the residential elevators, on the lowest deck of the SCCV Horizon. If you have joined as a janitor, your closet where you can pick up your gear is located just past the elevator, on the left side of your screen. If you have joined as a hangar technician, go south from the elevators, left at the Intrepid hangar, south until you reach the stairs, and through the brown doors to reach the Operations hangar. If you have joined as an assistant, you have no set department and you can generally go wherever you would like.
Controls and Interface
Space Station 13 has an expansive, archaic system of controls that are unintuitive at first glance. As you become more accustomed to the interface, you'll grow more used to the controls the way they are.
To start, you can press your Tab key to toggle Hotkey Mode, which allows you to use your keyboard for more shortcut buttons rather than typing commands into your hotbar. To move, you press your arrow keys or WASD. To speak, you can press T or type /say "Your text here." in your hotbar. With pretty much everything in Space Station 13, interacting with something involves clicking it; you click on items to pick them up, and you can press Q to drop them.
General Controls
| Interface keys | |
|---|---|
| Key | Description |
| Tab | Hotkey Toggle |
| F1 | Adminhelp |
| F2 | Talk in OOC |
| Shift+F2 | Screenshot |
| F3 | Say |
| F4 | Me |
| F5 | aSay (Admin only) |
| F6 | Player panel view (Admin only) |
| F7 | Admin-PM (Admin only) |
| F8 | Invismin (Admin only) |
| F12 | Hide inventory |
| Ctrl + Shift | Show options |
| In-game keys | |
|---|---|
| Key | Description |
| ↑ or w | Move north |
| ↓ or s | Move south |
| → or d | Move east |
| ← or a | Move west |
| ↑ + Ctrl | Face north |
| ↓ + Ctrl | Face south |
| → + Ctrl | Face east |
| ← + Ctrl | Face west |
| J | Toggle gun mode |
| H | Holster |
| 1 | Help intent |
| 2 | Disarm intent |
| 3 | Grab intent |
| 4 | Harm intent |
| ctrl + Left click | Drag object / mob |
| shift + Left click | Examine object / mob |
| Left-click + Drag to a tile/table | Crawl while on the floor and climb onto tables. |
Shortcut Controls
| Key Shortcuts | |
|---|---|
| Keys | Description |
| Shift + Click | Used to examine things when you are a mob. AI uses it to interact with some objects. |
| Alt + Click | Used to check the things on a turf when you are a mob. AI uses it to shock doors. |
| Ctrl + Click | Used to drag objects as a mob. AI uses it to bolt doors. |
| Middle Mouse | Switches active hand. |
| Ctrl + Alt + Click | Used to quickly interact with certain objects as a mob. |
| , . | Go up and down Z-levels respectively. |
Communication Controls
Languages
To speak a language, prefix your message with ',' or '#' (by default, you can change this in global settings.) Then after that prefix, add a language key, and then your message. For example, if you wanted to say "Hello World!" in Freespeak, you'd say ",3 Hello World!" or "#3 Hello World!" It is also possible to whisper by typing 'Whisper "Hello."' or for short, say ":w Hello."
| In-chat | |
|---|---|
| Key | Description |
| ,0 (Default) | Ceti Basic |
| ,1 | Sol common |
| ,2 | Tradeband |
| ,3 | Freespeak |
| ,s | Sign Language |
| ,q | Rootsong (Dionaea) |
| ,o | Sinta'Unathi (Unathi) |
| ,p | Sinta'Azaziba (Unathi) |
| ,k | Nral'malic (Skrellian) |
| ,j | Siik Maas (Tajaran) |
| ,w | Siik Tajr (Tajaran) |
| ,i | Nal'rasan (Tajaran) |
| ,9 | Hivenet (Vaurcae) |
| ,6 | Encoded Audio Language (All Synths) |
| ,d | Drone (Only Drones) |
| ,b | Robot Talk (Only Cyborgs & AI) |
| ,g | Changeling (Antagonist) |
| ,f | Cult (Antagonist) |
| ,x | Cortical Link (Antagonist) |
| ,a | Hivemind (They do not exist, Xenomorph, Antagonist) |
| For more information on the many Aurora languages, go here. | |
Radio Controls
To speak on a radio channel, type in the corresponding radio prefix, then your message. For example, to say "Help I'm being attacked!" on common, you'd type in ";Help I'm being attacked!" Likewise, if you wanted to say "Security to maint!" on the security channel, you'd say ":s Security to maint!"
You can also use voiced emotes or languages over the radio by placing the correct prefix or language key after the radio prefix. So ":c,1 Hello World!" would say "Hello World!" over the Command channel, in the Sol Common language. Likewise, ";! screams!" would show "Urist McYourname screams!" over the common channel.
It is possible to sing using "% tra la laaaa", which will insert musical note symbols around your speech for you.
| In-chat | |
|---|---|
| Prefix | Description |
| ,b | Robot Talk (Private Station-bound Synth channel) |
| :c | Command |
| :s | Security |
| :u | Supply |
| :e | Engineering |
| :m | Medical |
| :n | Science |
| :v | Service |
| :h | Headset's Default Department |
| ; | General radio |
If you've just spawned in, you may notice you have an expansive interface all along the bottom of your screen. This section will help you understand what these icons are and why.
For the most part, to interact with something, you click on it.
Inventory
The middle and left side of your screen is your inventory and item slots. From top to bottom, left to right, they are:
- Main Inventory: Accessed by pressing the toggle button in the bottom left corner.
- Helmet, right ear
- Glasses, mask, left ear
- Uniform, outer clothing, gloves
- Expand/collapse inventory, shoes, outer clothing storage
- Easy Access Inventory - Always visible
- ID
- Belt
- Backpack
- Right and left hand
- Pockets
Object Interaction
The bottom right side of the screen will contain a number of buttons that will change how you interact with objects or people around you. These are:
 Movement Intent
 Intents
- Help - You won't do harm by clicking on someone empty handed. Will also prevent you from firing ranged weapons by default.
- Disarm - You will knock items out of hands and potentially knock people to the ground.
- Grab - You will grab someone.
- Harm - You will punch someone if you click them.
 Targetting Window - Useful for precision stuff, mainly used for combat and surgery.
 Resist - You will resist out of physical incapacitation. Will also make you drop to the floor to put yourself out, should you be on fire.
 Drop - Will drop the item in your active hand.
 Throw - Will toggle throwing. Clicking somewhere with an item in your hand will throw it in that direction. If an item is thrown at you and you have an empty hand, you will catch the item.
 Toggle Gun Mode - Will determine if you shoot at who you click or if you will aim at them instead, which will bring up a few more options.
Status
Most of these icons are hidden, but if they were all active on the screen, then they would be:
 Ceiling - Informs you if there's a ceiling above you.
 Toxin - You're currently breathing in a toxic substance.
 Fire - You're currently on fire.
 Ice - You're currently freezing.
 Oxy Warn - You're not breathing enough oxygen.
 Pressure Warn - You are in a low/high pressure environment without protection.
 Internals Toggle - Will toggle your internal atmosphere on or off. You must be wearing a suitable mask and have a tank of air/oxygen in your immediate inventory.
 Health Doll - Will give you a rough estimate of how you're doing. This isn't 100% accurate, as pain will influence what this indicator looks like.
 Temperature Warn - Will inform you if you're too hot or too cold.
 Nutrition - Will pop up if you are hungry, or if you've eaten too much.
Exploring
So now you're actually playing the game, congrats! If you've read the Guide to Controls, then you should already have a rough idea of how to move your character around. If you joined mid-round, you will appear in the Residential Deck Lifts, on the Lower Dec. But if you join with the start of the round, you will appear in the Tool Storage, which is located in the Main Deck. You can check the Server Map for an overview of the SCCV Horizon.
The ship is divided into three main sections: the Lower Deck, the Main Deck, and the Upper Deck. The Lower Deck generally includes hangars and some utility departments, such as Custodial and Operations. The Main Deck, as the name suggests, houses almost all of the main departments, including Security, Engineering, Medical, and Research. The Upper Deck is mainly for Command and entertainment areas. While exploring the ship, you will come across these departments, but you won't be able to enter most of them as an Assistant due to clearance restrictions. Nonetheless, take the opportunity to familiarize yourself with the layout of the ship.
Keep in mind that a round typically lasts around two hours. If you need to leave before then, you can return to the Residential Deck Lifts in the Lower Deck and use either the Living Quarters Lift or the Cryogenic Freezer to exit the round.
After your first round, you may want to move on to an actual job. Some beginner-friendly occupations include:
- Janitor: Walk around the Horizon to learn its layout while performing custodial tasks.
- Hangar Technician: Do deliveries and sort the warehouse to get familiar with handling items in the game.
- Engineering Apprentice: Gain hands-on experience in Engineering, but make sure there are other Engineers available to help you.
- Medical Intern: The learner role of the medical department.
- Lab Assistant: Learn how to be a scientist after some work experience.
Additionally, interacting with other players can make the game more enjoyable and engaging. Try to stay in character and be creative with your interactions, but also be respectful of other players and their characters. Remember that everyone is here to have fun, so don't take things too seriously or get upset if something doesn't go as planned. Don't hesitate to ask for help if you're unsure about something. You can do so in-character (IC) or out of character (OOC). Most players are happy to assist newcomers, whether it's with small tasks or getting familiar with a particular department.
Good luck! Template:Gameplay Guides
