Difference between revisions of "Xenoarcheologist"
m (Direction fixes.) |
m (Added the Alden Saraspova tracker. Can't believe I forgot that.) |
||
| Line 46: | Line 46: | ||
# '''Locator Device''': Locates Tracking Beacons by tuning to their frequency. As useless as the Beacon. | # '''Locator Device''': Locates Tracking Beacons by tuning to their frequency. As useless as the Beacon. | ||
# '''Depth Analysis Scanner''': Absolute necessity. Tells you if the tile of rock in front of you, contains something, and gives you information about it if it is the case. Detailed later in this guide. | # '''Depth Analysis Scanner''': Absolute necessity. Tells you if the tile of rock in front of you, contains something, and gives you information about it if it is the case. Detailed later in this guide. | ||
# '''Alden Saraspova Tracker''': Absolute necessity. You click this and it directs you towards nearby anomalies. Make sure to scan rocks using the Analysis Scanner when within 20m. The last thing you want is to destroy the anomaly and the artifacts along with it. | |||
# '''Lantern''': A very useful light source. Helpful, but not necessary. Activate your excavation hood. | # '''Lantern''': A very useful light source. Helpful, but not necessary. Activate your excavation hood. | ||
# '''Excavation Gear-Belt''': The belt that will allow you to carry most of your equipment. | # '''Excavation Gear-Belt''': The belt that will allow you to carry most of your equipment. | ||
Revision as of 10:58, 28 March 2018
This section or article is a Work in Progress.
Assigned to: None
Please discuss changes with assigned users. If no one is assigned, or if the user is inactive, feel free to complain on the forums or try summoning another staff member.
This guide is not only a guide to basic Xenoarcheology, it is also a guide to playing an efficient and believable Xenoarcheologist. So, if you feel some parts are too much for you, feel free to ignore them, but it is still appreciated to work with a believable coworker rather than someone who leaves all their stuff on the floor, doesn’t analyze their findings, and barely even does their job.
Xenoarcheologist, Anomalist: The Difference
The first thing to know is that a Xenoarcheologist is not an Anomalist. While they tend to work together for obvious reasons, their field of study, method, and RP archetypes are quite different.
A Xenoarcheologist looks for artifacts. Artifacts are those things most people think are useless, like fossils, alien spoons, bowls, those kinds of things. And, on a gameplay point, they are, indeed, mostly useless: Most of them do not have any function except decoration, and the few that do have a function are not very useful. Xenoarcheology is mainly an RP job, where you give story and sense to these objects. It also quite different from the other Scientist jobs: You do not work in a laboratory solely, you mostly work outside, digging through rocks in the cold hard environment of the asteroid. You may work in a Laboratory during analysis (Spectrometry, Anomaly testing). So Xenoarcheologists are a strange breed amongst the Research team, with a very different set of goals and line of work.
An Anomalist studies the anomalies Xenoarcheologists bring to them. They are much more of a Lab worker than the Xenoarcheologist, do not spend much time outside, etc. This job is less of a pure Roleplay one, and much more closer to the rest of the station, with significant testing and gameplay to fiddle with. However, that does not mean you should not try to put some RP into it: How was your anomaly used by the people who made it? How does it relate to the artifacts the Xenoarcheologist found buried with it? You are not a Xenoarcheologist, but that does not mean you should totally ignore them and that your work does not relate.
So, know the difference between the two jobs, and act accordingly. For now, Anomalists are quite dependent on Xenoarcheologists in that they need them to find anomalies, however there is an extra Suspension Field Generator in the Sub-level Supply Closet, so Anomalists could retrieve their own anomalies. This should only be done if there is nothing to analyse or the Xenoarcheologist is missing or otherwise busy. Work with your Xenoarcheologists just as they should work with you.
Preparation: Before taking the Lift
You start in the Research department inside of the Research Conference, the Sub-level Lift is directly below you. You should stock up on anything you believe you need in preparation for moving down to the Sub-level. Most tools and devices are present within the Sub-level so you will not need to gather anything.
If you wish, you may still be creative: What do you think a Xenoarcheologist would use on an excavation? You will work in quite a large place, so do not worry about space, and impress your department with very complicated procedures and the like. A Universal Recorder and labeled Folder with Paper inside tends to create a believable atmosphere for a Scientist.
When you are done, go directly Downward of the Research Conference room and take the Lift.
There is no rush, and you may return to Main-level whenever you have time, if you do need something. Maybe a Jetpack?
Preparation: After taking the Lift
Now, you are on the Sub-level. Given you are a Xenoarcheologist, you will mainly use the Northern part of it, which I will describe. You travel up to the Main-level from the Lift, directly down is the Xenoarcheology department.
When you get out of the Lift, you will see your Department directly above you. There is a Fire Closet to your Right, and the Hallway leading to Toxins to your Left. directly Down is the Xenobiology Lab, which you have no reason to visit, but you may say hi to your coworkers if you desire. Directly Up and then Right is the Xenoarcheological Equipment and External Access room.
You may use this room to gather your equipment and exit onto the Asteroid. Be sure to put on your Mesons goggles, gloves, breath mask and your Magboots before you exit. Further up the hallway is the Anomaly Isolation room, which is used for both analysis and storage of dangerous anomalies. There are some less crucial tools there that can be used, such as a Camera, Folder, and multiple Gas types.
Directly above the Anomaly Isolation room you will find the Spectrometry Lab, which is explained further down this page, the Supply Closet, which carries many useful supplies such as an extra Suspension Field Generator and Monkey cubes, and the Anomaly Testing room, which also has Anomaly safety suits and testing equipment.
As a final note you should always wear gloves while testing and transporting Anomalies. Moving an anomaly without gloves runs the risk of activating it and can be deadly for yourself and coworkers.
Now, it is time to speak about the proper Xenoarcheology equipment. All of these things are available in the Xenoarcheology department, within the Anomaly and Xenoarcheology equipment rooms, so look in the lockers, on the tables, and the racks. Let’s take a look at this picture. Items 1 to 6 go in the Excavation Belt, while 7 and 8 go into your backpack/satchel.
- Measuring Tape: Tells you how deep you already dug into your site. Useful when you lose track of your excavation.
- GPS: Tells you your position on the asteroid. Not of major importance, but can be useful if you want to keep track of that too. You can get a callsign using this, and it increases your chance of being found when dead.
- Excavation Pick Set: Absolute necessity. Contains the small picks you need to excavate your artifacts, they all dig a different distance, detailed later in this guide.
- Tracking Beacon: When activated, allows locator devices to locate it by tuning on its frequency. Useful if you are in trouble, or if you simply lost your suspension field generator. Not a necessity at all and mostly a waste of space.
- Core Sampler: Absolute necessity. Needed to take the rock samples you need for spectrometer analysis.
- Wrench: Needed to set the suspension field generator, which is necessary to collect artifacts.
- Hand Pickaxe: The largest excavation pick, does not fit in the Excavation Pick Set. Digs 30cm.
- Locator Device: Locates Tracking Beacons by tuning to their frequency. As useless as the Beacon.
- Depth Analysis Scanner: Absolute necessity. Tells you if the tile of rock in front of you, contains something, and gives you information about it if it is the case. Detailed later in this guide.
- Alden Saraspova Tracker: Absolute necessity. You click this and it directs you towards nearby anomalies. Make sure to scan rocks using the Analysis Scanner when within 20m. The last thing you want is to destroy the anomaly and the artifacts along with it.
- Lantern: A very useful light source. Helpful, but not necessary. Activate your excavation hood.
- Excavation Gear-Belt: The belt that will allow you to carry most of your equipment.
- Optical Meson Scanner: Absolute necessity. Allows you to see through the rock, and locate your precious dig sites.
- Excavation Suit Hood Comes with a built-in flashlight. Click in the top left.
- Excavation Suit: Both the suit and hood are absolute necessities. Needed to go EVA, protects you against radiations and partially against exotic particles, should you find an activated anomaly.
Note: Anomaly Suits are not vacuum proof. Excavation suits are the only non-space suits on the Outpost that allow you to go EVA.
Now, you probably know the rest: An oxygen tank, available in the prep room, a breath mask also available there, and the gloves you were told to take earlier. You’ll notice we also have a camera, which is generally used to take photos of anomalies, and other rare things like skeletons (a combination of alien fossils) and the like. If you organize your equipment properly, you have enough space in your inventory to carry some equipment of your choice.
I, however, advise you to leave free slots in your backpack, to carry the artifacts you find back to your camp or the Station.
The Camp
Now that you are ready for the expedition, get into the airlock. There will be some equipment already out in your camp, but you should bring anything you need from the Station, as cycling the Airlocks takes a long time. Instead, it helps to leave the equipment in the camp spare incase you lose some.
File:Xenoarcheology External Basecamp.png
From here, you need to use your Alden Saraspova Counter to pinpoint your route. It helps to leave it in your pocket for quick retrieval, as you will need to click a lot to get to a digsite.
Mining
As for how you will mine, you will not have a mining drill unless Research prints you one from R&D. Instead, Xenoarcheology is outfitted with Mining pickaxes.
To mine efficiently, you will need to wield your pickaxe in two hands. (Pictured below)
You can achieve this by clicking the icon at the top left corner of your screen while holding a Pickaxe, the Pickaxe will have to be selected. When wielded, it will look like this. (Pictured above)
Further, to avoid destroying the very artifacts you intend to mine, you will want to carry a Depth Analysis Scanner along with you. When you are in range by 10, you should scan Rocks before you clear them. If you fail to do this, you will get a message that says 'Object shatters!' where object is replaced with whatever item it was, which means you have destroyed an artifact. There is a small chance for it to survive this, however.
Excavation
At last, you have found a dig site, or your Depth Analysis Scanner pinged while you were looking for one. It is time to be precise and thorough.
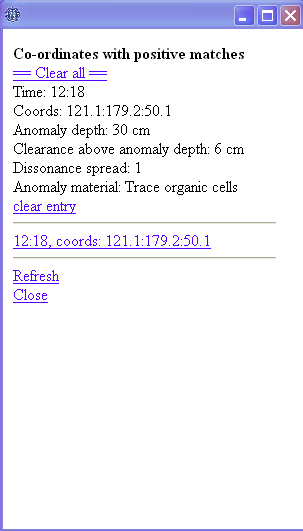
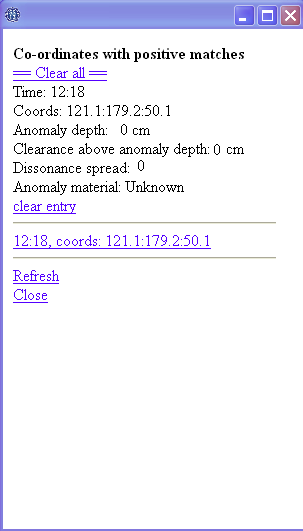
If you click on your Depth Analysis Scanner, a screen similar to this one will appear.
Time: The time at which the scan was made. Only for paperwork purposes.
Coords: Coordinates of the dig site. Paperwork purposes too.
Anomaly depth: The depth at which your artifact resides.
Clearance above anomaly depth: The size of the cavity in which the artifact is. If you dig in it, you will get a strange rock, which I will talk about later.
Dissonance spread: Quite useless, a 1 means it is an artifact, other numbers indicate an anomaly, but in this case, the scan is different enough to render this information useless.
Anomaly material: Tells you roughly what your artifact is. Depending on this information, you will activate a specific field on your suspension field generator to collect the artifact.
Now that you have this information, bring the Suspension Field Generator to the dig site. You need two free tiles around the site, so that you can put your generator on one, and be on the other one. Fix it to the ground, and do not activate it yet. For now, what we need is a rock sample.
For that purpose, you will need to dig just before the cavity starts. It means you need to subtract the Clearance from the anomaly depth, and dig at this distance. In the case of the image below, the artifact is at 30 cm and the clearance is 6 cm, so I need to dig 24 cm. Now that you have dug this distance, take your Core Sampler and click on the dig site. The red light will turn green, meaning that a sample was taken.
Note: You only need one sample per dig site.
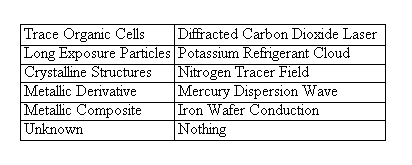
Now you can focus on the excavation. You will need to strike at the exact anomaly depth if you want to directly collect the artifact. Here, the Depth Analysis Scanner tells me the artifact contains traces of Organic Cells, so I activate a Diffracted Carbon Dioxide Laser, and I dig 6 cm to reach the anomaly. I turn the suspension field generator off, and...
Here is your artifact, excavated in the most efficient way possible.
Then, repeat the same procedure minus the sample until your Depth Analysis Scanner stops pinging.
Note: This example is for a precise excavation. If you dig too far, the artifact breaks. But, if you dig too short, and you end up in the cavity of the artifact, you will get this.
This is a strange rock. While not being a total failure, a strange rock is bad. First, because you need to open it with a welder, which is one unnecessary step in the process. But the most important point here is that opening strange rocks quite often breaks the artifact itself, so, try to dig at the exact anomaly depth to avoid these kinds of issues.
When you are done with the excavation, bring your sample and findings back to the Camp, where you will organize them in the way you see fit, like I explained in the Camp chapter.
Now, here are the two lists for the various excavation picks and the different fields of the generator.
You’ll notice some of the fields are missing: It is because they are useless. The last line, Unknown, is linked to anomalies, which will be talked about in a later chapter.
Analysis: Spectrometry
So! You have spent some time digging and excavating, and now, you have around 6 different dig sites, maybe more. That’s good. Hopefully you organized and labeled them all according to a memorable pattern. Now, take all the samples, put them in your crate, and head back to the Outpost, for the Spectrometer analysis.
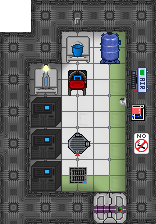
Here is the Spectrometry Laboratory. In the room, you see a coolant tank, a bucket, some nanopaste, and three spectrometers. In order to have an organized analysis, I suggest you only use one, most particularly, the upper one, since it avoids the usual back & forth to provide it with coolant. Once it is filled with coolant, take your first sample, take the rock sample in it, and put it in the spectrometer.
Note: Once again, use only one Spectrometer, and start with your Dig Site 1, then 2, etc. The results of the analysis are chronologically numerated, so, that way, you will have correspondence between your samples and your results.
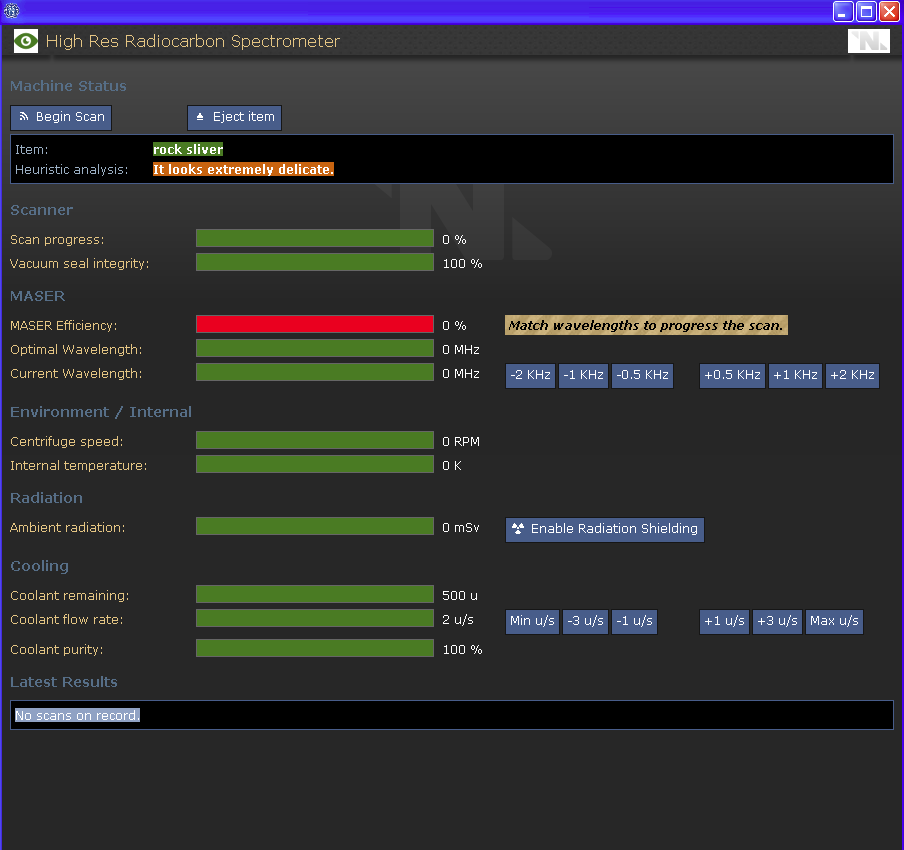
Now, you have opened the Spectrometer menu. Big scary screen at first, but simple to understand.
Scanner: Indicates the progress of the scan, and the "health" of the spectrometer. When it is too low, use nanopaste to fix it.
MASER: The most important stuff. Try to match you Current Wavelength with the Optimal Wavelength best as you can, since it is what makes the scan progress.
Environment / Internal: The speed at which the machine functions, and the heat it endures. The faster it goes, the hotter it is.
Radiation: Sometimes, radiation outbursts happen during the scan. You can enable the Radiation Shielding, but it stops the scan, so I rather suggest you keep your excavation suit on yourself, since it protects you against it. That way, you can totally ignore this factor.
Cooling: Rather simple to understand. It is what keeps the Internal Temperature low. On this screen, you see I put the flow rate at 2 u/s : It is best to keep it that way, 2 u/s gives you plenty of time before emptying it, and avoids overheat in almost every case.
If you followed these instructions, the only part you need to focus on is the MASER field, since it is the only one that will necessitate you to fiddle with during the scan.
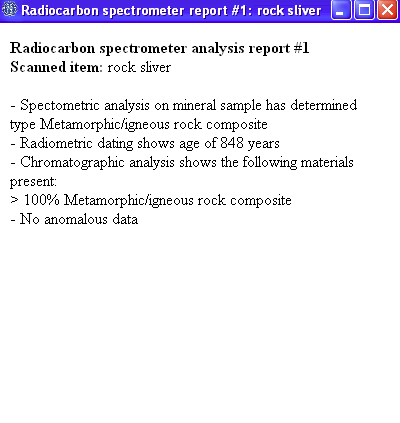
Now, you begin your scan, keep the Wavelength in check, and normally, the scan goes very well without any trouble. The machine pings, ejects your rock sample, and prints the result of the scan.
Now, you have some techno-babbling informations that will allow you to RP-study your artifacts later.
Analysis: Chemistry
Of course, the coolant in the tank is not enough to last a particularly busy shift. It is generally empty after three spectrometer scans. You can still use water as a less efficient coolant, but the real stuff is a better solution.
If you run out, you can access the Science Chemical Dispenser on the Main-level directly below the R&D. They should oblige. The formula is quite simple:
Tungsten + Acetone + Water
Now, if you get afew beakers of that, you should have plenty of Coolant to keep your spectrometer working!
Study
Now that you have analyzed all your samples, it is time to bring all of this to the Station and stow it away. Put your Artifacts in labeled crates, put your valuables into a locked briefcase, etc, and drag it back there. Then, put them on their respective locations, so that you have all the information you need available.
Now you have organized all your findings… think, look at the reports, be creative! Look at your 800 years old weapons of Dig Site 4. Maybe they belonged to the species depicted on this 850 year old bowl, in Dig Site 2? Basically, make logical links between the findings, invent stories around them, entire civilizations, wars, religions, the possibilities are massive. Maybe when you have enough data, you could write a book about it? Xenoarcheology may be a very lonely job, but it still gives you plenty of occasions to make great RP, so just go crazy.
Anomalies
But, while you have fun with your trinkets and old plant fossils, your buddies in the Anomaly department are still waiting for anomalies to work with.
They are found the same way you find artifacts: Scan a tile, if it doesn't ping, nothing, if it pings, excavate it. To make your life a lot easier, the Alden Saraspova Counter tool can be used to track anomalies. Rather than scanning every tile, this tool will find the closest anomaly and display your distance from it. Every time you change position, you can use it again, getting closer with each scan. Once you're within a few meters, you can begin to scan tiles confident that one of them will ping and contain an anomaly. Generally, anomalies are hidden behind a bunch of artifacts, so finding them is generally a matter of luck. You know you have found an anomaly when your Depth Analysis Scanner tells you this:
At this point, it means you need to dig at a depth of 200 cm. Once you are there, the external rock collapses, leaving a rocky debris. Scan it once again, and you’ll get another bunch of results, which are quite erratic, so don’t focus on them. For the excavation, you do not need your field generator, so just grab a small pick, smaller than 8 cm, and start digging. Make sure to use your measuring tape if you're unsure of what depth you're on. The last thing you want is to destroy the artifact. At one moment or another, the rocky debris will collapse too, leaving you with the anomaly. At this point, you might want to take a photo or something else, to add to your own paperwork.
Then, simply bring back the anomaly to the Camp and put it into the Airlock. If you have an Anomalist working with you, announce it over the radio. If you're alone, simply analyse it when you're ready to analyse.
Finding the cool loot
If you come across anything ranging from weaponry to artifacts, Please be sure to inform your research director and security team if you're bringing anything onboard the station.
Research Department
| |
| Head of department | Research Director |
| Personnel | Scientist - Xenobiologist - Xenoarcheologist - Roboticist |
| Useful guides | Guide to Research and Development - Guide to Xenobiology - Guide to Xenobotany - Guide to Xenoarchaeology - Integrated Electronics - Guide to Telescience - Guide to Modular Weaponry |

