|
|
| Line 1: |
Line 1: |
| {{JobPageHeader
| | Welcome to Space Station 13, a game that offers rich player interaction and, on this server and many others, a unique roleplay experience. This guide is designed for new players who are just starting their journey into the world of SS13 and BYOND in general. It's important to note that reading the rules is essential to ensure a smooth and enjoyable stay on the server. Failure to do so may result in a short-lived experience. |
| |headerbgcolor = black
| |
| |headerfontcolor = red
| |
| |stafftype = ENEMY
| |
| |imagebgcolor = Gray
| |
| |img_generic =Generic_cultist.gif
| |
| |img =Generic_cultist.gif
| |
| |jobtitle = Cultist
| |
| |access = Anywhere you had before your conversion or can sneak into.
| |
| |difficulty = <font style="color:red;">'''Medium'''</font>
| |
| |superior = <font style="color:red;">'''NAR'SIE, GEOMETER OF BLOOD'''</font>
| |
| |duties = Pray to your Dark Lord and supply Them with converts, servants, artifacts, and sacrifices. If They will it, summon the Geometer of Blood to this mortal coil!
| |
| |guides = This is the guide
| |
| }}
| |
|
| |
|
| You knew you were special, ever since the day you were shown the light. You kept it a secret in your heart; now, you can contain it no longer. Armed with Their gift, a precious book written in Their sacred tongue, you begin your dark work.
| | =BYOND= |
| | [[File:Pager.png|right|400px]] |
| | BYOND - Build Your Own Net Dream - is the <s>awful, archaic, and probably cursed</s> engine that SS13 uses, and it must be downloaded in order to join any server. You can easily download the latest version by visiting [http://www.byond.com/download/ the BYOND website]. |
|
| |
|
| The cultists are a group of fanatical worshippers of Nar'sie, the Geometer of Blood. For whatever reason, they have chosen this shift as the moment when they will reveal their dark purpose.
| | A BYOND account also must be created before you can join any servers. |
|
| |
|
| == Starting Out ==
| | After installing BYOND and creating an account, click the field next to ''Filter'' and type in "Space Station 13". The hub entry should appear, and you will likely see a list of servers, including Aurorastation. If you're unable to find Aurorastation, you can click [https://aurorastation.org/ Board The Aurora] on this link. This will automatically open BYOND and take you to the server. |
| You spawn as usual in your workplace area; your chatbox will indicate you have spawned as a Cultist. To coordinate with your fellow cultists OOCly, you should talk in <code>AOOC</code> to decide on a gimmick, or ask questions about mechanics. And Cult has a ''lot'' of mechanics.
| |
|
| |
|
| You can distinguish your allies by the tiny green skull over their head, and regular crewmembers have no inherent way of knowing you are a cultist. To speak over long distances with your fellow cultists, you can use a communication talisman. It's best to keep a few of the talismans on you whenever you can. You can also talk in Cult Common (the prefix is <code>,f</code>) locally, but it's obvious to anyone watching that this is a very strange language. | | ==You're In!== |
|
| |
|
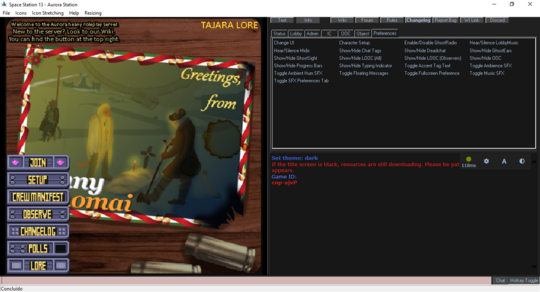
| If you feel the need to beseech Nar'sie, using the <code>Pray</code> verb for direction is never a bad option, though a reply is not always guaranteed. | | If you've successfully joined the server, you'll see the blank ''Dream Seeker'' screen. Once it disappears, you'll be presented with a split-screen interface. On the left side, you'll see the server's title screen with clickable options, and on the right side, you'll see a set of commands (also known as verbs) and the chat log. |
|
| |
|
| You begin with a '''tome''', which allows you to scribe runes from your own blOoOoOOOOOoOoood. This tome is the key to most of your cult powers, and it also looks pretty evil, so don't lose it and keep it out of sight! Remember that when you scribe a rune or create a talisman, it's ''very obvious''. Create runes in the shadows of maintenance!
| | [[File:Greetings.png|540px]] |
|
| |
|
| Your mechanical goal is to summon Nar'sie, a ship-destroying force of cosmic evil. When Nar'sie is summoned, the round is more or less ended, as They destroy any tile they touch. Therefore, your roleplay goal can be whatever you want; converting a high-value target, stealing a valuable artifact, setting up a base on a nearby asteroid, the like.
| | If the left side is blank, it means that the server is still streaming resources to your computer, which may take a minute or two. However, this is a one-time process that usually only occurs the first time you join the server. |
|
| |
|
| '''A final note:''' If you want to check on whether a potential convert is antagonist-banned from Cult, has their preferences for Cult on, or are already another antagonist, use the <code>Appraise Offering</code> verb in the IC tab. It's also polite to ask in <code>LOOC</code> before converting someone! | | =Fundamentals= |
| | Before we can continue, there are a few things we should make sure you know before you dive headfirst into the <s>chaos</s> action. |
| | #'''Make sure you've [https://aurorastation.org/rules.html read the rules!]''' |
| | #Be sure to check the [[Guide to Controls]] for how to control your character. |
| | #This is a roleplay server, so make sure that your character and their actions are believable for the [[Background_summary|setting]]. |
| | #Your first round may be rough. |
| | With that out of the way, we can continue to character creation! |
|
| |
|
| == Quick Start Guides == | | =Your First Character= |
| | On the left side of the screen, you'll see a menu of options, including ''Setup''. Click on this to open the character creation window, which should look similar to the picture on the right. For now, the only button at the top you need to worry about is the 'Save slot' button, which you should click regularly to avoid losing your progress. Below the save slot button, you'll see a row of buttons that allow you to customize your character's appearance and attributes. Keep in mind that your character should fit in with the server's setting! |
|
| |
|
| <div class="toccolours mw-collapsible mw-collapsed" style="width:99%; background:#d4c9c9">
| | ==General== |
| === Cultist Basics ===
| | [[File:Character.png|right|540px]] |
| <div class="mw-collapsible-content">
| | During character creation, you'll need to choose a few key details to define your character. Here's what you'll see on the left side: |
| | *'''Name:''' Determines what your character will be identified by. Choose a first and last name only - nicknames are not allowed. |
| | **'''Random Name:''' If you can't think of a name for your character, clicking this will cycle through pre-generated names. |
| | *'''Sex:''' This option determines your character's sex, either male or female. |
| | *'''Pronouns:''' What pronouns your character goes by. Male, female or plural. |
| | *'''Age:''' Sets the age of your character. Depending on the [[Job Guides|job]] you want to visit sooner or later, you'll want to set your age appropriately. |
| | *'''Spawn Point:''' This will determine where you spawn if you join the round late. |
| | *'''Languages:''' How many languages your character knows. By default, you know Ceti Basic, and you have space to add two more languages. However, it is not mandatory to select additional languages. |
| | *'''Body:''' This button will randomize your character's body, age, and sex. |
| | **'''Species:''' Clicking this will bring up a list of species you can play as. You can only play as a human until you've signed up for a race whitelist, so this is safe to ignore for now. |
| | **'''Blood Type:''' Determines what blood type you'll have, but you don't have to keep track of what it is. |
| | **'''Skin Tone:''' Adjusts the tone of your character in a range from 1 to 220, with 1 being pale and 220 being dark. |
| | **'''Disabilities:''' This option allows you to choose disabilities that will be inflicted on your character, which can have mechanical changes in gameplay and [[Job_Accessibility_Requirements|limit job options]]. As a beginner, it may be best to leave this alone for now. |
| | **'''Limbs:''' Brings up a list of your body parts, and whether or not you want the limb in question to be missing or replaced with a prosthesis. You may want to leave amputation alone, prosthetics function a little differently than organic limbs when damaged. |
| | **'''Internal Organs:''' Lets you replace organs with augmented/synthetic variants. Functionally identical to their organic counterparts until damaged. |
| | **'''Prosthesis/Amputations:''' Shows a list of everything that's been amputated/replaced, if you explored the two options above, as well as a button to reset your limbs/organs to default. |
| | *'''Hair:''' Allows you to select a hair style and color for your character. |
| | *'''Facial:''' Choose a facial hair style and color. Note that this option is only available to male characters. |
| | *'''Gradient:''' This option allows you to choose a color gradient and style for your character's hair. |
| | *'''Eyes:''' Lets you pick your eye color. |
| | *'''Body Color Presets:''' Brings up three options of body color presets for you to choose. |
| | *'''Body Markings:''' Option that brings up a list of decals to place on the body, like augmentations and tattoos. |
| | *'''Equipment:''' Here you will set some of the clothing and devices for your character. |
| | **'''Underwear:''' What sort of garments your character has under their clothing. |
| | **'''Socks:''' Socks. They go on your feet. |
| | **'''Undershirt:''' A shirt that goes under the uniform. |
| | **'''Backpack Type:''' Determines the sprite of the backpack you'll be wearing. Note that duffel bags can hold more, but inflict a speed penalty. |
| | **'''Backpack Style:''' Determines whether the sprite of your backpack will reflect your department's colors and style (if you're in one), or if it should just be a plain grey. |
| | **'''Backpack Strap:''' How the backpack strap will show on your character's sprite. |
| | **'''PDA Type:''' What type of PDA your character uses. It has many useful features, so do not choose "Nothing". |
| | **'''Headset Type:''' Select what type of radio used by your character. A headset is essential, so again, do not choose "Nothing". |
| | **'''Primary Radio Slot:''' Which ear the radio will be set to. |
| | *'''Records:''' Character records, documents used by other's in the ship to bring information about you. You don't need to touch these options until you're more familiar with the server's setting, but templates and a really useful Record Generator [[Records|may be found here]]. |
| | *'''Flavor:''' No, not how you taste. Flavor text is essentially your character's visual description. |
| | **'''Set Flavor Text:''' When you click on this, you will see a prompt with several sections, but for now, focus on the ''General'' section. Write a brief description of your character's characteristics, such as height, build, complexion, and hair style. This field is only for things that can be noticed at a glance, not your character's whole backstory. |
| | **'''Set Robot Flavor Text:''' This is the same as the above, but pertains to when you play a cyborg, if you play a cyborg. Which is not recommended if you're playing for the first time. |
| | *'''Signature:''' A prompt that you can edit and stylize the way you want. If you changed your character's name, you will want to hit ''Reset'' first. This is mostly used for paperwork. |
|
| |
|
| * As soon as you submit to conversion, your character's old goals are gone, and you are devoted to the service of Nar'Sie. Pursue your goals with trickery, force, and most importantly, teamwork; but remember that it's okay to lose, so long as everyone got a thrilling and fun experience out of it.
| | ==Origin== |
| * If you didn't spawn with one, ask your new friends to make you a tome of your own ASAP; you can't draw runes without it!
| | This tab provides some options regarding your character's background life. If you need further guidance on this, take a look at [[Guides/Character_Creation#Origins_-_Citizenship,_Language_and_Religion|this guide]]. |
| * Don't leave floor runes on the ground without reason; there can only be 25 at one time. Use talismans; they're unlimited.
| | *'''Culture:''' Choose the culture that your character belongs to. This changes what options will be available for '''Origin'''. |
| * Figure out how to ditch your job responsibilities ASAP without looking too suspicious so you can work on your goals before the shift ends.
| | *'''Origin:''' Where your character are from. Changes the options for '''Citizenship''' and '''Accent'''. |
| * Use Teleport runes and talismans to establish a safe house. Have an Artificer spookify the place, building and destroying walls and doors as needed.
| | *'''Economic Status:''' This setting determines your character's financial status, whether they are wealthy, impoverished, or somewhere in between. It affects how much will be available in the character's bank account. |
| * Use the Tome and click "Scribe a Rune" to draw runes. Since what you're doing is plainly visible, audible, and freaky, only do so in a secluded area, away from cameras. The Tome is visible on your sprite when you hold it. You lose a very tiny amount of blood when drawing, but otherwise you don't take damage. To use a rune, click it with an empty active hand. To erase or configure runes, use the tome on the rune. The entries in "Read the Tome" may be inaccurate.
| | *'''Citizenship:''' This option determines your character's official current citizenship. |
| <div class="toccolours mw-collapsible mw-collapsed" style="width:99%">Useful Runes<div class="mw-collapsible-content">
| | *'''Religion:''' Here you can choose your character's religious beliefs. |
| * '''Conversion.''' Makes new cultists out of non-cultists on the rune. Or if they resist, eventually burn them to death.
| | *'''Accent:''' This menu item determines the type of accent your character has. |
| * '''Communication.''' Allows you to broadcast a message to all cultists. Remember to state your name each time, as the spell won't identify you. Do so in private, if you care about stealth; you speak a freaky chant when activating. Extremely useful. | |
| * '''Forging.''' Gives you tough armor and a deadly weapon, and lets constructs heal themselves and change what type they are.
| |
| * '''Summon Soul Stone.''' Capture a player's soul when they are in crit. | |
| * '''Construct.''' Makes a shell you can put a filled soul stone in to turn it into a construct that will obey the cult. Constructs have a variety of useful abilities, generally aren't affected by atmospherics or gravity, and can destroy walls and doors.
| |
| ** The Artificer construct can make a forge for you to turn your robes and small oxy tank into a insulated voidsuit and big oxy tank, red pylons that act as turrets when an animal is sacrificed to them, and altars for you to heal.
| |
| ** The Wraith construct can phase through walls all around the station and have decent damage; send them on spying, sabotage, and assassination missions.
| |
| ** The Juggernaut construct is immune to small amounts of damage, can destroy walls and doors in half the hits, deals as much damage as a cult sword, can reflect bullets, and has very high health.
| |
| * '''Wall.''' Makes an impenetrable wall that can be turned on and off only by cultists.
| |
| * '''Tome summoning.''' Give this to new cultists ASAP!
| |
| * '''Teleportation.''' To teleport! Examine a rune to see what network it's on; use a tome on a rune to configure its network. It will teleport you to a random floor rune besides the one you used in the network. Cooldown is 5 seconds. | |
| * '''Incapacitation.''' Stuns non-cultists in a 5 tile radius. | |
| * '''Talisman creation.''' With a clean piece of paper on the rune, makes portable versions of compatible runes drawn next to it, so you can do magic on the go. Click a talisman with another talisman for compact storage; leave a few unbundled and renamed for quick access. Might want to make a folder out of a box (use the box when it's empty to unfold it) to store your talismans. | |
| * '''Blindness.''' Blinds non-cultists in a 3 tile radius, and leaves them with blurry vision afterwards for a while.
| |
| * '''EMP.''' EMP's the surrounding area. 2 tile radius on floor, 1 tile radius on talisman. Doesn't affect cultists or their belongings.
| |
| * '''Geometer:''' '''''Summon Nar'Sie.''''' Needs 9 cultists around the rune; apparitions don't count, but constructs do. | |
| * Runes not listed here: Apparition, Revival, Cultist summoning, Deafening, Blood boil, Blood drain, Freedom, Ethereal, Sacrificial, Concealment, Revealing, Visibility. View
| |
|
| |
|
| </div>
| | ==Occupation== |
| | The Job Selection screen is a crucial part of character creation that displays a list of available roles. Some of these roles are marked as '''[WHITELISTED]''' or [NEVER], which is perfectly normal. The whitelisted positions are typically reserved for the head-of-staff roles, which you don't need to worry about at the moment. |
| | *'''Character Faction:''' This option determines what faction your character's works for. For a quick overview of the Megacorporations, you can refer to [[Guides/Character_Creation#The_Scary_Megacorporations|this section.]] |
|
| |
|
| </div>
| | For your first round, you should toggle the ''Assistant'' role to [YES]. Assistants have no specific responsibilities, so you are free to explore the game as you wish. Feel free to ask others for help or directions, but keep in mind that you are in the lowest position in the [[Chain of Command]], so listen to your superiors. Once you feel comfortable with the game mechanics, you may want to try out other roles. |
|
| |
|
| </div>
| | ==Roles== |
| | This section is for special role candidacy, typically reserved for antagonists. It allows you to play as an antagonist if the game mode permits. However, it is recommended to set all options to "No" for now and avoid playing as an antagonist until you become more familiar with the game's mechanics. |
|
| |
|
| </div>
| | ==Loadout== |
| | This section is primarily focused on the items that will be available to your character upon spawning, assuming you have selected any. You have a total of 15 loadout points, and each item is assigned a specific point value. It's important to keep in mind that some items may be restricted to certain jobs. |
|
| |
|
| <div class="toccolours mw-collapsible mw-collapsed" style="width:99%; background:#d4c9c9">
| | ==Other== |
| | This is for when you have incident reports logged against your character from other characters. It's more for character complaints than player complaints, but you probably don't need to worry about this. |
|
| |
|
| === My soul's been trapped in a Construct, what do? === | | ==Global== |
| | This section entails settings that are independent of character slots, and will be persistent throughout your experience. |
| | *'''UI Style:''' Lets you pick from a few different styles of UI. ''Midnight'' should work just fine. |
| | *'''Custom UI:''' If you want to use a custom color. |
| | *'''Tooltip Style:''' Sets the tooltip style. You can leave |
| | *'''HTML UI Style:''' Chooses the HTML interface. The default is fine. |
| | *'''FPS:''' Set max FPS. |
|
| |
|
| <div class="mw-collapsible-content"> | | *'''Play admin midis:''' If enabled, this will allow you to hear music or other sounds uploaded by admins mid-round. They're typically not MIDIs anymore, though. |
| | *'''Play lobby music:''' Safe to ignore, just provides some <s>loud and obnoxious</s> music in the lobby that will probably get stale really quick. |
| | *'''Ghost ears/sight/radio:''' Will determine the range at which you hear/see actions if you're observing the round as a ghost. Setting the first two options to ''Nearest Creatures'' will probably spare you a lot of text from filling your log. |
| | *'''Observer LOOC:''' Toggles wether Local OOC typed in by observers will show up to you. |
| | *'''Space Parallax:''' Determines if the space background moves or doesn't move when you move. Purely aesthetic. |
| | *'''Space Dust:''' Extra particle effects out in space. Again, aesthetic. |
| | *'''Progress Bars:''' Shows a bar over your character when you conduct a task that requires time to complete. You should probably leave this on. |
| | *'''Floating Messages:''' This option enables sent messages to float above the character that said them. By default, it is set to "Yes" and can be left that way. |
| | *'''Hotkey Mode Default:''' This option toggles between control modes. The Hotkey Mode is a highly useful feature, so make sure to leave it "On". |
|
| |
|
| * You serve the cult and Nar'Sie. Do what they say. | | *'''Language Keys:''' Prefix characters to put in front of what you say to determine the language that you speak. These can be left alone. |
| * You are immune to a vacuum and slipping.
| |
| * If you're the first construct made this round, choose '''Artificer'''.
| |
| * You can change what type of construct you are by activating a Forging rune drawn on the ground by a friendly cultist. This also resets your spell cooldowns and heals you completely.
| |
| * You have spells in the upper right corner of your HUD and in your Spells tab.
| |
| * You can destroy walls, doors, and windows by attacking them. Wraith and Artificer can destroy a reinforced plasteel wall in 9 hits, and a regular wall in 2; Juggernaut can do the same in 4 and 1 hits. Certain walls don't have floors under them; when destroyed, they will vent the area to space. Take advantage of this abilty, combined with the Artificer's constructions, to reshape and deny areas as you see fit.
| |
| * You know two languages: Cult (<code>,f</code>) and Occult (<code>,y</code>). Only Cultists and other constructs understand Cult. Use Occult to broadcast to all constructs. You can also use AOOC to talk to fellow antags OOCly.
| |
| * Your three options are:
| |
| # Artificer: You have 50 health and do 5-15 damage. Use your spells often!
| |
| #:* Create a Daemon Forge in a safe place as the first thing. This lets cultists upgrade their armor into insulated voidsuits, letting them take advantage of vented areas and avoid electrocution.
| |
| #:* Pump out as many altars as you can; the cultists can heal themselves at them.
| |
| #:* Base-building tools:
| |
| #::- Cultify Area, while converting doors, removes their ID locks. Handy!
| |
| #::- Lesser Construction builds walls.
| |
| #::- Create floor... makes a culty floor. Works on space tiles.
| |
| #::- Red Pylons shed dim light. They can turn into turrets by click-dragging a small-ish animal onto them, then killing the animal. Mice, monkeys, slimes, and department pets are good candidates.
| |
| #:*You can ignore the rest of the spells. Cultists can already make these things faster than you, but you can help if you like.
| |
| # Wraith: You have 100 health, move decently fast, and do 25 damage. Use Phase Shift (lets you move through walls for 5 seconds) to traverse the station. Has a short cooldown. If you land in a wall, you get pushed out. With Phase Shift, you can go anywhere in the station and wreak havoc; spy on the enemy, assassinate crewmembers, set up passageways for infiltration, vent key areas, etc etc...
| |
| # Juggernaut: You have 400 health, move slowly, and do 30 damage. You can make a tile impenetrable by using your Shield spell; good for dealing with cowards using ranged weapons. Phases out after 25 seconds; cooldown is 30 seconds. Ranged brute damage attacks (i.e. bullets) against you have a 70-80% chance of being deflected off of you, reducing their damage by 70%. You destroy walls, windows, and doors very quickly, which makes you good for breaching fortified areas.
| |
|
| |
|
| </div>
| | =Your First Round= |
| | [[File:Arrivals1.png|128px|right]] |
| | Once you've got everything set and ready, go ahead and hit ''Save slot'' (you should have been clicking it often, anyway). |
| | Close the Character Setup window, if the game is already going on, you can click ''Join Game!'' to bring up a list of jobs to join as. You'll want to click assistant. If, however, you're present before a round starts, and you can't find the ''Join Game!'' button, then click ''Ready'' instead, and you'll be spawned in automatically in the Tool Storage once the round starts. |
|
| |
|
| </div>
| | Depending on when you join and what the round type is, the ship around you can either look calm and quiet or completely unpowered with scorch marks lining the walls and screams echoing throughout the corridors. If you joined during the former situation then you're in luck because you'll be able to learn how to familiarize yourself with many mechanics without worry. No matter which spawn point you chose you'll always end up on the Lower Deck of the ship. |
|
| |
|
| <div class="toccolours mw-collapsible mw-collapsed" style="width:99%; background:#d4c9c9">
| | ==The Interface== |
| | [[File:Interface1.png|right]] |
| | SS13 is rather sensitive with what you click on, and since you can only click on something one way, that means there's probably only one way to interact with it. This isn't the case here, as aside from using modifiers like holding Control or Shift there are a few interface objects to toggle how you interact with items or even other people. |
|
| |
|
| === I was a ghost, but then I stood on a rune, and now I'm an Apparition! === | | ===Inventory=== |
| | The middle and left side of your screen is your inventory and item slots. From top to bottom, left to right, they are: |
| | #Main Inventory - Accessed by pressing the toggle button in the bottom left corner |
| | ##Helmet, right ear |
| | ##Glasses, mask, left ear |
| | ##Uniform, outer clothing, gloves |
| | ##Expand/collapse inventory, shoes, outer clothing storage |
| | #Easy Access Inventory - Always visible |
| | ##ID |
| | ##Belt |
| | ##Backpack |
| | ##Right and left hand |
| | ##Pockets |
|
| |
|
| <div class="mw-collapsible-content">
| | ===Object Interaction=== |
| | The bottom right side of the screen will contain a number of buttons that will change how you interact with objects or people around you. These are: |
| | #[[File:Mov_intent.png]]Movement Intent |
| | #[[File:Intents.png]]Intents |
| | ##Help - You won't do harm by clicking on someone empty handed. Will also prevent you from firing ranged weapons by default. |
| | ##Disarm - You will knock items out of hands and potentially knock people to the ground. |
| | ##Grab - You will grab someone. |
| | ##Harm - You will punch someone if you click them. |
| | #[[File:Damage_zone.png]]Targetting Window - Useful for precision stuff, mainly used for combat and surgery. |
| | #[[File:Resist.png]]Resist - You will resist out of physical incapacitation. Will also make you drop to the floor to put yourself out, should you be on fire. |
| | #[[File:Drop.png]]Drop - Will drop the item in your active hand. |
| | #[[File:Throw.png]]Throw - Will toggle throwing. Clicking somewhere with an item in your hand will throw it in that direction. If an item is thrown at you and you have an empty hand, you will catch the item. |
| | #[[File:Toggle_gun.png]]Toggle Gun Mode - Will determine if you shoot at who you click or if you will aim at them instead, which will bring up a few more options. |
|
| |
|
| Fresh Apparition? Here's a rundown:
| | ===Status=== |
| | Most of these icons are hidden, but if they were all active on the screen, then they would be: |
| | #[[File:Ceiling_indicator.png]]Ceiling - Informs you if there's a ceiling above you. |
| | #[[File:Tox_indicator.png]]Toxin - You're currently breathing in a toxic substance. |
| | #[[File:Fire_indicator.png]]Fire - You're currently on fire. |
| | #[[File:Ice_indicator.gif]]Ice - You're currently freezing. |
| | #[[File:Oxy_indicator.gif]]Oxy Warn - You're not breathing enough oxygen. |
| | #[[File:Pressure_indicator.gif]]Pressure Warn - You are in a low/high pressure environment without protection. |
| | #[[FIle:Internals_toggle.png]]Internals Toggle - Will toggle your internal atmosphere on or off. You must be wearing a suitable mask and have a tank of air/oxygen in your immediate inventory. |
| | #[[File:Health_doll.png]]Health Doll - Will give you a rough estimate of how you're doing. This isn't 100% accurate, as pain will influence what this indicator looks like. |
| | #[[File:Temperature_indicator.gif]]Temperature Warn - Will inform you if you're too hot or too cold. |
| | #[[File:Nutrition4.png]]Nutrition - Will pop up if you are hungry, or if you've eaten too much. |
|
| |
|
| You have 300 health, can't be stunned, can't fall or slip, don't care about atmospherics other than being maybe moved by wind, and can't go into crit.
| | ==Exploring== |
| | [[File:Elevators1.png|192px|right]] |
| | [[File:Elevators2.png|192px|right]] |
| | So now you're actually playing the game, congrats! If you've read the [[Guide to Controls]], then you should already have a rough idea of how to move your character around. If you joined mid-round, you will appear in the Residential Deck Lifts, on the Lower Dec. But if you join with the start of the round, you will appear in the Tool Storage, which is located in the Main Deck. You can check the [https://map.aurorastation.org/#/h1?y=110.4140625&x=108.828125&z=6/ Server Map] for an overview of the SCCV Horizon. |
|
| |
|
| You can only speak and understand Cultish.
| | The ship is divided into three main sections: the Lower Deck, the Main Deck, and the Upper Deck. The Lower Deck generally includes hangars and some utility departments, such as Custodial and Operations. The Main Deck, as the name suggests, houses almost all of the main departments, including Security, Engineering, Medical, and Research. The Upper Deck is mainly for Command and entertainment areas. While exploring the ship, you will come across these departments, but you won't be able to enter most of them as an Assistant due to clearance restrictions. Nonetheless, take the opportunity to familiarize yourself with the layout of the ship. |
|
| |
|
| Ask your masters for a robe, sword, and tome to start you off, and ask them what they want you to do.
| | Keep in mind that a round typically lasts around two hours. If you need to leave before then, you can return to the Residential Deck Lifts in the Lower Deck and use either the Living Quarters Lift or the Cryogenic Freezer to exit the round. |
|
| |
|
| You can use runes and tools just like a crewmember cultist, too (see [https://wiki.aurorastation.org/index.php?title=Cult&action=submit#Cultist Cultist]), but you can't help summon Nar'Sie. Make sure the person who summoned you has access to plenty of brute damage healing and stays conscious so they can sustain your existence (if nothing else, bother the resident Artificer to make altars so they can heal). Without aid, your summoner will go from full health to crit in 5 minutes. If you die, the cultist can summon you again, so long as another ghost doesn't get picked.
| | After your first round, you may want to move on to an actual job. Some beginner-friendly occupations include: |
| | * [[Janitor]]: Walk around the Horizon to learn its layout while performing custodial tasks. |
| | * [[Hangar Technician]]: Do deliveries and sort the warehouse to get familiar with handling items in the game. |
| | * [[Engineer#Engineering Apprentice|Engineering Apprentice]]: Gain hands-on experience in Engineering, but make sure there are other Engineers available to help you. |
| | * [[Medical Intern]]: The learner role of the medical department. |
| | * [[Scientist#Lab Assistant|Lab Assistant]]: Learn how to be a scientist after some work experience. |
|
| |
|
| </div>
| | Additionally, interacting with other players can make the game more enjoyable and engaging. Try to stay in character and be creative with your interactions, but also be respectful of other players and their characters. Remember that everyone is here to have fun, so don't take things too seriously or get upset if something doesn't go as planned. Don't hesitate to ask for help if you're unsure about something. You can do so in-character (IC) or out of character (OOC). Most players are happy to assist newcomers, whether it's with small tasks or getting familiar with a particular department. |
|
| |
|
| </div>
| | Good luck! |
| | | {{Gameplay Guides}} |
| <div class="toccolours mw-collapsible mw-collapsed" style="width:99%; background:#d4c9c9">
| |
| === My soul was stolen, and now I'm a Shade. ===
| |
| <div class="mw-collapsible-content">
| |
| Beg your master to just make a construct shell and let you be a construct. You're Ian with an attack and the ability to speak Cult. Sorry.
| |
| | |
| </div>
| |
| | |
| </div>
| |
| | |
| == Runes ==
| |
| Before you dive in, here are some important notes regarding runes:
| |
| | |
| * There can only be twenty-five floor runes in existence at any one time. If you do not need a rune to stay somewhere, such as a wall or teleportation rune, it is highly advised to make a talisman of it instead or erase any other floor runes once you are done with them. Talismans have no limit.
| |
| * You cannot draw a rune on another rune. You can, however, do things like have a rune under a grille, door, or bookcase, and then use it by viewing the turf with alt-click.
| |
| * Null rods are capable of protecting their holder from the effects of most runes, and allows the bearer to destroy cult artifacts with ease.
| |
| * The act of creating a rune is very obvious, with a large message, loud sound, and drip of blood made whenever you start making one. Make sure to do so only in privacy.
| |
| * To erase or configure a rune, use a tome on it. Use alt-click to view the turf if you're having trouble targeting the rune.
| |
| | |
| <div class="toccolours mw-collapsible mw-collapsed" style="width:99%; background:#d4c9c9">
| |
| | |
| ===Sentience Runes===
| |
| <small>These runes relate to the creation of workers and soldiers for your infernal army. You can brainwash the Unenlightened to submit to the Dark Lord's will and aid your cause, use captured souls to spawn solid ghosts and power eldritch constructs, beckon restless spirits into terrifyingly durable bodies, and even bring back the dead... though not always with the soul they started with.</small>
| |
| <div class="mw-collapsible-content">
| |
| | |
| '''It is good practice to LOOC with your victim to confirm whether they are willing to participate as an antagonist.'''
| |
| | |
| {| class="wikitable sortable" style="width:100%; text-align:center" border="1" align="center" cellspacing="0" cellpadding="0"
| |
| ! scope="col" style='background-color:#a60000;' width="1%"|Name
| |
| ! scope="col" class="unsortable" style='background-color:#a60000;' width="12%"|Summary
| |
| ! scope="col" class="unsortable" style='background-color:#a60000;'|Detail
| |
| ! scope="col" style='background-color:#a60000;' width="1%"|Can make Talisman?
| |
| ! scope="col" style='background-color:#a60000;' width="1%"|Disappears after use?
| |
| |-
| |
| !Conversion
| |
| |style="text-align:left"| Convert crew to your cause by putting them on the rune and hoping they submit before they die.
| |
| |style="text-align:left"| Via force or guile, get a convertee onto the rune. Target will visibly writhe in and experience pain unless they can't feel pain; this usually means being berserk, having a mutation, or on oxycodone. They also take 5-20 burn damage, start hallucinating, and get a dialog to submit or resist. <br /> <br />If they resist or hesitate for more than 10 seconds, the target takes increasing burn damage. Burn gets worse the longer they resist or hesitate, accompanied by messages describing their blood boiling as corruption forces its way into their body and mind. After anywhere from 40 seconds to 2 and a half minutes, they start to seriously hallucinate and take brain damage along with the burn, with descriptions of their mind turning to ash as they begin to see a dark and incomprehensible figure. Damage and hallucination is taken every 10 seconds. <br /> <br />Can't be converted if they are dead. If they submit, they will be healed of their hallucination and brain damage, but not burn. If the target can't be culted due to account age, already being a different kind of antag, or due to jobban, they will be gibbed. Can be used on most humanoid species, dionae, IPCs, golems, and monkeys.
| |
| |No
| |
| |No
| |
| |-
| |
| !Construct
| |
| |style="text-align:left"| Makes a demonic machine frame, ready to host a captured soul and serve Nar'Sie.
| |
| |style="text-align:left"| The rune makes a shell for making a construct. Use a filled soul stone (see below) on it to make either a Juggernaut, Wraith, or Artificer. They fly, so they don't care about atmospherics knocking them over, and they also don't breathe. They can't see in the dark, and radiate darkness. They all have the same attack speed. Draw a Forging rune to let your constructs heal themselves and change what kind of construct they are. All constructs can be healed by Artificers.<div class="toccolours mw-collapsible mw-collapsed" style="width:99%">
| |
| Expand for an overview of the constructs.
| |
| <div class="mw-collapsible-content">
| |
| *Juggernaut: 400 health. 30 damage per punch. Slow. Damage to it is reduced by 10 (maybe? maybe not). Smashes a reinforced plasteel wall in 4 hits, regular wall in 1, girder in 1. Energy projectiles have a high chance of being deflected, reducing damage to the Juggernaut by 70% and redirecting the projectile somewhere within 3 tiles, possibly back at the one who fired it. Can create an impenenetrable wall for 25 seconds via the Shield spell.
| |
| *Wraith: 100 health. 25 damage per punch. Smashes a reinforced plasteel wall in 9 hits, regular wall in 2, girder in 1. Fast. Radiates less darkness than a juggernaut. Can walk through walls for 5 seconds via the Phase Shift spell.
| |
| *Artificer: 50 health. 10 damage per punch. Smashes a reinforced plasteel wall in 9 hits, regular wall in 2, girder in 1. Fast. Radiates less darkness than a wraith. Can repair other constructs by clicking on them. Has several spells, useful for base-building and support.<div class="toccolours mw-collapsible mw-collapsed" style="width:99%">Expand to view Artificer spells.<div class="mw-collapsible-content">
| |
| **Cultify area. Turns walls, floors, tables, grilles and doors into cult versions. Notably, doors become daemon stone doors- no ID needed. Once per 40 seconds.<br />
| |
| **Create empty shell. Same as the Construct rune. Once per three minutes.<br />
| |
| **Lesser construction. Makes a wall. Same as a steel wall, except cult flavored wall and girders. Once per ten seconds.<br />
| |
| **Create floor. Turns any floor into a cult floor, including space. Once every two seconds.<br />
| |
| **Summon soulstone. Same as the soul stone creation rune. Once every five minutes.<br />
| |
| **Red Pylon. Makes Pylons, which cast dim, red light. They can be upgraded with monkeys, slimes, rats, dogs, giant spider, small alien wildlife, walking tomatoes, walking mushrooms, lizards, foxes, chickens, goats, penguins, crabs, corgis, cats, carp, shades, parrots, bees, diona nymph, borers, and wizard familiars, by dragging and dropping the creature on the pylon, then killing it, to shoot lasor beams. Pew pew! Once turreted, it can't be moved. They do 3.5 damage twice a second with some armor piercing, and do 10 damage twice a second with more armor piercing and repair themselves if you shoot them with an energy weapon. They are immune to non-brute or explosion damage. Can be repaired by artificers. Once every twenty seconds.<br />
| |
| **Create daemon forge. Spawn a forge that lets you reforge some things into other nifty things, such as cult robes and hoods into voidsuits, small oxy tanks into large ones, books into tomes, metal swords into cult swords, desk lamps into red pylons, and regular backpacks into cult backpacks. Once every ten minutes. <br />
| |
| **Create altar. Spawn an altar that lets cultists heal themselves of 20 damage, fixing broken tendons, bones, and arteries, every 2 minutes, per cultist, per altar. Once every ten minutes.<br /></div></div>
| |
| |Yes
| |
| |Yes
| |
| |-
| |
| !Soul Stone Creation
| |
| |style="text-align:left"| Makes a soul stone, for capturing souls.
| |
| |style="text-align:left"| Soul Stone: Used to trap souls to make Shades or constructs. Use it on a dying or dead mob to capture their soul. Can be used on most humanoid species, dionae, IPCs, golems, and monkeys. Cannot be used on silicons, non-humanoids, animals, anyone infested by cortical borers, SSD people, or apparitions. Can only hold one soul. Use to release the trapped soul as a Shade; click the Shade to put it back in. Use a soul stone on a construct shell to put the soul into it. Disappears after use.<br /><br />Shade: 50 health. Deals 5-15 damage. Understands all languages. Can't fall. Can travel up and down if the way isn't blocked, no ladders required. Has collision like a solid mob. Doesn't get hungry. Decent speed. Other than that? It's Ian.
| |
| |Yes
| |
| |Yes
| |
| |-
| |
| !Apparition
| |
| |style="text-align:left"| A ghost standing on the rune is turned into a robust ally, at the cost of slowly draining your life.
| |
| |style="text-align:left"| Any one ghost standing on this rune when activated, and isn't jobbaned from cult, will become an apparition. The summoning cultist doesn't have to stay on the rune, but they take one brute damage every three seconds - 100 damage every 5 minutes - while the apparition exists (except dionae, they take two damage and lose nutrition). Falling unconscious or being SSD will destroy the apparition and allow you to summon another one (so use the SLEEP verb if you wish to get rid of yours). If you have a piece of paper on the rune when activated, and write >Name< on the paper (including the ><), the apparition will take on that name. It seems a cultist can have multiple of these active at one time, but make sure you have the means to heal yourself of the damage. Two or three altars are capable of keeping up with the damage from one rune.
| |
| *Apparitions: 300 health. Can use armor, tools, and machinery like a human. Doesn't feel pain, breathe, fall over, or have blood, and can't be stunned, poisoned, scanned in a body scanner, or go into crit or have an object embedded in them. They have incredible stamina, letting them fight for much longer. They can also sprint twice as long as a human, but only at 70% of the speed of a human. Cannot help summon Nar'Sie.
| |
| |No
| |
| |No
| |
| |-
| |
| !Revival
| |
| |style="text-align:left"| Sacrifice a corpse to bring back the dead... though not necessarily with the original soul.
| |
| |style="text-align:left"| The sacrifical corpse and the corpse to revive must both be on the rune, as well as a ghost. The sacrifice cannot be one you have an objective to sacrifice. If no ghost is on the rune, a message will be broadcast to deadchat alerting them of the revival attempt. When the conditions are met, the sacrificial corpse will be gibbed, and the corpse to be revived will be possessed by the ghost and will be cultist.
| |
| |No
| |
| |Yes
| |
| |}
| |
| | |
| | |
| </div>
| |
| | |
| </div>
| |
| | |
| <div class="toccolours mw-collapsible mw-collapsed" style="width:99%; background:#d4c9c9">
| |
| | |
| ===Summoning Runes===
| |
| | |
| <small>These runes relate to creation of tools, weapons, armor, and obstacles, as well as making use of Redspace for transporting and even rescuing cultists. Also included is the most important rune of them all, used to finally pierce the veil and bring Nar'Sie into this reality.</small>
| |
| <div class="mw-collapsible-content">
| |
| | |
| {| class="wikitable sortable" style="width:100%; text-align:center" border="1" align="center" cellspacing="0" cellpadding="0"
| |
| ! scope="col" style='background-color:#a60000;' width="1%"|Name
| |
| ! scope="col" class="unsortable" style='background-color:#a60000;' width="12%"|Summary
| |
| ! scope="col" class="unsortable" style='background-color:#a60000;'|Detail
| |
| ! scope="col" style='background-color:#a60000;' width="1%"|Can make Talisman?
| |
| ! scope="col" style='background-color:#a60000;' width="1%"|Disappears after use?
| |
| |-
| |
| !Forging
| |
| |style="text-align:left"| Dresses you in armored cult robes and gives you a deadly sword.
| |
| |style="text-align:left"| So long as the body slots are free, dresses you in a cult hood, backpack, robes, and boots, and gives you a sword. The armor can be turned into a voidsuit using a daemon forge provided by an artificer. Allows constructs to change what type they are.
| |
| *Armor details: Melee 50, Bullet 30, Laser 50, Energy 20, Bomb 25, Bio 10, Rad 0; protects against stunning/electrocution from tasers and stun batons; doesn't protect the hands. The boots silence your footsteps.
| |
| *Voidsuit details: Melee 60, Bullet 50, Laser 30, Energy 15, Bomb 30, Bio 30, Rad 30, protects against stunning/electrocution including the hands, allowing it to act as insulated gloves. Slows you down like a regular RIG suit.
| |
| *Sword details: 30 damage, 10 when thrown, can slowly destroy steel walls, damages internal organs, protects against shock when breaking electrified windows, can be stored on your belt, or in the armor slot of robes/voidsuit.
| |
| |Yes
| |
| |Yes
| |
| |-
| |
| !Wall
| |
| |style="text-align:left"| Makes an impenetrable wall, toggleable only by cultists.
| |
| |style="text-align:left"| Using the rune causes an impassable red blur to appear on the tile, and causes two brute damage to the user. Clicking the blur makes the blur go away and the rune visible again, causing another two brute damage. The blur becomes invisble when a Concealmeant rune is used, and visible again when a Revealing rune is used.
| |
| |No
| |
| |No
| |
| |-
| |
| !Tome summoning
| |
| |style="text-align:left"| Summons an arcane tome, for backup or to give to new acolytes.
| |
| |style="text-align:left"| Summons a tome. The tome does 5-20 silent burn damage when hitting the Unenlightened on any intent - good for executing and sacrificing without drawing too much attention.
| |
| |Yes
| |
| |Yes
| |
| |-
| |
| !Cultist summoning
| |
| |style="text-align:left"| Three cultists sacrifice their blood to summon a fellow acolyte from anywhere on the station to them.
| |
| |style="text-align:left"| Requires at least 3 cultists to activate. Select your target from the list, and if they are not bound (in the ways that the Freedom rune neutralizes) they will appear on the rune laying down. Unlimited range. If only three cultists activated, the activators are stunned for 6-12 seconds and weakened for 2. Additionally, the activators take brute damage equal to 25 divided by the number of activators divided by two, rounded down.
| |
| |No
| |
| |Yes
| |
| |-
| |
| !Teleportation
| |
| |style="text-align:left"| Teleport to another teleport rune in a messy fashion.
| |
| |style="text-align:left"| When you create the rune, it will assigned randomly to a network, visible when you examine it - the four networks are Vernuth, Koglan, Irgros, or Akon. Use your tome on the rune to change which network it belongs to. When you use the rune, it will randomly pick one of the other runes on the same network and take you to it, blood and gibs spattering out of both runes as you are sucked through Redspace. You must wait five seconds before teleporting again. The floor runes do not disappear on use, but the talismans are either one use only, or have a time window of usability after it's first used. Make sure to configure which network the talisman's rune goes to before you create the talisman. Only floor runes are valid destinations. Teleportation runes only work on the station.
| |
| |Yes
| |
| |No, except for talismans
| |
| |-
| |
| !Geometer
| |
| |style="text-align:left"| Summons Nar'Sie.
| |
| |style="text-align:left"| Only needs one rune, but needs nine or more cultists surrounding it. Apparitions don't count, though constructs and people revived via Revival do. Must be activated on the station itself.
| |
| |No
| |
| |Yes, but won't work a second time
| |
| |}
| |
| | |
| </div>
| |
| | |
| </div>
| |
| | |
| <div class="toccolours mw-collapsible mw-collapsed" style="width:99%; background:#d4c9c9">
| |
| ===Offense Runes===
| |
| <small>These runes are the bread and butter of His army, allowing them to blind, deaf, and stun their enemies, destroy technology, boil their blood, and even transfer their life essence to you. Important to note is that these runse only affect non-cultists.</small>
| |
| <div class="mw-collapsible-content">
| |
| | |
| {| class="wikitable sortable" style="width:100%; text-align:center" border="1" align="center" cellspacing="0" cellpadding="0"
| |
| ! scope="col" style='background-color:#a60000;' width="1%"|Name
| |
| ! scope="col" class="unsortable" style='background-color:#a60000;' width="12%"|Summary
| |
| ! scope="col" class="unsortable" style='background-color:#a60000;'|Detail
| |
| ! scope="col" style='background-color:#a60000;' width="1%"|Can make Talisman?
| |
| ! scope="col" style='background-color:#a60000;' width="1%"|Disappears after use?
| |
| |-
| |
| !Blindness
| |
| |style="text-align:left"| Blinds non-cultists for a decent duration.
| |
| |style="text-align:left"| Within three tiles, blind non-cultists for 40 seconds, blur vision for 100 seconds. Twice that time if talisman. If floor rune, has 10% to permanently blind, 5% chance to permanently blur vision. The rune won't expend itself unless there is a non-cultist nearby.
| |
| |Yes
| |
| |Yes
| |
| |-
| |
| !Deafening
| |
| |style="text-align:left"| Deafens non-cultists for a considerable duration.
| |
| |style="text-align:left"| As a floor rune, deafens non-cultists in a 1 tile radius for 100 seconds, and has a 1% chance to permanently deafen. As a talisman, deafens non-cultists in a 5-tile radius for 200 seconds.
| |
| |Yes
| |
| |Yes
| |
| |-
| |
| !Incapacitation
| |
| |style="text-align:left"| Confuses, silences non-cultists for a short duration, and freezes them for a very short duration.
| |
| |style="text-align:left"| Confuses for 20 seconds, silences for 15 seconds, and makes them stand still and do nothing for 2 seconds. Affects non-cultist carbon-based mobs (includes IPCs) in 3 tiles as a talisman. As a floor rune, has a range of 5 tiles, and additionally knocks people down for 2 seconds. Silicons are knocked down for 3 seconds and silenced for 30.
| |
| |Yes
| |
| |Yes
| |
| |-
| |
| !EMP
| |
| |style="text-align:left"| Send out an EMP blast in a short range.
| |
| |style="text-align:left"| Disables all technology and damages silicons. Floor rune has a radius of 2 tile, talisman rune has a radius of 1 tile. Doesn't affect anything held by cultists.
| |
| |Yes
| |
| |Yes
| |
| |-
| |
| !Blood Boil
| |
| |style="text-align:left"| Boil the blood of a non-cultist unlucky enough to be on the rune.
| |
| |style="text-align:left"| Requires at least 3 cultists standing next to it. Deals 50 brute and 50 burn to the victim on the rune. The cultists take 15 brute each. May or may not activate all nearby blood boil runes when one rune is activated. If so, then it makes a good trap to lure people into. Otherwise, it's only good for weakening sacrifices or executions. Remember that straight up killing someone should generbe a last result; ahelp before doing so.
| |
| |No
| |
| |Yes
| |
| |-
| |
| !Blood Drain
| |
| |style="text-align:left"| Drain the blood of your enemy, and put in into yourself. Does not heal.
| |
| |style="text-align:left"| You and a non-cultist must stand on these runes. Deals 10 brute and 10 burn damage to the victim, and transfers 10 units of their blood to you. May or may not activate all nearby blood drain runes when one rune is activated.
| |
| |No
| |
| |Yes
| |
| |}
| |
| | |
| </div>
| |
| | |
| </div>
| |
| | |
| <div class="toccolours mw-collapsible mw-collapsed" style="width:99%; background:#d4c9c9">
| |
| ===Utility Runes===
| |
| <small>These runes do not fit into any other category. With these, you can speak across distances with your brothers and sisters, free a cultist of their chains from a distance, briefly leave your body, and even spill the blood of your victims to gain your god's approval.</small>
| |
| <div class="mw-collapsible-content">
| |
| | |
| {| class="wikitable sortable" style="width:100%; text-align:center" border="1" align="center" cellspacing="0" cellpadding="0"
| |
| ! scope="col" style='background-color:#a60000;' width="1%"|Name
| |
| ! scope="col" class="unsortable" style='background-color:#a60000;' width="12%"|Summary
| |
| ! scope="col" class="unsortable" style='background-color:#a60000;'|Detail
| |
| ! scope="col" style='background-color:#a60000;' width="1%"|Can make Talisman?
| |
| ! scope="col" style='background-color:#a60000;' width="1%"|Disappears after use?
| |
| |-
| |
| !Communication
| |
| |style="text-align:left"| Broadcast messages to your fellow acolytes.
| |
| |style="text-align:left"| Use it, type your message, and hit enter to broadcast a message to all cultists. It's bugged so that the recipient hears the message as though it's coming from themselves, so make sure to announce your name each time you use this. If you don't want to send a message, just type nothing and you will keep the rune.
| |
| |Yes
| |
| |Yes
| |
| |-
| |
| !Freedom
| |
| |style="text-align:left"| Frees a fellow acolyte from restraints, remotely.
| |
| |style="text-align:left"| Requires three cultists to activate. Unlimited range. Unbuckles, uncuffs, unmuzzles, and un-straitjackets the target, unwelds, unlocks and opens any lockers the target is in the same tile as, and unlocks and opens any locked doors the target is within 2 tiles of.
| |
| |No
| |
| |Yes
| |
| |-
| |
| !Ethereal
| |
| |style="text-align:left"| Be a ghost.
| |
| |style="text-align:left"| Your body is frozen on the rune, and takes 10 brute damage per 10 seconds. A special message announces you to the ghosts, so they may have an idea you're not just an ordinary one. Use this time to recruit for manifestations, pump ghosts for info, and scout. Don't forget to toggle darkness in the Ghost tab, and ghost sight/ears in the Preferences tab.
| |
| |No
| |
| |No
| |
| |-
| |
| !Sacrificial
| |
| |style="text-align:left"| Sacrifice a body to appease your god.
| |
| |style="text-align:left"| Put a non-cultist body on the rune, have three or more cultists nearby, activate, and the body gibs. Used to satisfy objectives, or as a hardcore form of Pray. (Though make sure to Pray before and afterwards, this rune doesn't seem to generate an admin message.) The sacrifice is deemed worthy if it is sufficient "rarity" (vaurca, diona, skeleton, apparition (!), zombie, shadow, golem, slime person, and terminator ), or just on a 80% success die roll, 40% if the sacrifice is dead. Must be humanoid, or have/be a brain, braincase, robot, or intellicard.
| |
| |No
| |
| |No
| |
| |-
| |
| |}
| |
| | |
| </div>
| |
| | |
| </div>
| |
| | |
| <div class="toccolours mw-collapsible mw-collapsed" style="width:99%; background:#d4c9c9">
| |
| | |
| ===Metarunes===
| |
| <small>These runes alter other runes. These runes let you imprint runes on paper so you can take them with you, let you hide and unhide runes, and see hidden runes (and possibly other hidden things).</small>
| |
| <div class="mw-collapsible-content">
| |
| | |
| {| class="wikitable sortable" style="width:100%; text-align:center" border="1" align="center" cellspacing="0" cellpadding="0"
| |
| ! scope="col" style='background-color:#a60000;' width="1%"|Name
| |
| ! scope="col" class="unsortable" style='background-color:#a60000;' width="12%"|Summary
| |
| ! scope="col" class="unsortable" style='background-color:#a60000;'|Detail
| |
| ! scope="col" style='background-color:#a60000;' width="1%"|Can make Talisman?
| |
| ! scope="col" style='background-color:#a60000;' width="1%"|Disappears after use?
| |
| |-
| |
| !Talisman creation
| |
| |style="text-align:left"| Create portable runes.
| |
| |style="text-align:left"| Creates a talisman by putting a piece of clean paper on the rune, then drawing the rune you want to talismanify next to the creation rune. The talisman can be activated by using it. You can clip talismans together for easier storage, and even write on them (once created) to label them, as they're still paper. In fact, you can even disguise a talisman by making it the second in a stack of other normal papers. You may rename your talismans (right click->rename paper) so you know which is which, perhaps using a code to obfuscate its purpose to anyone who captures one. They can also be stored in folders (made by using an empty box, then using the resulting cardboard).
| |
| |No
| |
| |No
| |
| |-
| |
| !Concealment
| |
| |style="text-align:left"| Hides runes from all but ghost sight.
| |
| |style="text-align:left"| Makes runes in a four tile radius as invisible as ghosts. Has the same radius when used as a talisman.
| |
| |Yes
| |
| |Yes
| |
| |-
| |
| !Revealing
| |
| |style="text-align:left"| Reveals Concealed runes.
| |
| |style="text-align:left"| Reveals any runes hidden with Concealment within 6 tiles if a floor rune, or 4 tiles if a talisman.
| |
| |Yes
| |
| |Yes
| |
| |-
| |
| !Visibility
| |
| |style="text-align:left"| Gives you the sight of the ethereal undead.
| |
| |style="text-align:left"| Lets you see invisible things almost as a ghost would. Most practically, you can see runes hidden with Concealment anywhere you're able to see, and check if ghosts are standing on your Apparition or Revival runes. You only get a second or so of this sight, so you have to spam the rune.
| |
| |No
| |
| |No
| |
| |-
| |
| |}
| |
| | |
| </div>
| |
| | |
| </div>
| |
| | |
| == Roleplay and Strategy ==
| |
| You begin the round with an arcane tome book. You are, otherwise, indistinguishable from any other member of the crew.
| |
| | |
| It is highly recommended that your first actions with are as follows:
| |
| | |
| # Use a communication rune in a secluded, camera-less area to introduce yourself to the cult ICly. You can state as much or as little about yourself as you want. Be warned that the Unenlightened, if they can see you, will hear you chant in your dark language when doing this.
| |
| # Use AOOC (like OOC, but with an A for Antag in front) to figure out what general plan you want to pursue with your allies, and ask questions about how the cult works. Remember, no IC information!
| |
| | |
| === Remaining Unseen ===
| |
| Your cult is unknown to outsiders, but before the night is over, all will feel the power of Nar’Sie. Still, a little prudence goes a long way. Cult implements are often visually sinister, consisting of black books and bloody motifs. Should you wish to remain unseen, take care to conduct your magicks and conversions in secluded, camera-less areas. Bathroom stalls, dorms, firefighting closets, maintenance, the adult section in the library, and the construction site are all publicly accessible, relatively secluded, and have no cameras.
| |
| | |
| Good, responsible roleplayers may find your runes and Tomes strange, suspicious, or even indicative of insanity, but will not jump immediately into action, opting instead to investigate. But remember, the moment you emerge with battle-robes and dark energy swords, all bets are off!
| |
| | |
| === Spilling Blood in His Name ===
| |
| Cultists are notoriously robust, with lots of powerful offensive options at their disposal. Your first instinct may be to use the Armor rune and start contributing prized specimens to Nar-sie's severed head collection.
| |
| | |
| Your Cult Blade might be obscenely powerful, but remember that it's a melee weapon! With teamwork and skill, Security can put you down before you can get a swing in (unless you're a manifested ghost, then you can likely take a nuclear warhead to the face and live). Not only that, but stabbing people left and right is the exact opposite of a fun and interesting round.
| |
| | |
| === Playing by Man's Rules ===
| |
| Playing nicely, otherwise known as ''Peacecult'', is an extremely challenging strategy, and requires top-notch roleplaying. Or very gullible characters. In Peacecult, you do not harm anyone at all - instead, you and your fellow Cultists preach the word of Nar-sie openly, inviting people to join your religion in a friendly and harmless fashion.
| |
| | |
| However, take note of the following risks:
| |
| | |
| # Attempting to convert a player sends them a message describing the agonizing pain they are going through, as they writhe on the ground visibly in pain. More often than not, this is a very quick way to get Security called on you.
| |
| # You may be outright ignored. See: playing the Chaplain. Nothing is more frustrating than trying to recruit followers to summon your all-powerful God of Blood, only to be snubbed by the Tajara as they flirt with one another in Hydroponics.
| |
| # Some Cult players go into the round expecting mayhem and murder; they may simply reject your idea.
| |
| | |
| If you manage to make Peacecult work, this can be quite a hilarious experience. Good luck! Bonus points if you talk the ERT into joining!
| |
| | |
| == Surviving the Cult ==
| |
| So, your date with Lucas Greyer was interrupted by a gibbering band of madmen in robes with glowing swords. Well darn. There are a few things you need to know if you want to get out of this situation alive.
| |
| | |
| === Identifying the Occult ===
| |
| Identifying the Cult is difficult. They have been very secretive about their religion, and it is impossible for your character to recognize it. You have never heard of Nar-sie in your life. Those Tomes sure look sinister! But then again, so does your average Dungeons & Dragons sourcebook.
| |
| | |
| ''Remember that just as the Cult is obligated to make the round fun and challenging for you, you are also obligated to do the same.''
| |
| | |
| * You have no earthly idea what the runes are. They are not "obviously evil". Calling for Blue Alert or interrogating nearby crew at the first sight of a rune is poor play.
| |
| * Arcane Tomes are just that: weird books. Unless they were used to bash the Central Command Internal Affairs Agent's brains in, they are not suspicious.
| |
| * Cult robes might sling off bullets, but they don't look armored. They're pretty kooky, though. They could have been a missing costume shipment, or maybe the Chaplain got drunk and flung off his clothes.
| |
| * Cult Blades are as or more suspicious than fuel-tank bombs. They're vicious, incredibly sharp swords that glow and thrum like energy blades. Just touching them makes you feel horrendously ill, twisting your heart and filling your head with poisonous thoughts. If you're the Detective, consider these the holy grail of evidence.
| |
| | |
| Obviously, the onus is on the Cult to be discreet about their misdeeds. It will be immediately obvious if one draws a rune, but this in and of itself is nothing more than unsanitary graffiti; the cultist barely pricks their finger. Watching a Cultist disappear is obvious grounds for investigation. When in doubt, play it safe, try to think rationally and realistically, and don't be afraid to adminhelp if you need a second opinion.
| |
| | |
| === Striking Back ===
| |
| The Cult wears extremely high-quality armor, and their swords can send someone into crit with four hits. For Security (or in the event of a militarized civilian crew), it is vital that you wear riot armor, or any other gear which excels at absorbing melee brute damage. Tasers and stun batons are nearly worthless against the armored Cult!
| |
| | |
| If the Cult is smart, their robes will have been upgraded to allow them to go into space, and will have built turrets in their strongholds. The turrets do burn damage; ablative armor will still work against their beams. Do not shoot the turrets with lasers- this will only make them more powerful!
| |
| | |
| They also may have created eldritch constructs - recognizeable as floating, spiky metal contraptions. They can all destroy walls and doors; some can phase through walls, while others are so durable that bullets bounce off them.
| |
| | |
| Depending on the extremity of their assault, the Cult may or may not present a severe threat. Calling the ERT is a reasonable response once people begin losing their spinal cords.
| |
| | |
| ==== Wall Runes ====
| |
| You may come across a strange blurry patch of red air that seems impenetrable - there might be a rune there, or not, if the Cult was clever enough to hide it. Trying to shoot the Cultists through this invisible barrier is a quick way to be laughed at! You can cut through the real, solid walls in an attempt to get around, but be warned that the Cult can erect their Wall runes much faster than you can slice through the station.
| |
| | |
| The only way to truly remove a Wall rune is to have the Chaplain neutralize it, or hope you're lucky enough to catch the Cult with the wall down.
| |
| | |
| === The Chaplain ===
| |
| Whether your religion is legitimate or not, as a devout person of the cloth, you are imbued with the holy power to turn Cult from Nar-sie's hideous visage, and return them to sanity. Your obsidian Null Rod can erase runes, or de-program Cult members when used violently (but justly).
| |
| | |
| As the Chaplain, you are arguably the most powerful person on the Station in the event of a Cult round. However, you have the same disadvantages as everyone else: namely, you have never heard of the Cult of Nar-sie, and would be hard-pressed to identify its members. Security may bring you their armaments and Tomes if found - player's discretion is important to determine whether or not these would constitute a clearly foul presence aboard the Station. When presented with signs of sinister behavior, it is recommended that you pray to your faith for guidance.
| |
| | |
| The premise of your Null Rod is up to you. Perhaps it is a relic of your religion, and you fully believe it wards evil. Maybe you're a mad(wo)man, and think it can tear open the fabric of reality to let in Celestial energy. Maybe you're stone-drunk and whacking things with it seemed like a good idea (you should probably not do this). Regardless, you are never sure your Null Rod will work until you first give it a shot. After that, by all means, feel free to go kick ass for the Lord.
| |
| | |
| == Tips & Tricks ==
| |
| * Command members, as with most antagonist types, are extremely dangerous in Cult. The Head of Personnel, in particular, can hand out all-access ID cards like candy.
| |
| * Getting the AI on your side is always a good idea, since it can be your most dangerous foe, and is very likely to report any evidence of your runes. Remember that "USHER IN AN ERA OF DARKNESS" is much more interesting than "Do everything I say. Do not report this law."
| |
| * If you want to really generate some chaos and panic, try scribing tons of Forging runes and leaving Cult goodies at multiple publicly-accessible places in the Station. Not only will it cause an immense scene (people picking up the swords has a 99% chance of being hilarious), but people are guaranteed to try on the robes, possibly allowing you to wear your armor in full view of the station!
| |
| * Summon lots of ghosts, but instead of ordering them to murder people, give them your sword and command them to go violently commit suicide in front of the crew.
| |
| * Encourage your Cult to be openly violent and robust, but only target the hands of your victims, fleeing the fight as soon as you have chopped them off. This allows them to live, thus keeping them in the round (and able to RP!), and is still very likely to make Nar-sie smile. (Note, limb severing doesn't seem to work on Aurora Station.)
| |
| * The Wall rune is incredibly powerful, forming an excellent means to block the opposition's path. Make sure that you use the rune after you place it down - it does not activate automatically. Any Cultist can re-activate the rune to toggle the wall on and off. Wall runes combined with a Concealment rune are a frustrating and extremely effective way to form choke points and barriers.
| |
| * Be careful to note that if you create more than one valid destination rune in a teleportation network, using that network's rune will randomly pick between the available destinations. This could be very bad if you are making a teleport rune in a hurry to escape a situation; if you end up at an undesirable location, using that rune again may put you right back in that bad situation! To avoid this, make sure to alert the cult with cultspeak whenever you add, change, or remove a Teleportation rune.
| |
| * If no one else is manufacturing talismans, it may be a good idea to make some yourself and pass them out to your fellow acolytes.
| |
| * Recommended talismans to keep on you: teleport, communication, incapacitation, EMP, and tome summoning.
| |
| | |
| {{Antagonists}} | |
| {{Jobs}}
| |
| [[Category: Jobs]] [[Category:Antagonists]] [[Category:Pages]]
| |
Welcome to Space Station 13, a game that offers rich player interaction and, on this server and many others, a unique roleplay experience. This guide is designed for new players who are just starting their journey into the world of SS13 and BYOND in general. It's important to note that reading the rules is essential to ensure a smooth and enjoyable stay on the server. Failure to do so may result in a short-lived experience.
BYOND
BYOND - Build Your Own Net Dream - is the awful, archaic, and probably cursed engine that SS13 uses, and it must be downloaded in order to join any server. You can easily download the latest version by visiting the BYOND website.
A BYOND account also must be created before you can join any servers.
After installing BYOND and creating an account, click the field next to Filter and type in "Space Station 13". The hub entry should appear, and you will likely see a list of servers, including Aurorastation. If you're unable to find Aurorastation, you can click Board The Aurora on this link. This will automatically open BYOND and take you to the server.
You're In!
If you've successfully joined the server, you'll see the blank Dream Seeker screen. Once it disappears, you'll be presented with a split-screen interface. On the left side, you'll see the server's title screen with clickable options, and on the right side, you'll see a set of commands (also known as verbs) and the chat log.
If the left side is blank, it means that the server is still streaming resources to your computer, which may take a minute or two. However, this is a one-time process that usually only occurs the first time you join the server.
Fundamentals
Before we can continue, there are a few things we should make sure you know before you dive headfirst into the chaos action.
- Make sure you've read the rules!
- Be sure to check the Guide to Controls for how to control your character.
- This is a roleplay server, so make sure that your character and their actions are believable for the setting.
- Your first round may be rough.
With that out of the way, we can continue to character creation!
Your First Character
On the left side of the screen, you'll see a menu of options, including Setup. Click on this to open the character creation window, which should look similar to the picture on the right. For now, the only button at the top you need to worry about is the 'Save slot' button, which you should click regularly to avoid losing your progress. Below the save slot button, you'll see a row of buttons that allow you to customize your character's appearance and attributes. Keep in mind that your character should fit in with the server's setting!
General
During character creation, you'll need to choose a few key details to define your character. Here's what you'll see on the left side:
- Name: Determines what your character will be identified by. Choose a first and last name only - nicknames are not allowed.
- Random Name: If you can't think of a name for your character, clicking this will cycle through pre-generated names.
- Sex: This option determines your character's sex, either male or female.
- Pronouns: What pronouns your character goes by. Male, female or plural.
- Age: Sets the age of your character. Depending on the job you want to visit sooner or later, you'll want to set your age appropriately.
- Spawn Point: This will determine where you spawn if you join the round late.
- Languages: How many languages your character knows. By default, you know Ceti Basic, and you have space to add two more languages. However, it is not mandatory to select additional languages.
- Body: This button will randomize your character's body, age, and sex.
- Species: Clicking this will bring up a list of species you can play as. You can only play as a human until you've signed up for a race whitelist, so this is safe to ignore for now.
- Blood Type: Determines what blood type you'll have, but you don't have to keep track of what it is.
- Skin Tone: Adjusts the tone of your character in a range from 1 to 220, with 1 being pale and 220 being dark.
- Disabilities: This option allows you to choose disabilities that will be inflicted on your character, which can have mechanical changes in gameplay and limit job options. As a beginner, it may be best to leave this alone for now.
- Limbs: Brings up a list of your body parts, and whether or not you want the limb in question to be missing or replaced with a prosthesis. You may want to leave amputation alone, prosthetics function a little differently than organic limbs when damaged.
- Internal Organs: Lets you replace organs with augmented/synthetic variants. Functionally identical to their organic counterparts until damaged.
- Prosthesis/Amputations: Shows a list of everything that's been amputated/replaced, if you explored the two options above, as well as a button to reset your limbs/organs to default.
- Hair: Allows you to select a hair style and color for your character.
- Facial: Choose a facial hair style and color. Note that this option is only available to male characters.
- Gradient: This option allows you to choose a color gradient and style for your character's hair.
- Eyes: Lets you pick your eye color.
- Body Color Presets: Brings up three options of body color presets for you to choose.
- Body Markings: Option that brings up a list of decals to place on the body, like augmentations and tattoos.
- Equipment: Here you will set some of the clothing and devices for your character.
- Underwear: What sort of garments your character has under their clothing.
- Socks: Socks. They go on your feet.
- Undershirt: A shirt that goes under the uniform.
- Backpack Type: Determines the sprite of the backpack you'll be wearing. Note that duffel bags can hold more, but inflict a speed penalty.
- Backpack Style: Determines whether the sprite of your backpack will reflect your department's colors and style (if you're in one), or if it should just be a plain grey.
- Backpack Strap: How the backpack strap will show on your character's sprite.
- PDA Type: What type of PDA your character uses. It has many useful features, so do not choose "Nothing".
- Headset Type: Select what type of radio used by your character. A headset is essential, so again, do not choose "Nothing".
- Primary Radio Slot: Which ear the radio will be set to.
- Records: Character records, documents used by other's in the ship to bring information about you. You don't need to touch these options until you're more familiar with the server's setting, but templates and a really useful Record Generator may be found here.
- Flavor: No, not how you taste. Flavor text is essentially your character's visual description.
- Set Flavor Text: When you click on this, you will see a prompt with several sections, but for now, focus on the General section. Write a brief description of your character's characteristics, such as height, build, complexion, and hair style. This field is only for things that can be noticed at a glance, not your character's whole backstory.
- Set Robot Flavor Text: This is the same as the above, but pertains to when you play a cyborg, if you play a cyborg. Which is not recommended if you're playing for the first time.
- Signature: A prompt that you can edit and stylize the way you want. If you changed your character's name, you will want to hit Reset first. This is mostly used for paperwork.
Origin
This tab provides some options regarding your character's background life. If you need further guidance on this, take a look at this guide.
- Culture: Choose the culture that your character belongs to. This changes what options will be available for Origin.
- Origin: Where your character are from. Changes the options for Citizenship and Accent.
- Economic Status: This setting determines your character's financial status, whether they are wealthy, impoverished, or somewhere in between. It affects how much will be available in the character's bank account.
- Citizenship: This option determines your character's official current citizenship.
- Religion: Here you can choose your character's religious beliefs.
- Accent: This menu item determines the type of accent your character has.
Occupation
The Job Selection screen is a crucial part of character creation that displays a list of available roles. Some of these roles are marked as [WHITELISTED] or [NEVER], which is perfectly normal. The whitelisted positions are typically reserved for the head-of-staff roles, which you don't need to worry about at the moment.
- Character Faction: This option determines what faction your character's works for. For a quick overview of the Megacorporations, you can refer to this section.
For your first round, you should toggle the Assistant role to [YES]. Assistants have no specific responsibilities, so you are free to explore the game as you wish. Feel free to ask others for help or directions, but keep in mind that you are in the lowest position in the Chain of Command, so listen to your superiors. Once you feel comfortable with the game mechanics, you may want to try out other roles.
Roles
This section is for special role candidacy, typically reserved for antagonists. It allows you to play as an antagonist if the game mode permits. However, it is recommended to set all options to "No" for now and avoid playing as an antagonist until you become more familiar with the game's mechanics.
Loadout
This section is primarily focused on the items that will be available to your character upon spawning, assuming you have selected any. You have a total of 15 loadout points, and each item is assigned a specific point value. It's important to keep in mind that some items may be restricted to certain jobs.
Other
This is for when you have incident reports logged against your character from other characters. It's more for character complaints than player complaints, but you probably don't need to worry about this.
Global
This section entails settings that are independent of character slots, and will be persistent throughout your experience.
- UI Style: Lets you pick from a few different styles of UI. Midnight should work just fine.
- Custom UI: If you want to use a custom color.
- Tooltip Style: Sets the tooltip style. You can leave
- HTML UI Style: Chooses the HTML interface. The default is fine.
- FPS: Set max FPS.
- Play admin midis: If enabled, this will allow you to hear music or other sounds uploaded by admins mid-round. They're typically not MIDIs anymore, though.
- Play lobby music: Safe to ignore, just provides some
loud and obnoxious music in the lobby that will probably get stale really quick.
- Ghost ears/sight/radio: Will determine the range at which you hear/see actions if you're observing the round as a ghost. Setting the first two options to Nearest Creatures will probably spare you a lot of text from filling your log.
- Observer LOOC: Toggles wether Local OOC typed in by observers will show up to you.
- Space Parallax: Determines if the space background moves or doesn't move when you move. Purely aesthetic.
- Space Dust: Extra particle effects out in space. Again, aesthetic.
- Progress Bars: Shows a bar over your character when you conduct a task that requires time to complete. You should probably leave this on.
- Floating Messages: This option enables sent messages to float above the character that said them. By default, it is set to "Yes" and can be left that way.
- Hotkey Mode Default: This option toggles between control modes. The Hotkey Mode is a highly useful feature, so make sure to leave it "On".
- Language Keys: Prefix characters to put in front of what you say to determine the language that you speak. These can be left alone.
Your First Round
Once you've got everything set and ready, go ahead and hit Save slot (you should have been clicking it often, anyway).
Close the Character Setup window, if the game is already going on, you can click Join Game! to bring up a list of jobs to join as. You'll want to click assistant. If, however, you're present before a round starts, and you can't find the Join Game! button, then click Ready instead, and you'll be spawned in automatically in the Tool Storage once the round starts.
Depending on when you join and what the round type is, the ship around you can either look calm and quiet or completely unpowered with scorch marks lining the walls and screams echoing throughout the corridors. If you joined during the former situation then you're in luck because you'll be able to learn how to familiarize yourself with many mechanics without worry. No matter which spawn point you chose you'll always end up on the Lower Deck of the ship.
The Interface
SS13 is rather sensitive with what you click on, and since you can only click on something one way, that means there's probably only one way to interact with it. This isn't the case here, as aside from using modifiers like holding Control or Shift there are a few interface objects to toggle how you interact with items or even other people.
Inventory
The middle and left side of your screen is your inventory and item slots. From top to bottom, left to right, they are:
- Main Inventory - Accessed by pressing the toggle button in the bottom left corner
- Helmet, right ear
- Glasses, mask, left ear
- Uniform, outer clothing, gloves
- Expand/collapse inventory, shoes, outer clothing storage
- Easy Access Inventory - Always visible
- ID
- Belt
- Backpack
- Right and left hand
- Pockets
Object Interaction
The bottom right side of the screen will contain a number of buttons that will change how you interact with objects or people around you. These are:
 Movement Intent
 Intents
- Help - You won't do harm by clicking on someone empty handed. Will also prevent you from firing ranged weapons by default.
- Disarm - You will knock items out of hands and potentially knock people to the ground.
- Grab - You will grab someone.
- Harm - You will punch someone if you click them.
 Targetting Window - Useful for precision stuff, mainly used for combat and surgery.
 Resist - You will resist out of physical incapacitation. Will also make you drop to the floor to put yourself out, should you be on fire.
 Drop - Will drop the item in your active hand.
 Throw - Will toggle throwing. Clicking somewhere with an item in your hand will throw it in that direction. If an item is thrown at you and you have an empty hand, you will catch the item.
 Toggle Gun Mode - Will determine if you shoot at who you click or if you will aim at them instead, which will bring up a few more options.
Status
Most of these icons are hidden, but if they were all active on the screen, then they would be:
 Ceiling - Informs you if there's a ceiling above you.
 Toxin - You're currently breathing in a toxic substance.
 Fire - You're currently on fire.
 Ice - You're currently freezing.
 Oxy Warn - You're not breathing enough oxygen.
 Pressure Warn - You are in a low/high pressure environment without protection.
 Internals Toggle - Will toggle your internal atmosphere on or off. You must be wearing a suitable mask and have a tank of air/oxygen in your immediate inventory.
 Health Doll - Will give you a rough estimate of how you're doing. This isn't 100% accurate, as pain will influence what this indicator looks like.
 Temperature Warn - Will inform you if you're too hot or too cold.
 Nutrition - Will pop up if you are hungry, or if you've eaten too much.
Exploring
So now you're actually playing the game, congrats! If you've read the Guide to Controls, then you should already have a rough idea of how to move your character around. If you joined mid-round, you will appear in the Residential Deck Lifts, on the Lower Dec. But if you join with the start of the round, you will appear in the Tool Storage, which is located in the Main Deck. You can check the Server Map for an overview of the SCCV Horizon.
The ship is divided into three main sections: the Lower Deck, the Main Deck, and the Upper Deck. The Lower Deck generally includes hangars and some utility departments, such as Custodial and Operations. The Main Deck, as the name suggests, houses almost all of the main departments, including Security, Engineering, Medical, and Research. The Upper Deck is mainly for Command and entertainment areas. While exploring the ship, you will come across these departments, but you won't be able to enter most of them as an Assistant due to clearance restrictions. Nonetheless, take the opportunity to familiarize yourself with the layout of the ship.
Keep in mind that a round typically lasts around two hours. If you need to leave before then, you can return to the Residential Deck Lifts in the Lower Deck and use either the Living Quarters Lift or the Cryogenic Freezer to exit the round.
After your first round, you may want to move on to an actual job. Some beginner-friendly occupations include:
- Janitor: Walk around the Horizon to learn its layout while performing custodial tasks.
- Hangar Technician: Do deliveries and sort the warehouse to get familiar with handling items in the game.
- Engineering Apprentice: Gain hands-on experience in Engineering, but make sure there are other Engineers available to help you.
- Medical Intern: The learner role of the medical department.
- Lab Assistant: Learn how to be a scientist after some work experience.
Additionally, interacting with other players can make the game more enjoyable and engaging. Try to stay in character and be creative with your interactions, but also be respectful of other players and their characters. Remember that everyone is here to have fun, so don't take things too seriously or get upset if something doesn't go as planned. Don't hesitate to ask for help if you're unsure about something. You can do so in-character (IC) or out of character (OOC). Most players are happy to assist newcomers, whether it's with small tasks or getting familiar with a particular department.
Good luck!
Template:Gameplay Guides


