|
|
| (5 intermediate revisions by the same user not shown) |
| Line 1: |
Line 1: |
| ==Nutrition== | | == Overview: The Tesla Engine == |
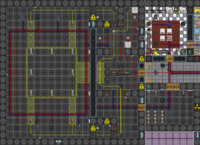
| | [[File:Tesla_1.png|thumb|left|200px|alt=|Be sure to click enlarge for a closer look.]] |
| | (Please note that this guide assumes you have a basic knowledge of the station layout, but limited knowledge of the engineering department layout specifically, and as such, will assume you can do things like “go to the surface level” without being told exactly what steps to take. If you need more help, please ask for help in-character.) |
|
| |
|
| As you walk, run, and spend time on the station, your character's nutrition level will drop. Eating food that contains nutriment, protein, or certain other reagents (see below) will replenish this value. It isn't good to go without food for too long, or to overeat! Keep in mind how much you've eaten and how long it has been since you last ate, and try to stay comfortably full.
| | So, the Tesla engine. What is it? Chances are, you’ve never even heard of it before, because it’s tucked away on the Engineering sub-level, and it’s rather out of the way. Or if you have heard of it, you’ve probably heard that it’s an infernal death machine; something that only insane people or the ignorant attempt to utilize. What’s important to know is that, when assembled correctly, the Tesla engine can be a helpful asset, and safer than the Supermatter Engine to operate. It’s more than capable of powering the station all by itself, and you don’t have to deal with the threat of radiation, hallucinations, toxic gas, phoron fires, and complete delamination. |
|
| |
|
| Note that nutriment and other reagents need to be metabolized by your body after you've eaten, so if you don't fill up immediately after a meal, you may after a few moments.
| | === What You Need and Where to Find It === |
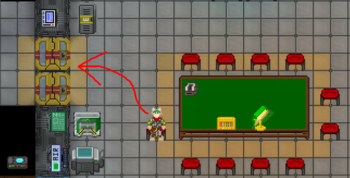
| | When you spawn into the game or arrive later, you begin in the Engineering Foyer. To get properly equipped, you’ll need to head over to the Engineering Storage room, which can be found beyond the two double doors to your left. |
|
| |
|
| | [[File:Tesla_4.png|350px]] |
| | [[File:Tesla_2.png|350px]] |
|
| |
|
| Several reagents will increase your nutrition:
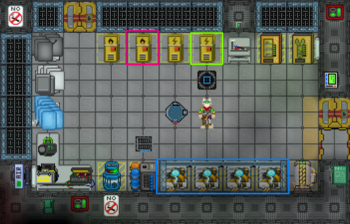
| | Inside this room, you have access to all the safety gear that you might need. The table below will explain further. |
| * Very effective: Corn Oil, Nutriment (found in most foods), Animal Protein (found in meat), and Egg Yolk.
| |
| * Somewhat effective: Ketchup, coco powder, Hot Ramen, Hell Ramen, Sugar.
| |
| * Minor increase: Soy Sauce, Hot Coco, Potato Juice, Bilk, Sprinkles, Dry Ramen, Flour, Rice, Cherry Jelly, Various Bar Drinks. There may be others!
| |
|
| |
|
| | *'''Insulated Gloves''' [[File:InsulatedGloves.png|50px]] |
| | *# For protecting your precious hands from electrical shock. Note: DO NOT use Budget Insulated Gloves. Ever. |
| | *# Can be found in the Electrical Supplies Locker (Green Square) |
| | *'''Welding Mask''' [[File:WeldingHelmet.png|50px]] |
| | *# For protecting your eyes from damage while welding. Note: Goggles also work. |
| | *# Available in the Welding Supplies Locker (Pink Square) |
| | *'''Voidsuit''' [[File:Engineering_VoidsuitFull.png|50px]] |
| | *# When combined with Insulated Gloves, it makes the Tesla’s arcs harmless and not deadly. Note: They will still stun you. |
| | *# Available in the Engineering Voidsuit Storage (Blue Square) |
|
| |
|
| Alien species have special dietary needs:
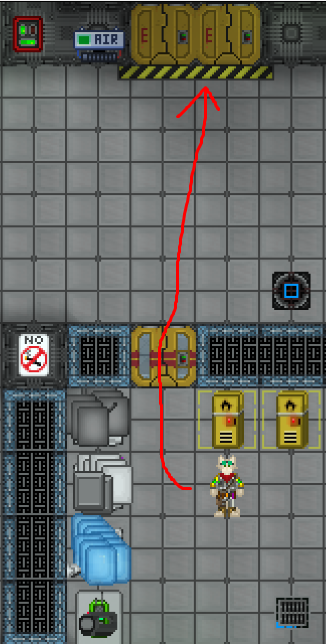
| | Once you’ve gathered these items, make sure to put them on (save for the voidsuit, which isn’t necessary until you actually fire the engine), and then head onto your next location, Hard Storage, which you’ll find northward. |
| * [[Vaurca|Vaurca]] are only nourished by k'ois paste, which is found in the k'ois products on station. These foods also contain phoron, which the species needs to survive. Consuming any other food reagent will poison them.
| |
| * [[Unathi|Unathi]] are only nourished by meat-based foods. While they can eat other foods, they will not provide an Unathi with nourishment. Unathi are also sensitive to foods that lower body temperature.
| |
| * [[Skrell|Skrell]] are not allergic to animal protein, but many exhibit some kind of vegetarianism.
| |
| * [[Tajara|Tajara]] do not have special dietary needs, but are sensitive to foods that raise body temperature.
| |
| * [[IPC|IPCs]] do not eat food. They require power from cyborg recharge stations or station APCs.
| |
|
| |
|
| | [[File:Tesla_3.png|350px]] |
|
| |
|
| ===Fullness/Starvation===
| | [[File:Tesla_5.png|350px]] |
| | [[File:Tesla 6.png|350px]] |
|
| |
|
| [[File:nutrition0.png|50px]][[File:nutrition3.png|50px]][[File:nutrition4.png|50px]]
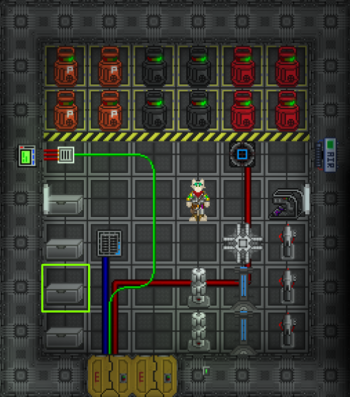
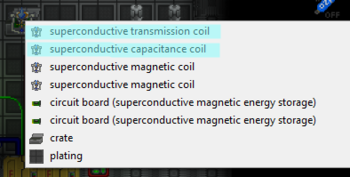
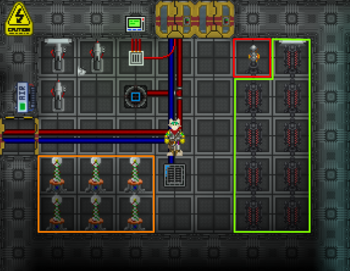
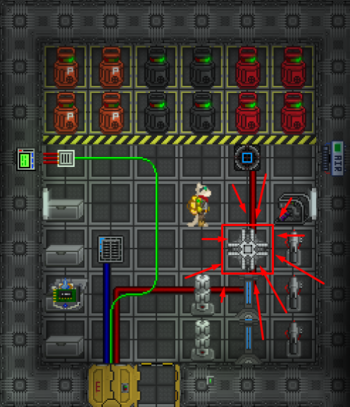
| | Once inside, you’ll want to go for the Green Crate, and you’ll want to take the following two highlighted things, as they’ll be needed to make the engine able to properly power the station. |
|
| |
|
| These icons may appear on your screen when your nutrition level needs attention:
| | ==== The Engine Room: Where do I find it? ==== |
| * A burger with a grey marker means you are too full and will move around more slowly. If your character starts to 'unwillingly' eat food, they are probably getting full and will soon have overeaten.
| | Once you have the items that were mentioned above, you’ll need to head down to the Engineering Sublevel, which can easily be accessed from the elevator. |
| * The yellow marker means your character is getting hungry.
| |
| * If you see the icon of a burger with a red marker on your screen, you will start to move very slowly due to starvation. This effect can be severe and will continue until you eat some food, so head to the [[chef]] for a wholesome snack!
| |
| ** IPCs that run out of nutrition due to a lack of power will be temporarily immobilized.
| |
| ** Vaurca are affected by nutrition like other species, but will also begin to suffocate if they do not replenish their internal phoron supply by consuming k'ois, or finding an external source of phoron.
| |
|
| |
|
| Some things will decrease your nutrition quickly:
| | [[File:Tesla_7.png|350px]] |
| * Sprinting by toggling 'Walk' to 'Run'
| |
| * Vomiting
| |
| * Being cold (by exposure to cold environments or because you were in a cryo tube)
| |
| * Recovering from blood loss
| |
| * Taking Lipozine
| |
| * Some viruses
| |
|
| |
|
| If you eat too much, your description when others examine you will note that you are "chubby." If you are starving, you will be described as "malnourished."
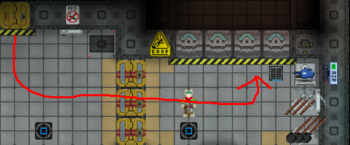
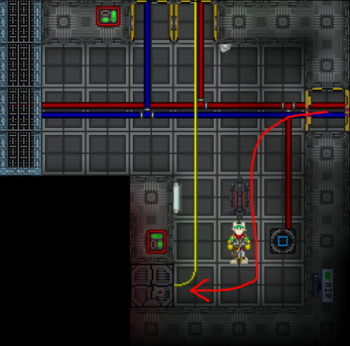
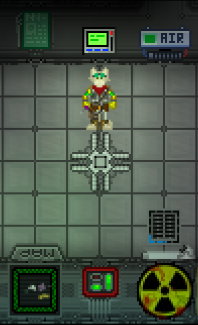
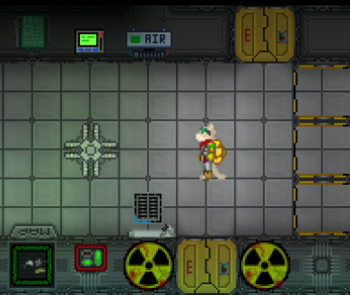
| | Follow that along, and you’ll soon find yourself outside the secondary Engine Room. |
|
| |
|
| ==Drink Recipes==
| | [[File:Tesla_8.png|350px]] |
|
| |
|
| Alcoholic drinks contain ethanol, the type of alcohol that gets humans drunk. Each alcoholic drink has a strength value that determines how quickly it will affect the person drinking it. Depending on how much you drink, you may start slurring your speech, get dizzy, start stumbling around, or even pass out. Drinking slowly will allow your body to metabolize alcohol and prevent some of these effects, but it can take a long time to metabolize high amounts of alcohol.
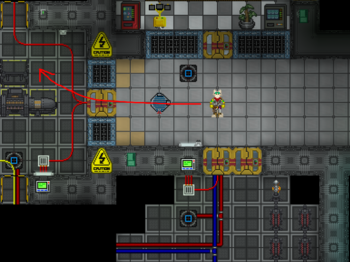
| | You’ll want to head further inside with the Superconductive Coils from earlier. |
|
| |
|
| Some species have special reactions to alcohol:
| | [[File:Tesla_9.png|350px]] |
| * Skrell will always treat any alcohol as extremely strong and can get very drunk, very quickly.
| |
| * Unathi and Vaurca cannot properly metabolize ethanol, and consuming it will inflict them with toxin damage as it is metabolized. There are some Unathi-safe alcoholic drinks that are butanol-based, rather than ethanol-based.
| |
| * Humans will take liver damage from drinking too much. This damage occurs at around the same level of intoxication where the character passes out.
| |
|
| |
|
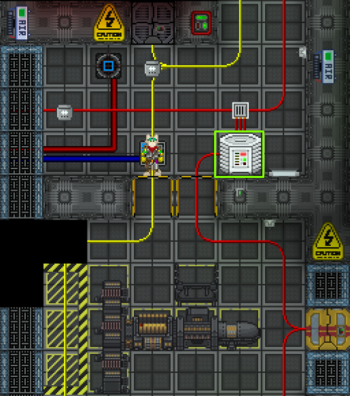
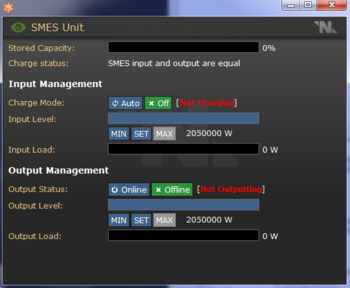
| | You’ll want to bring the Coils to the SMES unit that’s highlighted above, screwdriver its maintenance panels open, insert them both into it, and then screwdriver it closed once again. The coils will greatly increase the amount of power that the SMES unit can store, and output as well. Feel free to alter the settings as you see fit, but my personal settings are always putting both settings on maximum, like shown further below. |
|
| |
|
| <!-- overflow:auto; to fix collapsed display, because the toggle link has float:right; -->
| | [[File:Tesla_10.png|350px]] |
| <div class="toccolours mw-collapsible" style="width:99%; overflow:auto;">
| |
| ===Mixed Drinks===
| |
| While many of these drinks have toxic ingredients, the finished products are not toxic in and of themselves. However, this means that if incorrectly (or maliciously) mixed, you might poison your patrons.
| |
|
| |
|
| Since a drinking glass will hold only 30 units of liquid, it's recommended that bartenders use their drink shakers to mix these drinks before pouring them out into glasses.
| | (Note: A SMES unit can’t output more power than it’s inputting, so it’s always best to set their Input value to MAX. Output can be adjusted as is necessary to increase or decrease the amount of energy in the main power grid.) |
| <div class="mw-collapsible-content">
| |
|
| |
|
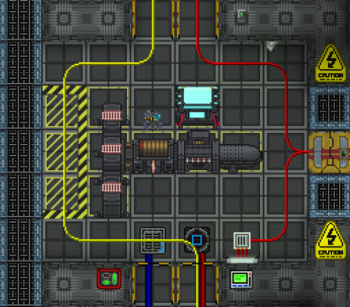
| | ==== Assembling the Particle Accelerator ==== |
| | The Particle Accelerator is a vital piece of equipment for setting up the engine. It can be done first, or last, but it’s ultimately required to jumpstart the engine so that it’ll produce power. It does this by firing accelerated particles at the Tesla Generator; so don’t stand in front of it when it’s active, or you’ll be irradiated! |
|
| |
|
| {| class="sortable" border="1" cellspacing="0" cellpadding="2" align="center"
| | The pieces of the PA all start in the places that they need to be, so wrench them all to secure the pieces in place. Following that, you should use some cable to start adding wires to the components. They should look like this if done properly: |
| ! style='background-color:Chocolate;'|Picture
| |
| ! style='background-color:Chocolate;'|Cocktail
| |
| ! style='background-color:Chocolate;'|Ingredients
| |
| ! style='background-color:Chocolate;'|Strength
| |
| ! style='background-color:Chocolate;'|Notes
| |
| |-
| |
| ![[File:AcidSpit.png|50px]]
| |
| |Acid Spit
| |
| |Mix 1 part sulphuric acid, 5 parts wine.
| |
| |25
| |
| |Get sulphuric acid from the chemist.
| |
| |-
| |
| ![[File:AlliesCocktail.png|50px]]
| |
| |Allies Cocktail
| |
| |Mix 1 part Classic Martini, 1 part vodka.
| |
| |25
| |
| | Classic Martini (2 gin, 1 vermouth)
| |
| |-
| |
| ![[File:Aloe.png|50px]]
| |
| |Aloe
| |
| |Mix 1 part cream, 1 part watermelon juice, 1 part whiskey.
| |
| |15
| |
| | Add the whiskey last, or you'll end up with Irish Cream.
| |
| |-
| |
| ![[File:Amasec.png|50px]]
| |
| |Amasec
| |
| |Mix 1 part iron, 5 parts vodka, 5 parts wine.
| |
| |25
| |
| |Makes 10 parts. Get Iron from the chemist.
| |
| |-
| |
| ![[File:Andalusia.png|50px]]
| |
| |Andalusia
| |
| |Mix 1 part lemon juice, 1 part rum, 1 part whiskey.
| |
| |35
| |
| |Get lemons from the gardener and process them.
| |
| |-
| |
| ![[File:antifreezeglass.png|50px]]
| |
| |Anti-Freeze
| |
| |Mix 1 part cream, 1 part ice, 1 parts vodka.
| |
| |20
| |
| |Raises body temperature.
| |
| |-
| |
| ![[File:aprilshower.gif|50px]]
| |
| |April Shower
| |
| |Mix 1 part brandy, 1 part orange juice, 1 part yellow chartreuse.
| |
| |25
| |
| |
| |
| |-
| |
| ![[File:Atomicbombglass.gif|50px]]
| |
| |Atomic Bomb
| |
| |Mix 10 parts B-52, 1 part uranium.
| |
| |50
| |
| |Gets you drunk immediately, and maybe high.
| |
| |-
| |
| ![[File:B-52.png|50px]]
| |
| |B-52
| |
| |Mix 1 part Irish Cream, 1 part cognac, 1 part kahlua.
| |
| |35
| |
| | Irish Cream (2 Whiskey, 1 Cream)
| |
| |-
| |
| ![[File:badtouch.gif|50px]]
| |
| |Bad Touch
| |
| |Mix 2 parts vodka, 2 parts rum, 1 part absinthe, 1 part lemon-lime.
| |
| |50
| |
| |
| |
| |-
| |
| ![[File:Bahamamamaglass.gif|50px]]
| |
| |Bahama Mama
| |
| |Mix 1 part ice, 2 parts orange juice, 2 parts rum, 1 part lime juice.
| |
| |15
| |
| |Add the lime juice last, or you'll end up with Daiquiri!
| |
| |-
| |
| ![[File:BananaHonk.png|50px]]
| |
| |Banana Mama (Banana Honk)
| |
| |Mix 1 part banana, 1 part cream, 1 part sugar.
| |
| |15
| |
| |Yes, it's an alcoholic drink with no alcoholic ingredients. Get bananas from the gardener.
| |
| |-
| |
| ![[File:Barefoot.png|50px]]
| |
| |Barefoot
| |
| |Mix 1 part berry juice, 1 part cream, 1 part vermouth.
| |
| |15
| |
| |Get berries from the gardener and process them.
| |
| |-
| |
| ![[File:bassline.gif|50px]]
| |
| |Bassline
| |
| |Mix 2 parts vodka, 2 parts grape juice, 1 part curacao, 1 part lime juice.
| |
| |25
| |
| |
| |
| |-
| |
| ![[File:BeepskySmash.gif|50px]]
| |
| |Beepksy Smash
| |
| |Mix 1 part iron, 1 parts lime juice, 1 parts whiskey.
| |
| |35
| |
| |Briefly stuns.
| |
| |-
| |
| ![[File:brownglass.gif|50px]]
| |
| |Bilk
| |
| |Mix 1 part beer, 1 part milk.
| |
| |4
| |
| |Get milk from the kitchen.
| |
| |-
| |
| ![[File:BlackRussian.png|50px]]
| |
| |Black Russian
| |
| |Mix 2 parts vodka, 1 part kahlua.
| |
| |20
| |
| |
| |
| |-
| |
| ![[File:Tallblackrussian.gif|50px]]
| |
| |Black Russian (Tall)
| |
| |Mix 1 part Black Russian, 1 part cola.
| |
| |25
| |
| |
| |
| |-
| |
| ![[File:blindrussian.gif|50px]]
| |
| |Blind Russian
| |
| |Mix 1 part kahlua, 1 part cream, 1 part Irish Cream.
| |
| |40
| |
| |Irish Cream (2 Whiskey, 1 Cream)
| |
| |-
| |
| ![[File:BloodyMary.png|50px]]
| |
| |Bloody Mary
| |
| |Mix 3 parts tomato juice, 2 part vodka, 1 part lime juice.
| |
| |20
| |
| |Get tomato juice from the booze-o-mat vending machine.
| |
| |-
| |
| ![[File:bluebird.gif|50px]]
| |
| |Bluebird
| |
| |Mix 3 parts Gin and Tonic, 1 part curacao.
| |
| |30
| |
| |
| |
| |-
| |
| ![[File:bluelagoon.gif|50px]]
| |
| |Blue Lagoon
| |
| |Mix 3 parts lemonade, 1 part vodka, 1 part curacao, 1 part ice.
| |
| |25
| |
| |
| |
| |-
| |
| ![[File:Boogerglass.gif|50px]]
| |
| |Booger
| |
| |Mix 2 part cream, 1 part banana, 1 part watermelon juice, 1 part rum.
| |
| |20
| |
| |Get bananas from the garden and process them.
| |
| |-
| |
| ![[File:BraveBull.png|50px]]
| |
| |Brave Bull
| |
| |Mix 2 parts tequila, 1 part kahlua.
| |
| |30
| |
| |
| |
| |-
| |
| ![[File:carthusiansazerac.gif|50px]]
| |
| |Carthusian Sazerac
| |
| |Mix 1 part whiskey, 1 part green chartreuse, 1 part grenadine, 1 part absinthe.
| |
| |15
| |
| |
| |
| |-
| |
| ![[File:caruso.gif|50px]]
| |
| |Caruso
| |
| |Mix 2 parts martini, 2 part creme de menthe.
| |
| |25
| |
| |
| |
| |-
| |
| ![[File:cmojito.gif|50px]]
| |
| |Champagne Mojito
| |
| |Mix 1 part mint syrup, 1 part champagne, 1 part rum.
| |
| |15
| |
| |Get champagne from the Booze-o-Mat.
| |
| |-
| |
| ![[File:ChangelingSting.png|50px]]
| |
| |Changeling Sting
| |
| |Mix 1 part Screwdriver, 1 part lemon juice, 1 part lime juice.
| |
| |40
| |
| |Screwdriver (2 Vodka, 1 Orange Juice). Get lemons from the gardener and process them.
| |
| Note: Makes 5 units of cocktail with 3 units of input - more than the sum of its parts!
| |
| |-
| |
| ![[File:cherrytreefireball.gif|50px]]
| |
| |Cherry Tree Fireball
| |
| |Mix 3 parts Lemonade, 1 part Fireball, 1 part cherry jelly, 1 part ice.
| |
| |15
| |
| |Lemonade (1 lemon juice, 1 sugar, 1 water).
| |
| |-
| |
| ![[File:classic.gif|50px]]
| |
| |The Classic
| |
| |Mix 2 parts champagne, 1 part bitters, 1 part lemon juice.
| |
| |20
| |
| |Get champagne and bitters from the Booze-o-Mat.
| |
| |-
| |
| ![[File:ClassicMartini.png|50px]]
| |
| |Classic Martini
| |
| |Mix 2 parts gin, 1 part vermouth.
| |
| |25
| |
| |
| |
| |-
| |
| ![[File:cobaltvelvet.gif|50px]]
| |
| |Cobalt Velvet
| |
| |Mix 3 parts champagne, 2 parts curacao, 1 part cola.
| |
| |25
| |
| |
| |
| |-
| |
| ![[File:corkpopper.gif|50px]]
| |
| |Cork Popper
| |
| |Mix 1 part whiskey, 1 part champagne, 1 part lemon juice.
| |
| |30
| |
| |Get champagne from the Booze-o-Mat.
| |
| |-
| |
| ![[File:CubaLibre.png|50px]]
| |
| |Cuba Libre
| |
| |Mix 2 parts rum, 1 part cola.
| |
| |10
| |
| |
| |
| |-
| |
| ![[File:daiquiri.gif|50px]]
| |
| |Daiquiri
| |
| |Mix 1 part lime juice, 1 part rum.
| |
| |15
| |
| |
| |
| |-
| |
| ![[File:Demonsbloodglass.gif|50px]]
| |
| |Demons Blood
| |
| |Mix 3 part rum, 1 part blood, 1 part Space Mountain Wind, 1 part Dr. Gibb.
| |
| |15
| |
| |Blood can be drawn with a syringe or juiced from blood tomatoes. Don't gross out your patrons.
| |
| |-
| |
| ![[File:DevilsKiss.png|50px]]
| |
| |Devils Kiss
| |
| |Mix 1 part blood, 1 part kahlua, 1 part rum.
| |
| |15
| |
| |Blood can be drawn with a syringe or juiced from blood tomatoes. Don't gross out your patrons.
| |
| |-
| |
| ![[File:deweycocktail.gif|50px]]
| |
| |Dewey Cocktail
| |
| |Mix 1 part gin, 1 part grenadine, 1 part creme de Yvette.
| |
| |25
| |
| |
| |
| |-
| |
| ![[File:drdaniels.gif|50px]]
| |
| |Dr. Daniels
| |
| |Mix 3 parts Diet Dr. Gibb, 1 part whiskey, 1 part honey
| |
| |20
| |
| |Diet Dr. Gibb (1 Dr. Gibb, 1 water).
| |
| |-
| |
| ![[File:ErikaSurprise.png|50px]]
| |
| |Erika Surprise
| |
| |Mix 2 part ale, 1 part whiskey, 1 part banana, 1 part ice, 1 part lime juice.
| |
| |15
| |
| |Get bananas from the gardener and process them.
| |
| |-
| |
| ![[File:europanail.gif|50px]]
| |
| |Europa Nail
| |
| |Mix 2 parts Rusty Nail, 2 parts kahlua, 2 parts cream.
| |
| |30
| |
| |Rusty Nail (1 whiskey, 1 drambuie).
| |
| |-
| |
| ![[File:french75.gif|50px]]
| |
| |French 75
| |
| |Mix 2 parts champagne, 1 part gin, 1 part lemon juice.
| |
| |25
| |
| |Get champagne from the Booze-o-Mat.
| |
| |-
| |
| ![[File:fringeweaver.gif|50px]]
| |
| |Fringe Weaver
| |
| |Mix 2 parts ethanol, 1 part sugar.
| |
| |65
| |
| |
| |
| |-
| |
| ![[File:Gimlet.gif|50px]]
| |
| |Gimlet
| |
| |Mix 1 part gin, 1 part lime juice, 1 part soda water.
| |
| |20
| |
| |
| |
| |-
| |
| ![[File:GinTonic.png|50px]]
| |
| |Gin and Tonic
| |
| |Mix 2 parts gin, 1 part tonic.
| |
| |12
| |
| |
| |
| |-
| |
| ![[file:GinFizz.png|50px]]
| |
| |Gin Fizz
| |
| |Mix 1 parts gin, 1 part soda water, 1 part lime juice.
| |
| |20
| |
| |
| |
| |-
| |
| ![[File:Goldschlagerglass.gif|50px]]
| |
| |Goldschlager
| |
| |Mix 10 parts vodka, 1 part gold.
| |
| |50
| |
| |Grind up gold from Mining. This drink can also be ordered in a party crate from Cargo.
| |
| |-
| |
| ![[File:Grog.png|50px]]
| |
| |Grog
| |
| |Mix 1 part rum, 1 part water.
| |
| |10
| |
| |
| |
| |-
| |
| ![[File:HippiesDelight.png|50px]]
| |
| |Hippies Delight
| |
| |Mix 1 part psilocybin, 1 part Pan-Galactic Gargle Blaster.
| |
| |15
| |
| |Gets you high. Psilocybin comes from several types of mushroom that grow in the garden.
| |
| |-
| |
| ![[File:brownglass.gif|50px]]
| |
| |Hooch
| |
| |Mix 2 parts ethanol, 1 part welding fuel, 1 part sugar.
| |
| |65
| |
| |Causes alcohol poisoning faster than other drinks. Ethanol from the chemistry dispensers or made in the kitchen. Get welding fuel from fuel tanks.
| |
| |-
| |
| ![[File:icepick.gif|50px]]
| |
| |Ice Pick
| |
| |Mix 1 part iced tea, 1 part vodka.
| |
| |10
| |
| |
| |
| |-
| |
| ![[File:IcedBeer.png|50px]]
| |
| |Iced Beer
| |
| |Mix 5 parts beer, 1 part ice OR 10 parts beer, 1 part frost oil.
| |
| |5
| |
| |Lowers body temperature.
| |
| |-
| |
| ![[File:Irish Car Bomb.png|50px]]
| |
| |Irish Car Bomb
| |
| |Mix 1 part ale, 1 part Irish Cream.
| |
| |50
| |
| |Irish Cream (2 Whiskey, 1 Cream)
| |
| |-
| |
| ![[File:IrishCream.png|50px]]
| |
| |Irish Cream
| |
| |Mix 2 parts whiskey, 1 part cream.
| |
| |25
| |
| |-
| |
| ![[File:ManlyDorf.png|50px]]
| |
| |Cinnamon Apple Whiskey
| |
| |Mix 3 parts hot cider, 1 part fireball whiskey.
| |
| |20
| |
| |-
| |
| ![[File:johncollins.gif|50px]]
| |
| |John Collins
| |
| |Mix 2 parts Whiskey Soda, 1 part lemon juice, 1 part grenadine, 1 part ice.
| |
| |25
| |
| |Whiskey Soda (2 parts whiskey, 1 part soda water)
| |
| |-
| |
| ![[File:junglejuice.gif|50px]]
| |
| |Jungle Juice
| |
| |Mix 1 part lemon juice, 1 part orange juice, 1 part lemon-lime, 1 part vodka, 1 part rum.
| |
| |35
| |
| |
| |
| |-
| |
| ![[File:LongIslandIcedTea.png|50px]]
| |
| |Long Island Iced Tea
| |
| |Mix 3 part Cuba Libre, 1 part vodka, 1 part gin, 1 part tequila.
| |
| |40
| |
| |Cuba Libre (1 cola, 2 rum)
| |
| |-
| |
| ![[File:Manhattan.png|50px]]
| |
| |Manhattan
| |
| |Mix 2 parts whiskey, 1 part vermouth.
| |
| |30
| |
| |
| |
| |-
| |
| ![[File:Manhattanprojglass.gif|50px]]
| |
| |Manhattan Project
| |
| |Mix 10 parts Manhattan, 1 part uranium.
| |
| |30
| |
| |Manhattan (2 whiskey, 1 vermouth). Gets you high.
| |
| |-
| |
| ![[File:Margarita.png|50px]]
| |
| |Margarita
| |
| |Mix 2 parts tequila, 1 part lime juice.
| |
| |30
| |
| |
| |
| |-
| |
| ![[File:Marsarita.gif|50px]]
| |
| |Marsarita
| |
| |Mix 4 parts Margarita, 1 part curacao, 1 part hot sauce.
| |
| |30
| |
| |Margarita (2 parts tequila, 1 part lime juice)
| |
| |-
| |
| ![[File:midnightkiss.gif|50px]]
| |
| |Midnight Kiss
| |
| |Mix 3 parts champagne, 1 part vodka, 1 part curacao.
| |
| |25
| |
| |
| |
| |-
| |
| ![[File:metropolitan.gif|50px]]
| |
| |Metropolitan
| |
| |Mix 1 part brandy, 1 part vermouth, 1 part grenadine.
| |
| |27
| |
| |
| |
| |-
| |
| ![[File:mintjulep.gif|50px]]
| |
| |Mint Julep
| |
| |Mix 1 parts water, 1 part whiskey, 1 part ice.
| |
| |25
| |
| |Really not just watery whiskey, we promise.
| |
| |-
| |
| ![[File:muscmule.gif|50px]]
| |
| |Muscovite Mule
| |
| |Mix 1 parts vodka, 1 part lime juice, 1 part mint syrup.
| |
| |40
| |
| |Get mint syrup from the Booze-o-Mat.
| |
| |-
| |
| ![[File:Neurotoxin.png|50px]]
| |
| |Neurotoxin
| |
| |Mix 1 part gargle blaster, 1 part soporific.
| |
| |50
| |
| |Weakens you, causing you to fall over for a while. Soporific is available from Medical.
| |
| |-
| |
| ![[File:oldfashioned.gif|50px]]
| |
| |Old Fashioned
| |
| |Mix 3 parts Whiskey Soda, 1 part bitters, 1 part sugar.
| |
| |30
| |
| |Whiskey Soda (2 whiskey, 1 soda water).
| |
| |-
| |
| ![[File:olympusmons.gif|50px]]
| |
| |Olympus Mons
| |
| |Mix 1 part Black Russian, 1 part whiskey, 1 part rum.
| |
| |30
| |
| |Black Russian (2 vodka, 1 kahlua).
| |
| |-
| |
| ![[File:omimosa.gif|50px]]
| |
| |Orange Mimosa
| |
| |Mix 1 part orange juice, 1 part champagne.
| |
| |15
| |
| |
| |
| |-
| |
| ![[File:GargleBlaster.gif|50px]]
| |
| |Pan-Galactic Gargle Blaster
| |
| |Mix 2 parts vodka, 1 part gin, 1 part whiskey, 1 part cognac, 1 part lime juice.
| |
| |50
| |
| |
| |
| |-
| |
| ![[File:Patronglass.gif|50px]]
| |
| |Patron
| |
| |Mix 10 parts tequila, 1 part silver.
| |
| |20
| |
| |Can be found in party crates ordered from Cargo. Grind up silver from Mining.
| |
| |-
| |
| ![[File:pinkgintonic.gif|50px]]
| |
| |Pink Gin
| |
| |Mix 2 parts gin, 1 part bitters.
| |
| |25
| |
| |Get bitters from the Booze-o-Mat.
| |
| |-
| |
| ![[File:pinkgintonic.gif|50px]]
| |
| |Pink Gin and Tonic
| |
| |Mix 2 parts pink gin, 1 part tonic.
| |
| |25
| |
| |
| |
| |-
| |
| ![[File:piratepunch.gif|50px]]
| |
| |Pirate's Punch
| |
| |Mix 1 part rum, 1 part lemon juice, 1 part mint syrup, 1 part grenadine, 1 part bitters.
| |
| |25
| |
| |Get grenadine, mint syrup and bitters from the Booze-o-Mat.
| |
| |-
| |
| ![[File:planterpunch.gif|50px]]
| |
| |Planter's Punch
| |
| |Mix 2 parts rum, 1 part orange juice, 1 part grenadine.
| |
| |25
| |
| |Get grenadine from the Booze-o-Mat.
| |
| |-
| |
| ![[File:pousseecafe.gif|50px]]
| |
| |Pousse-Cafe
| |
| |Mix 1 part brandy, 1 part green chartreuse, 1 part yellow chartreuse, 1 part creme de menthe, 1 part grenadine.
| |
| |15
| |
| |
| |
| |-
| |
| ![[File:RedMead.png|50px]]
| |
| |Red Mead
| |
| |Mix 1 part blood, 1 part mead.
| |
| |21
| |
| |Blood can be drawn with a syringe or juiced from blood tomatoes. Don't gross out your patrons.
| |
| |-
| |
| ![[File:rustynail.gif|50px]]
| |
| |Rusty Nail
| |
| |Mix 1 part whiskey, 1 part drambuie.
| |
| |25
| |
| |
| |
| |-
| |
| ![[File:Messa_mead_bottle.png|50px]]
| |
| |Messas Mead
| |
| |Mix 1 part honey, 1 part earthenroot juice.
| |
| |25
| |
| |A sweet alcoholic adhomian drink. Produced with Messa's tears and earthen-root.
| |
| |-
| |
| ![[File:Winter_offensive.png|50px]]
| |
| |Winter Offensive
| |
| |Mix 1 part ice, 1 part victory gin.
| |
| |15
| |
| |An alcoholic tajaran cocktail, named after a less than successful military campaign.
| |
| |-
| |
| ![[File:rustynail.gif|50px]]
| |
| |Rusty Nail
| |
| |Mix 1 part whiskey, 1 part drambuie.
| |
| |25
| |
| |
| |
| |-
| |
| ![[File:sangria.gif|50px]]
| |
| |Sangria
| |
| |Mix 3 parts wine, 1 part orange juice, 1 part lemon juice, 1 part brandy.
| |
| |30
| |
| |
| |
| |-
| |
| ![[File:Sbiten.png|50px]]
| |
| |Sbiten
| |
| |Mix 1 part capsaicin, 10 parts mead.
| |
| |40
| |
| |Raises body temperature. Capsaicin is processed from chili peppers from the garden.
| |
| |-
| |
| ![[File:Screwdriver.png|50px]]
| |
| |Screwdriver
| |
| |Mix 2 parts vodka, 1 part orange juice.
| |
| |15
| |
| |
| |
| |-
| |
| ![[File:singuloglass.gif|50px]]
| |
| |Singulo
| |
| |Mix 5 part vodka, 1 part radium, 5 parts wine.
| |
| |50
| |
| |Get Radium from Chemistry.
| |
| |-
| |
| ![[File:cbsc.png|50px]]
| |
| |Complex Bluespace Calculation
| |
| |Mix 4 part wine, 3 part soda water, 2 part vodka, 1 part radium
| |
| |25
| |
| |Get Radium from Chemistry. Overconsumption causes jittering. A word of warning: Improperly mixing your Complex Bluespace Calculation can result in a Singulo!
| |
| |-
| |
| ![[File:SnowWhite.png|50px]]
| |
| |Snow White
| |
| |Mix 1 part beer, 1 part lemon lime.
| |
| |7
| |
| |
| |
| |-
| |
| ![[File:ssroyale.gif|50px]]
| |
| |Southside Royale
| |
| |Mix 1 part mint syrup, 1 part gin, 1 part lime juice, 1 part champagne.
| |
| |20
| |
| |Get champagne from the Booze-o-Mat.
| |
| |-
| |
| ![[File:starsandstripes.gif|50px]]
| |
| |Stars and Stripes
| |
| |Mix 1 part cream, 1 part grenadine, 1 part creme de Yvette.
| |
| |10
| |
| |
| |
| |-
| |
| ![[File:sugarrush.gif|50px]]
| |
| |Sugar Rush
| |
| |Mix 4 parts Star-Kist (Brown Star), 1 part grenadine, 1 part vodka.
| |
| |15
| |
| |
| |
| |-
| |
| ![[File:suidream.png|50px]]
| |
| |Sui Dream
| |
| |Mix 1 parts Space-Up, 1 parts blue curacao, 1 part melon liquor.
| |
| |5
| |
| |Curacao and melon liquor are in the booze-o-mat vending machine.
| |
| |-
| |
| ![[File:SyndicateBomb.png|50px]]
| |
| |Syndicate Bomb
| |
| |Mix 1 part whiskey cola, 1 part beer.
| |
| |65
| |
| |Whiskey Cola (2 Whiskey, 1 Cola)
| |
| |-
| |
| ![[File:TequillaSunrise.png|50px]]
| |
| |Tequila Sunrise
| |
| |Mix 2 parts tequila, 1 part orange juice.
| |
| |15
| |
| |
| |
| |-
| |
| ![[File:ManlyDorf.png|50px]]
| |
| |The Manly Dorf
| |
| |Mix 1 part beer, 2 parts ale.
| |
| |45
| |
| |
| |
| |-
| |
| ![[File:threemileislandglass.gif|50px]]
| |
| |Three Mile Island Iced Tea
| |
| |Mix 10 parts Long Island Iced Tea, 1 part uranium.
| |
| |60
| |
| |Also gets you high. Grind up uranium from Mining.
| |
| |-
| |
| ![[File:ToxinsSpecial.gif|50px]]
| |
| |Toxins Special
| |
| |Mix 2 parts phoron, 2 parts rum, 2 part vermouth.
| |
| |40
| |
| |Raises body temperature. Grind up phoron from Mining or process k'ois spores, but be careful not to spill it!
| |
| |-
| |
| ![[file:VodkaTonic.png|50px]]
| |
| |Vodka and Tonic
| |
| |Mix 2 parts vodka, 1 part tonic.
| |
| |35
| |
| |
| |
| |-
| |
| ![[File:ClassicMartini.png|50px]]
| |
| |Vodka Martini
| |
| |Mix 2 parts vodka, 1 part vermouth.
| |
| |32
| |
| |Necessarily shaken, not stirred.
| |
| |-
| |
| ![[File:WhiskeyCola.png|50px]]
| |
| |Whiskey Cola
| |
| |Mix 2 parts whiskey, 1 part cola.
| |
| |15
| |
| |
| |
| |-
| |
| ![[File:WhiskeySoda.png|50px]]
| |
| |Whiskey Soda
| |
| |Mix 2 parts whiskey, 1 part soda water.
| |
| |15
| |
| |
| |
| |-
| |
| ![[File:WhiteRussian.png|50px]]
| |
| |White Russian
| |
| |Mix 2 parts Black Russian, 1 parts cream.
| |
| |30
| |
| |Black Russian (2 Vodka, 1 Kaluha)
| |
| |-
| |
| |[[File:DriestMartiniglass.png|50px]]
| |
| |Driest Martini
| |
| |Mix 1 unit gin, 1 unit nothing
| |
| |20
| |
| |
| |
| |-
| |
| |[[File:Silencerglass.png|50px]]
| |
| |Silencer
| |
| |Mix 1 part cream, 1 part sugar, 1 part nothing
| |
| |50
| |
| |
| |
| |-
| |
| ![[File:Thirdincident.png|50px]]
| |
| |Third Incident
| |
| |Mix 10 part curacao, 10 part grape juice, 3u of egg yolk
| |
| |10
| |
| |
| |
| |}
| |
| </div></div>
| |
|
| |
|
| | [[File:Tesla_11.png|350px]] |
|
| |
|
| <!-- overflow:auto; to fix collapsed display, because the toggle link has float:right; -->
| | Once wired, you should then close their panels by using a screwdriver, at which point the assembly should look like this; |
| <div class="toccolours mw-collapsible" style="width:99%; overflow:auto;">
| |
|
| |
|
| ===Poured Drinks===
| | [[File:Tesla_26.png|350px]] |
| To create some of these drinks, you can mix ground produce with the universal enzyme found in the kitchen. Note that the enzyme is a catalyst, which means it doesn't get used up in the reaction - separate it from your end product unless you want your patrons drinking it!
| |
|
| |
|
| <div class="mw-collapsible-content">
| | ==== Assembling the Engine ==== |
| | To start properly assembling the Engine, you’ll need to grab the components from inside the storage room. |
|
| |
|
| {| class="sortable" border="1" cellspacing="0" cellpadding="2" align="center"
| | [[File:Tesla_13.png|350px]] |
| ! style='background-color:Chocolate;'|Picture
| |
| ! style='background-color:Chocolate;'|Drink
| |
| ! style='background-color:Chocolate;'|Strength
| |
| ! style='background-color:Chocolate;'|Notes
| |
| |-
| |
| ![[File:Absinthe.png|50px]]
| |
| |Absinthe
| |
| |75
| |
| |Bottles are labeled "Jailbreaker Verte." Causes alcohol effects faster than most drinks.
| |
| |-
| |
| ![[File:Aleglass.png|50px]]
| |
| |Ale
| |
| |6
| |
| |Bottles are labeled "Magm-Ale."
| |
| |-
| |
| ![[File:beerglass.png|50px]]
| |
| |Beer
| |
| |5
| |
| |Also available in the bar's back room or from the beer keg. Mix 10 parts corn oil and 5 parts universal enzyme (catalyst). Reduces jittering by 3 points per unit.
| |
| |-
| |
| ![[File:boukhaglass.gif|50px]]
| |
| |Boukha
| |
| |40
| |
| |Bottles are labeled "Boukha Boboksa Classic."
| |
| |-
| |
| ![[File:champagneglass.gif|50px]]
| |
| |Champagne
| |
| |15
| |
| |Bottles are labeled "Tailfeather's Bubbliest champagne."
| |
| |-
| |
| ![[File:curaco.png|50px]]
| |
| |Blue Curacao
| |
| |25
| |
| |Bottles are labeled "Miss Blue Curacao." Mix 10 parts orange juice and 5 parts universal enzyme (catalyst).
| |
| |-
| |
| ![[File:cognac.png|50px]]
| |
| |Cognac
| |
| |40
| |
| |Bottles are labeled "Chateau De Baton Premium Cognac."
| |
| |-
| |
| ![[File:glass_clear.png|50px]]
| |
| |Ethanol
| |
| |75
| |
| |Comes from chemical dispenser.
| |
| |-
| |
| ![[File:fireballglass.gif|50px]]
| |
| |Fireball
| |
| |35
| |
| |Bottles are labeled "Uncle Git's Cinnamon Fireball."
| |
| |-
| |
| ![[File:ginglass.png|50px]]
| |
| |Gin
| |
| |20
| |
| |Bottles are labeled "Griffeater Gin."
| |
| |-
| |
| ![[File:meadglass.png|50px]]
| |
| |Mead
| |
| |25
| |
| |Mix 1 part sugar, 1 part water, and 5 parts universal enzyme (catalyst).
| |
| |-
| |
| ![[File:melonliquorglass.png|50px]]
| |
| |Melon Liquor
| |
| |23
| |
| |Bottles are labeled "Emeraldine Melon Liquor." Mix 10 parts watermelon juice, and 5 parts universal enzyme (catalyst).
| |
| |-
| |
| ![[File:glass_clear.png|50px]]
| |
| |Moonshine
| |
| |65
| |
| | Mix 10 parts nutriment and 5 parts universal enzyme (catalyst).
| |
| |-
| |
| ![[File:pwineglass.png|50px]]
| |
| |Poison Wine
| |
| |15
| |
| |Made from poison berries. Mix 10 parts poison berry juice and 5 parts universal enzyme (catalyst). As the name implies, this wine is not safe and will poison people who drink it.
| |
| |-
| |
| ![[File:rumglass.png|50px]]
| |
| |Rum
| |
| |40
| |
| |Bottles are labeled "Captain Pete's Cuban Spiced Rum." Dispenser labels it "Deadrum." Causes dizziness.
| |
| |-
| |
| ![[File:sakeglass.png|50px]]
| |
| |Sake
| |
| |20
| |
| |Mix 10 units of rice and 5 universal enzyme (catalyst).
| |
| |-
| |
| ![[File:tequilaglass.png|50px]]
| |
| |Tequila
| |
| |40
| |
| |Bottles are labeled "Caccavo Guaranteed Quality Tequilla."
| |
| |-
| |
| ![[File:thirteenloko.png|50px]]
| |
| |Thirteen Loko
| |
| |10
| |
| |Comes from [[Hacking#Vending Machines|hacked soda vending machines]].Reduces drowsiness, lowers body temperature to normal, and causes jittering.
| |
| |-
| |
| ![[File:vermouthglass.png|50px]]
| |
| |Vermouth
| |
| |17
| |
| |Bottles are labeled "Goldeneye Vermouth."
| |
| |-
| |
| ![[File:vodkaglass.png|50px]]
| |
| |Vodka
| |
| |50
| |
| |Bottles are labeled "Tunguska Triple Distilled." Mix 10 parts potato juice and 5 parts universal enzyme (catalyst). Cures 1 point of radiation per unit.
| |
| |-
| |
| ![[File:whiskeyglass.png|50px]]
| |
| |Whiskey
| |
| |40
| |
| |Bottles are labeled "Uncle Git's Special Reserve."
| |
| |-
| |
| ![[File:wineglass.gif|50px]]
| |
| |Wine
| |
| |15
| |
| |Bottles are labeled "Doublebeard Bearded Special Wine." Mix 10 parts grape juice and 5 parts universal enzyme (catalyst).
| |
| |-
| |
| ![[File:bittersglass.png|50px]]
| |
| |Bitters
| |
| |40
| |
| |Get from the Booze-O-Mat. Called "Angstra Aromatic Bitters"
| |
| |-
| |
| ![[File:victoryginglass.png|50px]]
| |
| |Victory Gin
| |
| |18
| |
| |Get from the Booze-O-Mat
| |
| |-
| |
| ![[File:whiskeyglass.png|50px]]
| |
| |Special Whiskey
| |
| |45
| |
| |
| |
| |-
| |
| ![[File:greenchartreuseglass.png|50px]]
| |
| |Green Chartreuse
| |
| |40
| |
| |Get from the Booze-O-Mat
| |
| |-
| |
| ![[File:yellowchartreuseglass.png|50px]]
| |
| |Yellow Chartreuse
| |
| |40
| |
| |Get from the Booze-O-Mat
| |
| |-
| |
| ![[File:whitecremeglass.png|50px]]
| |
| |White Creme de Menthe
| |
| |20
| |
| |Get from the Booze-O-Mat
| |
| |-
| |
| ![[File:cremedeyvetteglass.png|50px]]
| |
| |Creme de Yvette
| |
| |20
| |
| |Get from the Booze-O-Mat
| |
| |-
| |
| ![[File:brandyglass.png|50px]]
| |
| |Brandy
| |
| |40
| |
| |Get from the Booze-O-Mat
| |
| |-
| |
| ![[File:guinnessglass.png|50px]]
| |
| |Guinness
| |
| |8
| |
| |Get from the Booze-O-Mat
| |
| |-
| |
| ![[File:drambuieglass.png|50px]]
| |
| |Drambuie
| |
| |40
| |
| |Get from the Booze-O-Mat
| |
| |-
| |
| ![[File:whitwineglass.png|50px]]
| |
| |White Wine
| |
| |15
| |
| |Get from the Booze-O-Mat. Called "Doublebeard Bearded White Wine"
| |
| |-
| |
| |}
| |
| </div></div>
| |
|
| |
|
| <!-- overflow:auto; to fix collapsed display, because the toggle link has float:right; -->
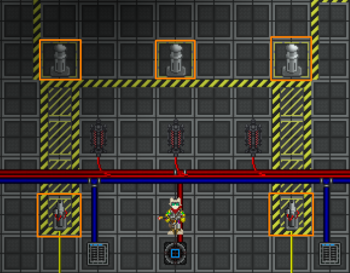
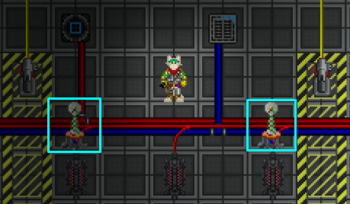
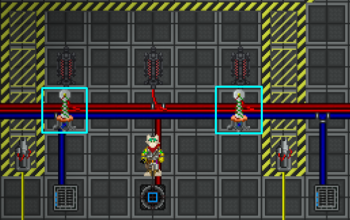
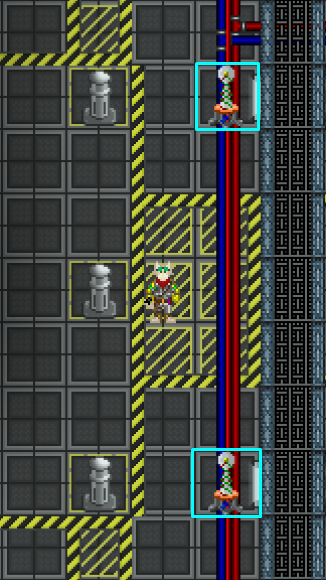
| | The devices highlighted in green are Tesla Coils, which are vital pieces of equipment for generating power. When the Tesla fires arcs of lightning, tesla coils convert it into usable electricity. |
| <div class="toccolours mw-collapsible" style="width:99%; overflow:auto;">
| |
|
| |
|
| ===Xeno-based Drinks===
| | The devices highlighted in orange are the Grounding Rods, which don’t generate any power, however they instead exist as safety equipment. They’re placed in certain locations within the engine room in order to attract the tesla arcs to them. That means, standing near them stops you from getting fried by a stray arc of lightning. |
| Alcohol is toxic for some Species. Instead, they get drunk by butanol or toothpaste, which has little to no effect on other species.
| |
| <div class="mw-collapsible-content">
| |
| {| class="sortable" border="1" cellspacing="0" cellpadding="2" align="center"
| |
| ! style='background-color:Chocolate;'|Picture
| |
| ! style='background-color:Chocolate;'|Drink
| |
| ! style='background-color:Chocolate;'|How to Get It
| |
| ! style='background-color:Chocolate;'|Strength
| |
| |-
| |
| |
| |
| |Pure Butanol
| |
| |Mix 10 units corn oil, 10 units sugar and 5 units enzyme.
| |
| |100
| |
| |-
| |
| |[[File:xuiziglass.gif|50px]]
| |
| |Xuizi Juice
| |
| |Get it in your Booze-o-Mat.
| |
| |5
| |
| |-
| |
| |[[File:sarezhiglass.gif|50px]]
| |
| |Sarezhi Wine
| |
| |Order from Cargo, or get it in your Booze-o-Mat.
| |
| |20
| |
| |-
| |
| |[[File:Crocodile Guwan.png|50px]]
| |
| |Crocodile Guwan
| |
| |Mix 5 parts sarezhi wine, 1 part toxin.
| |
| |50
| |
| |-
| |
| |[[File:Cactusmargerita.png|50px]]
| |
| |Moghes Margarita
| |
| |Mix 2 parts xuizi juice, 3 parts lime.
| |
| |30
| |
| |-
| |
| |[[File:Cactuscreme.png|50px]]
| |
| |Cactus Creme
| |
| |Mix 2 parts berry juice, 1 part cream, 2 parts xuizi juice.
| |
| |15
| |
| |-
| |
| |[[File:BahamaLizard.png|50px]]
| |
| |Bahama Lizard
| |
| |Mix 2 parts xuizi juice, 2 parts lemon juice, 1 part cream, 1 part ice.
| |
| |15
| |
| |-
| |
| |[[File:Lizardphlegm.png|50px]]
| |
| |Lizard Phlegm
| |
| |Mix 2 parts cream, 1 part banana, 1 part xuizi juice, 1 part watermelon juice.
| |
| |20
| |
| |-
| |
| |[[File:icepick.gif|50px]]
| |
| |Cactus Tea
| |
| |Mix 1 part ice tea, 1 part xuizi juice.
| |
| |10
| |
| |-
| |
| |[[File:Moghespolitan.png|50px]]
| |
| |Moghespolitan
| |
| |Mix 2 parts sarezhi wine, 1 part xuizi juice, 5 parts grenadine.
| |
| |27
| |
| |-
| |
| |[[File:Moghessheat.png|50px]]
| |
| |Wasteland Heat
| |
| |Add 3 units of capsaicin to 10 units of xuizi juice. Results in 10 units.
| |
| |40
| |
| |-
| |
| |[[File:Contactwine.png|50px]]
| |
| |Contact Wine
| |
| |Ruin 5 parts xuizi juice and 5 parts sarezhi wine with 1 part radium.
| |
| |50
| |
| |-
| |
| |[[File:Sangria.gif|50px]]
| |
| |Sandgria
| |
| |Flavor 3 parts sarezhi wine with 1 part orange juice, 1 part lemon juice, and 1 part xuizi juice.
| |
| |30
| |
| |-
| |
| |[[File:WhiskeyCola.png|50px]]
| |
| |Cactus Cola
| |
| |Mix 2 parts xuizi juice with 2 parts cola. Finish off with 1 part ice.
| |
| |15
| |
| |-
| |
| |[[File:Screwdriver.png|50px]]
| |
| |Sandpit
| |
| |Mix 2 parts xuizi juice and 2 parts orange juice.
| |
| |15
| |
| |-
| |
| |[[File:Demonsbloodglass.gif|50px]]
| |
| |Heretics Blood
| |
| |Mix 3 parts xuizi juice with 1 part Mountain Wind, 1 part blood and 1 part Dr. Gibb.
| |
| |15
| |
| |-
| |
| |[[File:Bloodwine.png|50px]]
| |
| |Bloodwine
| |
| |Mix 3 parts sarezhi wine and 2 parts blood.
| |
| |21
| |
| |-
| |
| |[[File:Kois_odyne.png|50px]]
| |
| |Kois Odyne
| |
| |Mix 1 parts tonic, koispaste, toothpaste.
| |
| |60
| |
| |-
| |
| |[[File:Sedantian_Firestorm.png|50px]]
| |
| |Sedantian Firestorm
| |
| |Mix 1 parts phoron, toothpaste.
| |
| |80
| |
| |-
| |
| |[[File:Waterfresh.png|50px]]
| |
| |Waterfresh
| |
| |Mix 1 parts tonic, soda water, toothpaste.
| |
| |40
| |
| |-
| |
| |[[File:teathpasteglass.png|50px]]
| |
| |Teathpaste
| |
| |Desecrate 2 parts tea with 1 part toothpaste.
| |
| |20
| |
| |-
| |
| |[[File:trizkizkiglass.png|50px]]
| |
| |Trizkizki Tea
| |
| |Mix 1 part green tea, 1 part sarezhi wine, 1 part grenadine.
| |
| |5
| |
| |-
| |
| |[[File:Cold_gate.png|50px]]
| |
| |Coldgate
| |
| |Mix 1 part mint syrup, ice, toothpaste.
| |
| |25
| |
| |-
| |
| |[[File:zora_drone.png|50px]]
| |
| |Drone Fuel
| |
| |Get it from a Zo'ra Soda vendor.
| |
| |N/A
| |
| |-
| |
| |}
| |
| </div></div>
| |
|
| |
|
| | The device highlighted in red is the Tesla Ball Generator, which is what turns into the giant ball of electricity when shot by a Particle Accelerator. It is the last part that should go into the engine setup, and is consumed in the reaction that jumpstarts the engine; so don’t let it go to waste. |
|
| |
|
| <!-- overflow:auto; to fix collapsed display, because the toggle link has float:right; -->
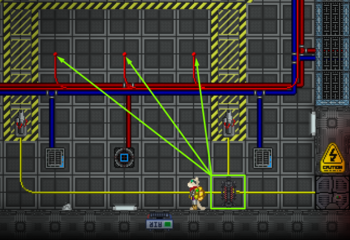
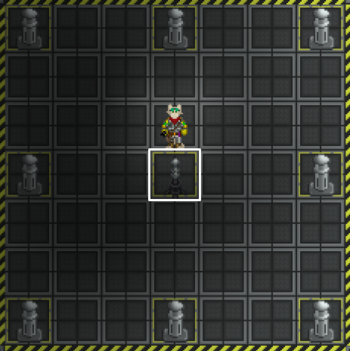
| | To begin setting up the engine, first drag the Tesla Coils into the engine room. |
| <div class="toccolours mw-collapsible" style="width:99%; overflow:auto;">
| |
|
| |
|
| ===Non-Alcoholic Drinks===
| | [[File:Tesla_14.png|350px]] |
|
| |
|
| <div class="mw-collapsible-content">
| | [[File:Tesla_15.png|350px]] |
|
| |
|
| {| class="sortable" border="1" cellspacing="0" cellpadding="2" align="center"
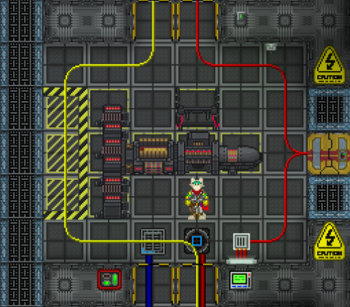
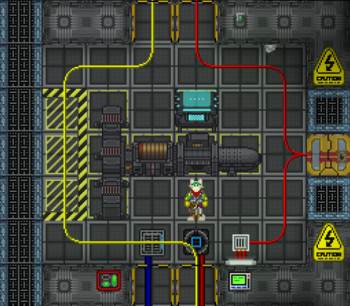
| | Once you’ve taken them inside, you’ll notice three wire knots on the North, South, and West sides of the engine room, making nine in total. Which is handy, because there are exactly nine Tesla Coils as well. The Tesla Coils need to be placed above each wire knot, and wrenched into place, like in the image below. And you’ll want to use them all, or the engine won’t make enough power. |
| ! style='background-color:Chocolate;'|Picture
| |
| ! style='background-color:Chocolate;'|Cocktail
| |
| ! style='background-color:Chocolate;'|How to Get It
| |
| |-
| |
| ![[File:bananajuice.png|50px]]
| |
| |Banana Juice
| |
| |Process a banana.
| |
| |-
| |
| |[[File:Berryglass.gif|50px]]
| |
| |Berry Juice
| |
| |Process berries.
| |
| |-
| |
| ![[File:Brownstar.png|37px]]
| |
| |Brown Star
| |
| |Mix 2 parts orange juice, 1 part cola.
| |
| Cold Drinks vending machine.
| |
| |-
| |
| ![[File:carrotjuice.png|50px]]
| |
| |Carrot Juice
| |
| |Process a carrot.
| |
| |-
| |
| ![[File:glass_white.png|50px]]
| |
| |Cream
| |
| |Drinks dispenser.
| |
| |-
| |
| ![[File:Dr_gibb.png|50px]]
| |
| |Dr. Gibb
| |
| |Drinks dispenser; cold drinks vending machine.
| |
| |-
| |
| ![[File:Rootbeer couple.png|37px]]
| |
| |R&D Root Beer
| |
| |Drinks dispenser; cold drinks vending machine.
| |
| |-
| |
| |[[File:grapejuice.png|50px]]
| |
| |Grape Juice
| |
| |Process grapes or green grapes; cold drinks vending machine.
| |
| |-
| |
| ![[File:grapesoda.png|50px]]
| |
| |Grape Soda
| |
| |Mix 2 parts grape juice, 1 part cola.
| |
| |-
| |
| ![[File:Grenadineglass.png|50px]]
| |
| |Grenadine Syrup
| |
| |Mix 10 parts berry juice, 5 parts universal enzyme (catalyst).
| |
| |-
| |
| ![[File:Hotcocoglass.png|50px]]
| |
| |Hot Chocolate
| |
| |Mix 5 parts water, 1 part coco powder; hot drinks vending machine.
| |
| |-
| |
| ![[File:iceglass.png|50px]]
| |
| |Ice
| |
| |Drinks dispenser; hacked hot drinks vending machine.
| |
| |-
| |
| ![[File:Iceteaglass.gif|50px]]
| |
| |Iced Tea
| |
| |Mix 1 part ice, 2 parts tea; cold drinks vending machine.
| |
| |-
| |
| ![[File:bureacratea.png|50px]]
| |
| |Bureacratea
| |
| |Mix 1 part tea, 1 part expresso.
| |
| |-
| |
| ![[File:Greenteavend.png|50px]]
| |
| |Green Tea
| |
| |Get from the hot drinks vendor or Coffee Master 3000
| |
| |-
| |
| ![[File:Chaivend.png|50px]]
| |
| |Chai Tea
| |
| |Get from the hot drinks vendor or Coffee Master 3000
| |
| |-
| |
| ![[File:chailatte.png|50px]]
| |
| |Chai Latte
| |
| |Mix 1 part chai tea, 1 part milk or soy milk.
| |
| |-
| |
| ![[File:cocochaiteaglass.png|50px]]
| |
| |Chocolate Chai
| |
| |Mix 2 parts chai tea, 1 part coco.
| |
| |-
| |
| ![[File:Coco chailatte.png|50px]]
| |
| |Chocolate Chai Latte
| |
| |Mix 1 part chocolate chai tea, 1 part milk or soy milk.
| |
| |-
| |
| ![[File:coffteacup.png|50px]]
| |
| |Cofftea
| |
| |Mix 1 part tea, 1 part coffee
| |
| |-
| |
| ![[File:deserttea.png|50px]]
| |
| |Desert Blossom Tea
| |
| |Mix 2 parts green tea, 1 part xuizi juice, 1 part sugar.
| |
| |-
| |
| ![[File:halfandhalf.png|50px]]
| |
| |Half and Half
| |
| |Mix 1 part iced tea, 1 part lemonade.
| |
| |-
| |
| ![[File:hereticteashort.gif|50px]]
| |
| |Heretic's Tea
| |
| |Mix 3 parts iced tea, 1 part blood, 1 part space mountain wind, 1 part dr gibb.
| |
| |-
| |
| ![[File:bigtea.png|50px]]
| |
| |Martian Tea
| |
| |Ruin tea or green tea with a pepper mill. One shake per four units.
| |
| |-
| |
| ![[File:mendelltea.png|50px]]
| |
| |Mendell Afternoon Tea
| |
| |Mix 4 parts green tea, 1 part mint syrup, 1 part lemon juice.
| |
| |-
| |
| ![[File:berrytea.png|50px]]
| |
| |Mixed Berry Tea
| |
| |Mix 2 parts tea or green tea, 1 part berry juice.
| |
| |-
| |
| ![[File:pomegranateteaglass.png|50px]]
| |
| |Pomegranate Iced Tea
| |
| |Mix 1 part iced tea, 1 part grenadine.
| |
| |-
| |
| ![[File:bigtea.png|50px]]
| |
| |Potatea
| |
| |Mix 2 parts tea, 1 part potato juice.
| |
| |-
| |
| ![[File:securitea.gif|50px]]
| |
| |Securitea
| |
| |Mix 2 parts tea, 1 part crayon dust (any color).
| |
| |-
| |
| ![[File:sleepytea.gif|50px]]
| |
| |Sleepytime Tea
| |
| |Mix 5 parts tea, 1 part soporific.
| |
| |-
| |
| ![[File:hakhmaglass.png|50px]]
| |
| |Spiced Hakhma Tea
| |
| |Mix 2 parts tea, 2 parts hakhma milk, 1 part space spices.
| |
| |-
| |
| ![[File:icetea.png|50px]]
| |
| |Sweet Tea
| |
| |Mix 1 part iced tea, 1 part sugar.
| |
| |-
| |
| ![[File:bigtea.png|50px]]
| |
| |Tomatea
| |
| |Mix 2 parts tea, 1 part tomato juice.
| |
| |-
| |
| ![[File:junglejuice.gif|50px]]
| |
| |Tropical Iced Tea
| |
| |Mix 3 parts iced tea, 1 part lime juice, 1 part orange juice, 1 part watermelon juice.
| |
| |-
| |
| ![[File:bureacratea.png|50px]]
| |
| |Librarian Special
| |
| |Mix 1 part tea, 1 part Nothing.
| |
| |-
| |
| ![[File:Kirateaglass.gif|50px]]
| |
| |Kira Tea
| |
| |Mix 1 part iced tea, 1 part kira special.
| |
| |-
| |
| ![[File:Kiraspecial.gif|50px]]
| |
| |Kira Special
| |
| |Mix 1 part orange juice, 1 part lime juice, 1 part soda water.
| |
| |-
| |
| |[[File:CafeLatte.png|50px]]
| |
| |Apple Cider (hot)
| |
| |Get from the hot drinks vendor or Coffee Master 3000.
| |
| |-
| |
| |[[File:meadglass.png|50px]]
| |
| |Apple Cider (cold)
| |
| |Mix 2 parts apple cider, 1 part ice.
| |
| |-
| |
| |[[File:meadglass.png|50px]]
| |
| |Apple Cider Juice
| |
| |Mix 2 parts apple juice, 1 part sugar, 1 part space spices.
| |
| |-
| |
| |[[File:lemonglass.gif|50px]]
| |
| |Lemon Juice
| |
| |Process a lemon.
| |
| |-
| |
| ![[File:lemonlime.png|50px]]
| |
| |Lemon Lime
| |
| |Drinks dispenser.
| |
| |-
| |
| ![[File:Lemonade.png|50px]]
| |
| |Lemonade
| |
| |Mix 1 part Lemon juice, 1 part sugar, 1 part water.
| |
| |-
| |
| |[[File:limejuice.png|50px]]
| |
| |Lime Juice
| |
| |Drinks dispenser; process a lime. Heals 0.5 toxin damage per unit.
| |
| |-
| |
| ![[File:meloncooler.gif|50px]]
| |
| |Melon Cooler
| |
| |2 parts watermelon juice, 2 parts soda water, 1 part mint syrup, 1 part ice.
| |
| |-
| |
| ![[File:Cigarettelizard.png|50px]]
| |
| |Cigarette Lizard
| |
| |2 parts lime juice, 2 parts soda water, 1 part mint syrup, 1 part ice.
| |
| |-
| |
| ![[File:glass_white.png|50px]]
| |
| |Milk
| |
| |From the biogenerator, or from a cow that has been fed wheat. Heals 0.5 trauma damage per unit, and removes 5 units of capsaicin from your body per unit.
| |
| |-
| |
| ![[File:milkshake.png|50px]]
| |
| |Milkshake
| |
| |Mix 1 part cream, 2 parts ice, 2 parts milk.
| |
| |-
| |
| ![[File:Meatshake.png|50px]]
| |
| |Meatshake
| |
| |1 part cream, 1 part animal protein, 1 part water.
| |
| |-
| |
| ![[File:millionairesour.gif|50px]]
| |
| |Millionaire Sour
| |
| |3 parts Spacemountain Wind, 1 parts grenadine, 1 part lime juice.
| |
| |-
| |
| ![[File:space_mountain_wind.png|50px]]
| |
| |Mountain Wind
| |
| |Drinks Dispenser; cold drinks vending machine.
| |
| |-
| |
| ![[File:nukacolaglass.gif|50px]]
| |
| |Nuka Cola
| |
| |1 part uranium, 5 parts space cola. Gets you high, jittery, dizzy, and makes you ignore speed penalties.
| |
| |-
| |
| |[[File:orangeglass.gif|50px]]
| |
| |Orange Juice
| |
| |Drinks dispenser; process an orange. Heals 2 suffocation damage per unit.
| |
| |-
| |
| ![[File:poisonberryjuice.png|50px]]
| |
| |Poison Berry Juice
| |
| |Process a poison berry.
| |
| |-
| |
| |[[File:brownglass.gif|50px]]
| |
| |Potato juice
| |
| |Process a potato.
| |
| |-
| |
| ![[File:shirleytemple.gif|50px]]
| |
| |Shirley Temple
| |
| |4 parts Space Up, 2 parts grenadine.
| |
| |-
| |
| ![[File:glass_clear.png|50px]]
| |
| |Soda Water
| |
| |Drinks dispenser.
| |
| |-
| |
| ![[File:space_cola.png|50px]]
| |
| |Space Cola
| |
| |Drinks dispenser; Cold Drinks vending machine.
| |
| |-
| |
| ![[File:space_up.png|50px]]
| |
| |Space-Up
| |
| |Drinks dispenser; Cold Drinks vending machine.
| |
| |-
| |
| ![[File:glass_white.png|50px]]
| |
| |Soy Milk
| |
| |Process a soybean.
| |
| |-
| |
| ![[File:teacup.png|50px]]
| |
| |Tea
| |
| |From drinks dispenser or hot drinks vending machine.
| |
| |-
| |
| ![[File:DoctorDelight.gif|50px]]
| |
| |The Doctor's Delight
| |
| |Mix 2 parts cream, 1 part lime juice, 1 part tomato juice, 1 part orange juice, 1 part tricordrazine. Heals 4 suffocation damage, 2 trauma damage, 2 burn damage, 2 toxin damage, 15 dizziness and 5 confusion, per unit.
| |
| |-
| |
| ![[File:tomatojuice.png|50px]]
| |
| |Tomato Juice
| |
| |Process a tomato; Booze vendor. Heals 0.5 burn damage per unit.
| |
| |-
| |
| ![[File:glass_clear.png|50px]]
| |
| |Tonic water
| |
| |Drinks dispenser.
| |
| |-
| |
| ![[File:Upsidedowncup.png|50px]]
| |
| |Upside-Down Cup
| |
| |Mix 3 parts Dr. Gibb, 1 part lemon juice, 1 part ice
| |
| |-
| |
| ![[File:waterglass.png|50px]]
| |
| |Water
| |
| |Drinks dispenser; cold drinks vending machine, sinks, and water tanks.
| |
| |-
| |
| ![[File:tomatojuice.png|50px]]
| |
| |Watermelon Juice
| |
| | Drinks dispenser; process a watermelon slice.
| |
| |-
| |
| ![[File:Portsvilleminttea.png|50px]]
| |
| |Portsville Mint Tea
| |
| |Mix 3 parts ice tea, 1 part berry juice, 1 part mint syrup, 1 part sugar
| |
| |-
| |
| ![[File:mint_syrupglass.png|50px]]
| |
| |Mint Syrup
| |
| |Get from the Booze-O-Mat. Called "Wintergreen Mint Syrup"
| |
| |-
| |
| ![[File:Cooling_breeze.png|50px]]
| |
| |Cooling Breeze
| |
| |Cold drinks vending machine. Heals a mild amount of toxin damage.
| |
| |-
| |
| ![[File:Dyn_juice.png|50px]]
| |
| |Dyn Juice
| |
| |Get it by juicing a dyn leaf or from your Booze-o-Mat. Heals a mild amount of toxin damage.
| |
| |-
| |
| ![[File:Dyn_tea.png|50px]]
| |
| |Dyn Tea
| |
| |Mix 1 part dyn juice and 4 parts water. Heals a mild amount of toxin damage.
| |
| |-
| |
| ![[File:Dyn_iced_tea.png|50px]]
| |
| |Dyn Iced Tea
| |
| |Mix 1 part dyn juice, 2 parts ice and 2 parts water. Heals a mild amount of toxin damage.
| |
| |-
| |
| ![[File:Dyn_iced_tea.png|50px]]
| |
| |Dyn Iced Tea
| |
| |Mix 1 part dyn juice, 2 parts ice and 2 parts water. Heals a mild amount of toxin damage.
| |
| |-
| |
| ![[File:algaeSurprise.png|50px]]
| |
| |Pl'iuop Algae Surprise
| |
| |Mix 2 virus food, 1 banana.
| |
| |-
| |
| ![[File:rixulinSundae.png|50px]]
| |
| |Rixulin Sundae
| |
| |Mix 2 virus food, 1 wulumunusha, 1 white wine.
| |
| |-
| |
| ![[File:xrim.png|50px]]
| |
| |Xrim Garden
| |
| |Mix 2 virus food, 1 watermelon juice, 1 orange juice, 1 lime juice, 1 C'thur rockin' raspberry (Zo'ra vendor).
| |
| |-
| |
| ![[File:Thewake.png|50px]]
| |
| |The Wake
| |
| |Mix 1 part tea, 1 part orange juice, 1 part dyn juice.
| |
| |-!
| |
| ![[File:zora_cherry.png|50px]]
| |
| |Zo'ra Soda Cherry
| |
| |Get it from a Zo'ra Soda vendor.
| |
| |-
| |
| ![[File:zora_phoron.png|50px]]
| |
| |Zo'ra Soda Phoron Passion
| |
| |Get it from a Zo'ra Soda vendor.
| |
| |-
| |
| ![[File:zora_kois.png|50px]]
| |
| |Zo'ra Soda K'ois Twist
| |
| |Get it from a Zo'ra Soda vendor.
| |
| |-
| |
| ![[File:zora_hozm.png|50px]]
| |
| |Zo'ra Soda High Octane Zorane Migh
| |
| |Get it from a Zo'ra Soda vendor.
| |
| |-
| |
| ![[File:zora_venom.png|50px]]
| |
| |Zo'ra Soda Sour Venom Grass
| |
| |Get it from a Zo'ra Soda vendor.
| |
| |-
| |
| ![[File:zora_klax.png|50px]]
| |
| |Klaxan Energy Crush
| |
| |Get it from a Zo'ra Soda vendor.
| |
| |-
| |
| ![[File:zora_cthur.png|50px]]
| |
| |C'thur Rockin' Raspberry
| |
| |Get it from a Zo'ra Soda vendor.
| |
| |-
| |
| ![[File:zora_jelly.png|50px]]
| |
| |Royal Jelly
| |
| |Get it from a Zo'ra Soda vendor.
| |
| |-
| |
| |}
| |
|
| |
|
| </div></div>
| | [[File:Tesla_16.png|350px]] |
|
| |
|
| | Once you’ve secured all nine Tesla Coils, you’ll want to turn to these devices, the Emitters, and the Field Generators. |
|
| |
|
| <!-- overflow:auto; to fix collapsed display, because the toggle link has float:right; -->
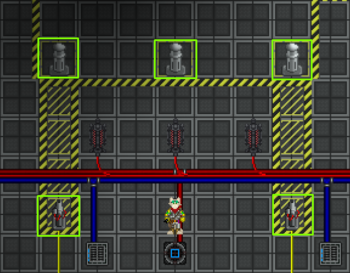
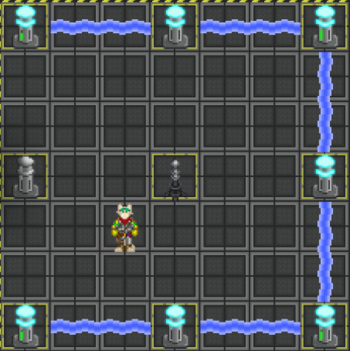
| | Both of these need to be wrenched into place. There are four emitters in total; two on the south side of the engine room, and two on the north side. As for field generators, there are eight, and they form a square around the center of the room; they also need to be wrenched down, as well. |
| <div class="toccolours mw-collapsible" style="width:99%; overflow:auto;">
| |
|
| |
|
| ===Coffee Drinks===
| | [[File:Tesla_17.png|350px]] |
|
| |
|
| <div class="mw-collapsible-content">
| | Next, flip down your welding mask or goggles, because you also need to weld down each emitter and field generator too, or they won’t function. The reason behind this is that these pieces of equipment are also used in the outdated Singularity Engine setup, and they needed to be able to resist immense gravitational pull; not that the Tesla emits one, however. But nonetheless, flip those goggles down, and weld all those pieces down too. Four emitters, and eight field generators. |
|
| |
|
| {| class="sortable" border="1" cellspacing="0" cellpadding="2" align="center"
| | Next, go back to storage and start carrying out the Grounding Rods. These don’t have specific locations that they’re absolutely required to be placed in, just so long as they’re placed and wrenched down. My prefered locations for them are as follows; South, East, and North. |
| ! style='background-color:Chocolate;'|Picture
| |
| ! style='background-color:Chocolate;'|Beverage
| |
| ! style='background-color:Chocolate;'|How to Mix It
| |
| ! style='background-color:Chocolate;'|Alcoholic
| |
| ! style='background-color:Chocolate;'|Strength
| |
| |-
| |
| ![[File:hot_coffee.png|50px]]
| |
| |Coffee
| |
| |Dispense from drinks dispenser, Vending Machine. Removes 10 units of frost oil from your body per unit.
| |
| | N
| |
| | N/A
| |
| |-
| |
| ![[File:CafeLatte.png|50px]]
| |
| |Cafe Latte
| |
| |Mix 1 part coffee, 1 part milk.
| |
| | N
| |
| | N/A
| |
| |-
| |
| ![[File:CafeLatte.png|50px]]
| |
| |Frappe Coffee
| |
| |Mix 1 part coffee, 1 part ice.
| |
| | N
| |
| | N/A
| |
| |-
| |
| ![[File:hot_coffee.png|50px]]
| |
| |Espresso
| |
| |Dispense from Coffee Master 3000
| |
| | N
| |
| | N/A
| |
| |-
| |
| ![[File:hot_coffee.png|50px]]
| |
| |Freddo Espresso
| |
| |Mix 1 part espresso, 1 part ice.
| |
| | N
| |
| | N/A
| |
| |-
| |
| ![[File:hot_coffee.png|50px]]
| |
| |Caffe Americano
| |
| |Mix 1 part espresso, 1 part water.
| |
| | N
| |
| | N/A
| |
| |-
| |
| ![[File:CafeLatte.png|50px]]
| |
| |Flat White Espresso
| |
| |Mix 1 part espresso, 1 part milk.
| |
| | N
| |
| | N/A
| |
| |-
| |
| ![[File:CafeLatte.png|50px]]
| |
| |Latte
| |
| |Mix 1 part flat white, 1 part milk.
| |
| | N
| |
| | N/A
| |
| |-
| |
| ![[File:hot_coffee.png|50px]]
| |
| |Cappuccino
| |
| |Mix 1 part espresso, 1 part cream.
| |
| | N
| |
| | N/A
| |
| |-
| |
| ![[File:hot_coffee.png|50px]]
| |
| |Freddo Cappuccino
| |
| |Mix 1 part cappuccino, 1 part ice.
| |
| | N
| |
| | N/A
| |
| |-
| |
| ![[File:hot_coffee.png|50px]]
| |
| |Macchiato
| |
| |Mix 1 part cappuccino, 1 part espresso.
| |
| | N
| |
| | N/A
| |
| |-
| |
| ![[File:CafeLatte.png|50px]]
| |
| |Mocacchino
| |
| |Mix 1 part flat white, 1 part coco.
| |
| | N
| |
| | N/A
| |
| |-
| |
| ![[File:Sromshine.png|50px]]
| |
| |Sromshine
| |
| |Mix 2 parts coffee, 1 part orange juice.
| |
| |N
| |
| |N/A
| |
| |-
| |
| ![[File:IrishCoffee.png|50px]]
| |
| |Irish Coffee
| |
| |Mix 1 parts coffee, 1 part Irish Cream.
| |
| | Y
| |
| | 50
| |
| |-
| |
| ![[File:CafeLatte.png|50px]]
| |
| |Soy Latte
| |
| |Mix 1 part coffee, 1 part soymilk.
| |
| | N
| |
| | N/A
| |
| |-
| |
| ![[File:Rewriter.png|50px]]
| |
| |Rewriter
| |
| |1 part Space Mountain Wind, 1 part Coffee. Causes jittering.
| |
| | N
| |
| | N/A
| |
| |-
| |
| ![[File:Kahluaglass.gif|50px]]
| |
| |Kahlua
| |
| |Bottles are labeled "Robert Robust's Coffee Liqueur." Mix 5 parts coffee, 5 parts sugar, and 5 universal enzyme (catalyst).
| |
| Reduces dizziness, drowsiness, sleep, and lowers your body temperature down to normal. Causes jittering.
| |
| | Y
| |
| | 20
| |
| |-
| |
| ![[File:hot_coffee.png|50px]]
| |
| |Martian Special
| |
| |Pepper coffee by clicking your mug with a pepper mill, one peppering per 4 units of coffee.
| |
| | N
| |
| | N/A
| |
| |}
| |
|
| |
|
| </div></div>
| | [[File:Tesla_18.png|350px]] |
|
| |
|
| ==Food Recipes==
| | [[File:Tesla_19.png|350px]] |
| * Liquids, condiments, ground fruits and vegetables, and eggs that have been cracked into a container are all measured in reagent units rather than their own items. They can be poured directly into the microwave (whole eggs can be added directly to the microwave and are considered a separate ingredient, so be careful!)
| |
|
| |
|
| * Sliceable foods can be divided into smaller portions by slicing them with a sharp object. Their reagents are divided equally into the slices. The slices noted here are the maximum number of slices, which you can get by using a precise cutting tool like a kitchen knife, cleaver, or scalpel; crude cutting tools, like axes, shovels, and saws will result in fewer slices.
| | Once you’re done with those, go back into storage, grab the Tesla Ball Generator, and put it in the very center of the engine room, like so; |
|
| |
|
| * Condiments and reagents can be added to food, possibly increasing their nutrition value or adding some [[traitor|fun]] extras. A chef can create condiments by grinding up things that contain them and isolating them in the CondiMaster in the back room. Condiments let you put ketchup on your fries, salt in your soup, dylovene on your fish fingers, or psilocybin on your ghost burger--the possibilities are endless. Foods hold a maximum of fifty units of reagents.
| | [[File:Tesla_20.png|350px]] |
|
| |
|
| * Some poisonous foods can be prepared safely if Dylovene is added to the finished product, or if the poisonous reagent is neutralized somehow. Experienced chefs only!
| | And once you’ve done that, head back into the observation room for now. |
|
| |
|
| * Poisonous reagents are marked in <span style="color:red">red text</span>. Reagents which have other, non-deadly effects--like intoxication, sleepiness, or the effects of hot or cold sauce--are marked in <span style="color:blue">blue text</span>.
| | === Final Steps === |
|
| |
|
| * Traitor chefs can make some sneaky substitutions:
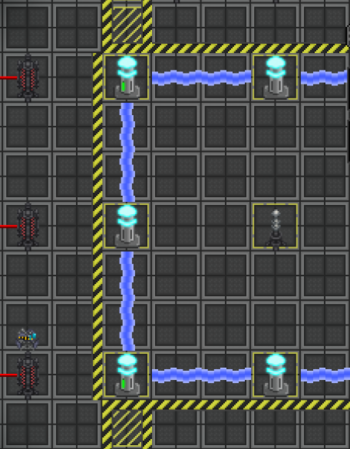
| | There are a few final steps for the Tesla Engine to make it safe and effective. The first one being a bypass from the Tesla Grid to the Containment Grid, which will be explained below. |
| ** Poisonous apples can be used in all apple dishes, and the final dish will be poisoned. Unlike poisonous mushrooms, cyanide apples can easily kill.
| |
| ** Slime jelly can be substituted for cherry jelly, and will poison the resulting food.
| |
| ** Anything made with meat can be made with human meat. (It's still necessary to emag the gibber before butchering one's murder victims.)
| |
|
| |
|
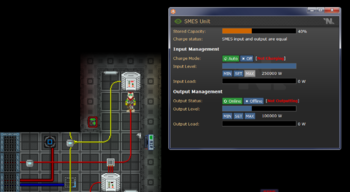
| | First, go to the northernmost SMES unit, and change its settings to match the image below. |
|
| |
|
| <!-- overflow:auto; to fix collapsed display, because the toggle link has float:right; -->
| | [[File:Tesla_21.png|350px]] |
| <div class="toccolours mw-collapsible" style="width:99%; overflow:auto;">
| |
|
| |
|
| ===Microwave===
| | This SMES will always start with 40% charge, which is important, as the input and output need to be enabled in order for the engine room emitters to work properly. If this isn’t enabled, the emitters will draw from the room’s APC, which does not have enough capacity to sustain them, and the containment field will fail mid-firing. |
| [[File:microwave.gif|50px]]
| |
| <br>
| |
| To operate the microwave, simply insert the listed ingredients to make a recipe. The microwave can take multiple full sets of ingredients to make multiple copies of the same recipe simultaneously (but don't try to make two different things at once).
| |
| <div class="mw-collapsible-content">
| |
|
| |
|
| {| class="sortable" border="1" cellspacing="0" cellpadding="2" align="center"
| | Once the containment SMES is enabled, we’re ready to start up the engine. |
| ! style='background-color:Red;'|
| |
| ! style='background-color:Red;'|Result
| |
| ! style='background-color:Red;'|Recipe
| |
| ! style='background-color:Red;'|Reagents & Notes
| |
|
| |
|
| |-
| | ==== Firing the Engine ==== |
| |[[File:friedegg.png|50px]]
| | Head into the engine room once more, and turn on all four emitters by clicking on them, and make sure they stay on. Pay attention to the warning markings on the floor, and don’t walk into the beams, because they can very easily kill you -- even with a voidsuit on. Don’t forget to swipe your ID card on them after you’ve turned them on to lock the controls, so that nobody can turn them off. |
| |'''Fried Egg
| |
| | Microwave 1 egg, 1 unit of salt, 1 unit of pepper.
| |
| | 3 animal protein, 3 egg yolk, 1 salt, 1 pepper
| |
| |-
| |
| |[[File:Poachedegg.gif|50px]]
| |
| |'''Poached Egg
| |
| | Microwave 1 egg, 1 unit salt, 1 unit pepper, 1 unit space spice, 5 units water.
| |
| | 3 egg yolk, 1 nutriment, 1 pepper
| |
| |-
| |
| |[[File:egg.png|50px]]
| |
| |'''Boiled Egg
| |
| | Microwave 1 egg, 5 units water.
| |
| | 2 animal protein, 3 egg yolk
| |
| |-
| |
| |[[File:plain Burger.png|50px]]
| |
| |'''Burger
| |
| | Microwave 1 meat, 1 Bun.
| |
| | 3 nutriment, 13 animal protein
| |
| |-
| |
| |[[File:plain Burger.png|50px]]
| |
| |'''Burger
| |
| | Combine 1 Cutlet/Meatball with 1 Bun.
| |
| | 3 nutriment, 3 animal protein
| |
| |-
| |
| |[[File:cheeseburger.png|50px]]
| |
| |'''Cheese Burger
| |
| | Combine 1 cheese wedge with 1 Burger.
| |
| | 2 animal protein, 2 nutriment
| |
| |-
| |
| |[[File:brainburger.png|50px]]
| |
| |'''Brain Burger
| |
| | Microwave 1 Bun, 1 brain.
| |
| | 7 animal protein, <span style="color:blue">6 alkysine</span>, <span style="color:red">5 blood</span>
| |
| |-
| |
| |[[File:roburger.png|50px]]
| |
| |'''Roburger
| |
| | Microwave 1 Bun, 1 robot head.
| |
| | 2 nutriment, 1 animal protein, 5% probability of <span style="color:blue">2 nanites</span>
| |
| |-
| |
| |[[File:Xenoburger.png|50px]]
| |
| |'''Xenoburger
| |
| | Microwave 1 Bun, 1 xeno-meat.
| |
| | 15 animal protein, 6 <span style="color:red">polytrinic acid</span>
| |
| |-
| |
| |[[File:Bearburger.gif|50px]]
| |
| |'''Bearburger
| |
| | Microwave 1 Bun, 1 bear meat.
| |
| | 10 animal protein, 5 <span style="color:blue">hyperzine</span>
| |
| |-
| |
| |[[File:carpsandwich.png|50px]]
| |
| |'''Fillet -o- Carp Sandwich
| |
| | Microwave 1 Bun, 1 carp fillet.
| |
| | 10 animal protein, <span style="color:red">6 carpotoxin</span>
| |
| |-
| |
| |[[File:tofubuger.png|50px]]
| |
| |'''Tofu Burger
| |
| | Microwave 1 Bun, 1 Tofu.
| |
| | 6 nutriment, 1 animal protein
| |
| |-
| |
| |[[File:ghostbur.PNG|50px]]
| |
| |'''Ghost Burger
| |
| | Microwave 1 Bun, 1 ectoplasm.
| |
| | 2 nutriment, 1 animal protein
| |
| |-
| |
| |[[File:clownburger.png|50px]]
| |
| |'''Clown Burger
| |
| | Microwave 1 Bun, 1 clown wig and mask.
| |
| | 6 nutriment, 1 animal protein
| |
| |-
| |
| |[[File:mimeburger.png|50px]]
| |
| |'''Mime Burger
| |
| | Microwave 1 Bun, 1 beret.
| |
| | 6 nutriment, 1 animal protein
| |
| |-
| |
| |[[File:Hotdog.png|50px]]
| |
| |'''Hotdog
| |
| | Microwave 1 Sausage, 1 Bun.
| |
| | 19 animal protein
| |
| |-
| |
| |[[File:Bacon.png|50px]]
| |
| |'''Microwaved Bacon
| |
| | Microwave 1 Raw Bacon
| |
| | .3 animal protein, 1 unit Triglyceride
| |
| |-
| |
| |[[File:Bacon Stick.png|50px]]
| |
| |'''Eggpop
| |
| | Combine 1 Bacon with 1 Boiled Egg.
| |
| | 3 animal protein, 1 egg
| |
| |-
| |
| |[[File:Bacon and Eggs.png|50px]]
| |
| |'''bacon and eggs
| |
| | Combine 1 Bacon with 1 Fried Egg.
| |
| | 3 animal protein, 1 egg
| |
| |-
| |
| |[[File:chickenfillet.gif|50px]]
| |
| |'''Chicken Fillet
| |
| | Microwave or combine 1 Katsu and 1 Bun.
| |
| | 5 nutriment, 10 animal protein
| |
| |-
| |
| |[[File:waffles.png|50px]]
| |
| |'''Waffles
| |
| | Microwave 2 balls of dough, 10 units sugar.
| |
| | 8 nutriment, 2 animal protein
| |
| |-
| |
| |[[File:donkpocket.png|50px]]
| |
| |'''Warm Donk Pocket
| |
| | Microwave 1 ball of dough, 1 meatball.
| |
| | 2 nutriment, 6 animal protein, 5 tricordrazine
| |
| |-
| |
| |[[File:donkpocket.png|50px]]
| |
| |'''Warm Donk Pocket
| |
| | Microwave 1 Donk Pocket.
| |
| | 2 nutriment, 2 animal protein, 5 tricordrazine
| |
| |-
| |
| |[[File:donkpocket.png|50px]]
| |
| |'''Donk Pocket
| |
| | Allow a warm Donk Pocket to cool.
| |
| | 2 nutriment, 2 or 6 animal protein
| |
| |-
| |
| |[[File:applepie.png|50px]]
| |
| |'''Apple Pie
| |
| | Microwave 1 flat dough, 1 apple.
| |
| | 4 nutriment, 1 animal protein
| |
|
| |
|
| For some reason, this is not an oven recipe.
| | Once the emitters are up, head into the central square, and start turning on each of the field generators by clicking on them, as well. Make sure to click on them all, even the ones not being shot by emitters, but don’t get yourself stuck inside! Generally a good idea is to turn on just seven, then step outside before enabling the last one, like so. |
| |-
| |
| |[[File:meatbun.gif|50px]]
| |
| |'''Meat Bun
| |
| | Microwave 1 raw cutlet, 1 dough slice, 1 unit space spice, 5 units water.
| |
| | 5 nutriment, 3 animal protein
| |
| |-
| |
| |[[File:meatbun.gif|50px]]
| |
| |'''Custard Bun
| |
| | Microwave 1 dough slice, 3 units egg yolk, 1 unit space spice, 5 units water.
| |
| Don't use a whole egg, or it will end up as a boiled egg.
| |
| | 6 nutriment, 2 egg yolk
| |
| |-
| |
| |[[File:momo.gif|50px]]
| |
| |'''Chicken Momo
| |
| | Microwave 1 chicken meat, 3 dough slices, 2 units space spice, 5 units water.
| |
| | 7 nutriment, 6 animal protein, 2 space spice
| |
| |-
| |
| |[[File:momo.gif|50px]]
| |
| |'''Vegetable Momo
| |
| | Microwave 1 carrot, 1 cabbage, 3 dough slices, 2 units space spice, 5 units water.
| |
| | 10 nutriment, 4 space spice, 3 carrot juice, <span style="color:blue">1 imidazoline</span>
| |
| |-
| |
| |[[File:cheesepmelet.png|50px]]
| |
| |'''Omelette Du Fromage
| |
| | Microwave 6 units egg yolk, 2 cheese wedges.
| |
| | 16 animal protein, 6 egg yolk
| |
| |-
| |
| |[[File:muffins.png|50px]]
| |
| |'''Muffin
| |
| | Microwave 1 ball of dough, 5 units milk, 5 units sugar.
| |
| | 6 nutriment, 1 animal protein
| |
| |-
| |
| |[[File:eggplantparmigiana.png|50px]]
| |
| |'''Eggplant Parmigiana
| |
| | Microwave 2 cheese wedges, 1 eggplant.
| |
| | 6 nutriment, 8 animal protein
| |
| |-
| |
| |[[File:soylenvirdians.png|50px]]
| |
| |'''Soylen Virdians
| |
| | Microwave 10 units flour, 1 soybean.
| |
| | 10 nutriment, 1 soy milk
| |
| |-
| |
| |[[File:soylentgreen.png|50px]]
| |
| |'''Soylent Green
| |
| | Microwave 2 human meat, 10 units flour.
| |
| | 28 Animal Protein
| |
| |-
| |
| |[[File:berryclafoutis.png|50px]]
| |
| |'''Berry Clafoutis
| |
| | Microwave 1 flat dough, 1 berry.
| |
| | 4 nutriment, 7 berry juice, 1 animal protein
| |
| |-
| |
| |[[File:wingchu.png|50px]]
| |
| |'''Wing Fang Chu
| |
| | Microwave 5 units soy sauce, 1 xeno-meat.
| |
| | 12 animal protein, <span style="color:red">6 polytrinic acid</span>
| |
| |-
| |
| |[[File:meatkabob.png|50px]]
| |
| |'''(Human)-kabob
| |
| | Microwave 2 human meat, 1 metal rod.
| |
| | 26 animal protein
| |
| May break the microwave.
| |
| |-
| |
| |[[File:meatkabob.png|50px]]
| |
| |'''Meat-kabob
| |
| | Microwave 2 meat, 1 metal rod.
| |
| | 26 animal protein
| |
| May break the microwave.
| |
| |-
| |
| |[[File:meatkabob.png|50px]]
| |
| |'''Tofu-kabob
| |
| | Microwave 2 tofu, 1 metal rod.
| |
| | 8 nutriment
| |
| May break the microwave.
| |
| |-
| |
| |[[File:bakedpotato.png|50px]]
| |
| |'''Loaded Baked Potato
| |
| | Microwave 1 potato, 1 cheese wedge.
| |
| | 3 nutriment, 7 animal protein, 2 potato juice
| |
| |-
| |
| |[[File:cheesefries.png|50px]]
| |
| |'''Cheese Fries
| |
| | Microwave 1 Space Fries, 1 cheese wedge.
| |
| | 4 nutriment, 6 animal protein
| |
| |-
| |
| |[[File:chilicheesefries.gif|50px]]
| |
| |'''Chili Cheese Fries
| |
| | Microwave 1 Space Fries, 1 Hot Chili, 1 cheese wedge.
| |
| | 9 nutriment, 9 animal protein, <span style="Color: Blue">2 capsaicin</span>
| |
| |-
| |
| |[[File:cubancarp.png|50px]]
| |
| |'''Cuban Carp
| |
| | Microwave 1 carp fillet, 1 ball of dough, 1 chili pepper.
| |
| | 7 animal protein, 3 nutriment, <span style="color:red">6 carpotoxin</span>, <span style="color:blue">10 capsaicin</span>
| |
| |-
| |
| |[[File:Sushi_Roll.png|50px]]
| |
| |'''Ouere Carp Log
| |
| | Microwave 1 carp meat, 1 cabbage, 1 boiled rice.
| |
| | 6 seafood,
| |
| |-
| |
| |[[File:popcorn.png|50px]]
| |
| |'''Popcorn
| |
| | Microwave 1 corn.
| |
| | 2 nutriment, 3 corn oil
| |
| |-
| |
| |[[File:meatstake.png|50px]]
| |
| |'''Meat Steak
| |
| | Microwave 1 unit salt, 1 unit pepper, 1 meat (any type).
| |
| | 13 animal protein, 1 salt, 1 pepper
| |
| |-
| |
| |[[File:duff.gif|50px]]
| |
| |'''Spacy Liberty Duff
| |
| | Microwave 5 units water, 5 units vodka, 5 units psilocybin.
| |
| | 6 nutriment, <span style="color:blue">6 psilocybin</span>
| |
| |-
| |
| |[[File:AmanitaJelly.gif|50px]]
| |
| |'''Amanita Jelly
| |
| | Microwave 5 units water, 5 units vodka, 5 units amatoxin.
| |
| |6 nutriment, <span style="color:blue">3 psilocybin</span>
| |
| |-
| |
| |[[File:meatsoup.png|50px]]
| |
| |'''Meatball Soup
| |
| | Microwave 10 units water, 1 meatball, 1 carrot, 1 potato.
| |
| | 11 animal protein, 5 water, <span style="color:blue">5 imidazoline</span>, 1 carrot juice, 2 potato juice
| |
| |-
| |
| |[[File:vegesoup.png|50px]]
| |
| |'''Vegetable Soup
| |
| | Microwave 10 units water, 1 carrot, 1 corn, 1 eggplant, 1 potato.
| |
| | 8 nutriment, 5 water, 3 corn oil, <span style="color:blue">5 imidazoline</span>, 1 carrot juice, 2 potato juice
| |
| |-
| |
| |[[File:nettlesoup.png|50px]]
| |
| |'''Nettle Soup
| |
| | Microwave 10 units water, 1 nettle, 3 units egg yolk, 1 potato.
| |
| | 8 nutriment, 5 water, <span style="color:blue">5 tricordrazine</span>, <span style="color:red">9 sulphuric acid</span>, 2 potato juice, 3 egg yolk
| |
| |-
| |
| |[[File:Wishsoup.png|50px]]
| |
| |'''Wish Soup
| |
| | Microwave 20 units water. Yep.
| |
| | 10 water, 25% chance of 8 nutriment
| |
| |-
| |
| |[[File:hotstew.png|50px]]
| |
| |'''Hot Chili
| |
| | Microwave 1 meat, 1 chili pepper, 1 tomato.
| |
| | 3 nutriment, 12 animal protein <span style="color:blue">10 capsaicin</span>, 4 tomato juice
| |
| |-
| |
| |[[File:coldstew.png|50px]]
| |
| |'''Cold Chili
| |
| | Microwave 1 meat, 1 ice pepper, 1 tomato.
| |
| | 3 nutriment, 12 animal protein, <span style="color:blue">10 frost oil</span>, 4 tomato juice
| |
| |-
| |
| |[[File:Tajaran_Stew.png|50px]]
| |
| |'''Nav'Twir Stew
| |
| | Microwave 10 units water, 2 adhomai meat, 2 nifberries, 1 mushroom, 1 messas tear.
| |
| | 4 nutriment, 4 animal protein
| |
| |-
| |
| |[[File:Tajaran_soup.png|50px]]
| |
| |'''Earthen-root soup
| |
| | Microwave 2 earthenroot, 10 units water, 1 space spice, 1 sodium chloride.
| |
| | 4 nutriment
| |
| |-
| |
| |[[File:Tajaran_Spicy_Clams.png|50px]]
| |
| |'''Spicy Ras'val clams
| |
| | Microwave 2 clams, 1 cabbage, 1 chili, 1 blackpepper, 1 spacespice.
| |
| | 4 seafood, 1 pepper
| |
| |-
| |
| |[[File:Spell.png|50px]]
| |
| |'''Spell Burger
| |
| | Microwave 1 Burger, 1 wizard hat.
| |
| | 6 nutriment, 3 or 13 animal protein
| |
| |-
| |
| |[[File:bigbite.png|50px]]
| |
| |'''Big Bite Burger
| |
| | Microwave 1 Burger, 3 meat, 3 egg yolk.
| |
| | 40 animal protein, 4 nutriment, 3 egg yolk
| |
| |-
| |
| |[[File:fishandchips.png|50px]]
| |
| |'''Fish & Chips
| |
| | Microwave 1 Space Fries, 1 carp meat.
| |
| | 3 nutriment, 6 animal protein, <span style="color:red">6 carpotoxin</span>
| |
| |-
| |
| |[[File:sandwich.png|50px]]
| |
| |'''Sandwich
| |
| | Microwave 2 bread slices, 1 Meat Steak, 1 cheese wedge.
| |
| Custom sandwiches can be made by combining items with a bread slice, but use this recipe for others that call for a sandwich as an ingredient.
| |
| | 3 nutriment, 20.4 animal protein, 1.2 egg yolk, 1 salt, 1 pepper
| |
| |-
| |
| |[[File:toastsand.png|50px]]
| |
| |'''Toasted Sandwich
| |
| | Microwave 1 Sandwich.
| |
| | 3 nutriment, 23.4 animal protein, 1.2 egg yolk, 1 salt, 1 pepper, 2 carbon
| |
| |-
| |
| |[[File:toastsand.png|50px]]
| |
| |'''Grilled Cheese Sandwich
| |
| | Microwave 2 bread slices, 1 cheese wedge.
| |
| | 3 nutriment, 8.4 animal protein, 1.2 egg yolk
| |
| |-
| |
| |[[File:tomatosoup.png|50px]]
| |
| |'''Tomato Soup
| |
| | Microwave 10 units water, 2 tomatoes.
| |
| | Drinking this makes you feel like a vampire. A tomato vampire.
| |
| 5 nutriment, 14 tomato juice
| |
| |-
| |
| |[[File:roffle.png|50px]]
| |
| |'''Roffle Waffles
| |
| | Microwave 2 balls of dough, 10 units sugar, 5 units psilocybin.
| |
| | 8 nutriment, <span style="color:blue">8 psilocybin</span>, 2 animal protein
| |
| |-
| |
| |[[File:stew.png|50px]]
| |
| |'''Stew
| |
| | Microwave 10 units water, 1 meat, 1 tomato, 1 potato, 1 carrot, 1 eggplant, 1 chantrelle mushroom.
| |
| | 6 nutriment, 13 animal protein, 7 tomato juice, <span style="color:blue">10 imidazoline</span>, 5 water, 2 potato juice, 1 carrot juice
| |
| |-
| |
| |[[File:Bearstew.gif|50px]]
| |
| |'''Bear Stew
| |
| | Microwave 10 units water, 1 bluespace bear meat, 1 tomato, 1 potato, 1 carrot, 1 eggplant, 1 chantrelle mushroom.
| |
| | 6 nutriment, 4 animal protein, 5 tomato juice, <span style="color:blue">5 hyperzine</span>, <span style="color:blue">5 imidazoline</span>, 5 water
| |
| |-
| |
| |[[File:jellytoast.png|50px]]
| |
| |'''Jellied Toast
| |
| | Microwave 1 bread slice, 5 units cherry jelly or slime jelly.
| |
| Slime jelly will poison someone who eats it.
| |
| | 1 nutriment, 0.2 animal protein, 0.6 egg yolk, 5 cherry jelly or <span style="color:red">5 slime jelly</span>
| |
| |-
| |
| |[[File:honeytoast.gif|50px]]
| |
| |'''Honeyed Toast
| |
| | Microwave 1 bread slice, 5 units honey.
| |
| | 1 nutriment, 0.2 animal protein, 0.6 egg yolk, 5 honey
| |
| |-
| |
| |[[File:milo.png|50px]]
| |
| |'''Milosoup
| |
| | Microwave 10 units water, 2 tofu, 2 soy dope.
| |
| | 8 nutriment, 5 water
| |
| |-
| |
| |[[File:Stewedsoymeat.png|50px]]
| |
| |'''Stewed Soy Meat
| |
| | Microwave 2 soy dope, 1 carrot, 1 tomato.
| |
| | 8 nutriment, <span style="color:blue">5 imidazoline</span>, 1 carrot juice, 2 tomato juice
| |
| |-
| |
| |[[File:spagettiboiled.png|50px]]
| |
| |'''Boiled Spaghetti
| |
| | Microwave 5 units water, 1 spaghetti (uncooked).
| |
| | 2 nutriment, .33 animal protein
| |
| |-
| |
| |[[File:lomein.gif|50px]]
| |
| |'''Lo Mein
| |
| | Microwave 5 units water, 5 units soy sauce, 1 carrot, 1 cabbage, 1 spaghetti (uncooked).
| |
| | 6 nutriment, 3 carrot juice, <span style="color:blue">1 imidazoline</span>
| |
| |-
| |
| |[[File:Boiledrice.png|50px]]
| |
| |'''Boiled Rice
| |
| | Microwave 5 units water, 10 units rice.
| |
| | 2 nutriment
| |
| |-
| |
| |[[File:friedrice.gif|50px]]
| |
| |'''Fried Rice
| |
| | Microwave 5 units water, 10 units rice, 5 units soy sauce, 1 carrot, 1 cabbage.
| |
| | 6 nutriment, 5 rice, 3 carrot juice, <span style="color:blue">1 imidazoline</span>
| |
| |-
| |
| |[[File:risotto.gif|50px]]
| |
| |'''Risotto
| |
| | Microwave 5 units wine, 10 units rice, 1 unit space spice, 1 chantrelle mushroom.
| |
| | 6 mushroom, 4 rice
| |
| |-
| |
| |[[File:bibimbap.gif|50px]]
| |
| |'''Bibimbap
| |
| | Microwave 5 units rice, 1 cutlet, 1 egg, 1 carrot, 1 cabbage, 1 chantrelle mushroom, 2 units space spice.
| |
| | 6 animal protein, 3 egg yolk, 3 space spice, <span style="color:blue">3 imidazoline</span>
| |
| |-
| |
| |[[File:Ricepudding.png|50px]]
| |
| |'''Rice Pudding
| |
| | Microwave 5 units milk, 10 units rice.
| |
| | 4 nutriment
| |
| |-
| |
| |[[File:pastatomato.png|50px]]
| |
| |'''Spaghetti
| |
| | Microwave 5 units water, 1 spaghetti (uncooked), 2 tomatoes.
| |
| | 6 nutriment, 14 tomato juice, .33 animal protein
| |
| |-
| |
| |[[File:meatballspag.png|50px]]
| |
| |'''Spaghetti & Meatballs
| |
| | Microwave 5 units water, 1 spaghetti (uncooked), 2 meatballs.
| |
| | 4 nutriment, 10.33 animal protein
| |
| |-
| |
| |[[File:spesslaw.png|50px]]
| |
| |'''Spesslaw
| |
| | Microwave 5 units water, 1 spaghetti (uncooked), 4 meatballs.
| |
| | 4 nutriment, 16.33 animal protein
| |
| |-
| |
| |[[File:superbite.png|50px]]
| |
| |'''Super Bite Burger
| |
| | Microwave 1 Big Bite Burger, 1 ball of dough, 1 meat, 1 tomato, 1 Boiled Egg, 1 cheese wedge, 5 units salt, 5 units pepper.
| |
| | 25 nutriment, 25 animal protein
| |
| |-
| |
| |[[File:candiedapple.png|50px]]
| |
| |'''Candied Apple
| |
| | Microwave 5 units water, 5 units sugar, 1 apple.
| |
| | 3 nutriment
| |
| |-
| |
| |[[File:jellyburger.png|50px]]
| |
| |'''Jelly Burger
| |
| | Microwave 1 bun, 5 units of cherry jelly or slime jelly.
| |
| Slime jelly will poison someone who eats it.
| |
| | 5 nutriment, 5 cherry jelly or <span style="color:red">5 slime jelly</span>, 1 animal protein
| |
| |-
| |
| |[[File:twobread.png|50px]]
| |
| |'''Two Bread
| |
| | Microwave 2 bread slices, 5 units wine.
| |
| | 2 nutriment, 0.4 animal protein, 1.2 egg yolk
| |
| |-
| |
| |[[File:Jellysandwich.png|50px]]
| |
| |'''Jelly Sandwich
| |
| | Microwave 2 bread slices, 5 units cherry jelly or slime jelly.
| |
| | 2 nutriment, 5 cherry jelly or <span style="color:red">5 slime jelly</span>, .4 animal protein, 1.6 egg yolk
| |
| |-
| |
| |[[File:tomatosoup.png|50px]]
| |
| |'''Tomato Soup
| |
| | Microwave 30 units blood!
| |
| | Smells like copper...
| |
| 2 animal protein, <span style="color:red">10 blood</span>, 5 water
| |
| |-
| |
| <!-- These two are totally missing
| |
|
| |
|
| | [[File:Tesla_22.png|350px]] |
|
| |
|
| | Missing Sprite
| | Make sure NOT to walk into the energy field, or you’ll be launched back, and that’ll hurt quite a bit on its own. But you might also fly into a wall or window or piece of machinery, and that’ll hurt even more. This can and will kill you if you’re careless. Make sure to be careful, and watch your step. Also, if you do trap yourself inside the energy field, call out over the radio and ask another engineer or the AI to disable the containment SMES so that the emitters are no longer powered. You’ll have to wait for the field generators to run out of power (just a couple seconds) for the energy fields to fail. |
| |'''Slime Soup
| |
| | Microwave 10 units of water, 5 units of slime jelly.
| |
| | 10 Water, <span style="color:red">5 Slime Jelly</span>
| |
| |-
| |
| | Missing Sprite
| |
| |'''Boiled slime Core
| |
| | Microwave 5 units of water, 1 slime core
| |
| | <span style="color:red">35 Slime Jelly</span>
| |
| |-
| |
|
| |
|
| | Once you do step outside the square, enable the last generator, and it should look like this. |
|
| |
|
| -->
| | [[File:Tesla_23.png|350px]] |
| |[[File:Chocegg.png|50px]]
| |
| |'''Chocolate Egg
| |
| | Microwave 1 egg, 1 chocolate bar.
| |
| | 3 nutriment, 4 sugar, 4 coco, 3 egg yolk
| |
| |-
| |
| |[[File:Sausage.png|50px]]
| |
| |'''Sausage
| |
| | Microwave 1 cutlet, 1 meatball.
| |
| | 12 animal protein
| |
| |-
| |
| |[[File:fishfingers.png|50px]]
| |
| |'''Fish Fingers
| |
| | Microwave 10 units flour, 3 units egg yolk, 1 carp meat.
| |
| | 7 animal protein, <span style="color:red">6 carpotoxin</span>, 3 egg yolk
| |
| |-
| |
| |[[File:Mysterysoup.png|50px]]
| |
| |'''Mystery Soup
| |
| | Microwave 10 units water, 1 Burned Mess, 1 tofu, 3 egg yolk, 1 cheese wedge.
| |
| | Always contains 4 animal protein, <span style="color:red">3+ toxin</span>, and 1+ carbon.
| |
| Possible other reagents: nutriment, <span style="color:blue">capsaicin</span>, tomato juice, <span style="color:blue">frost oil</span>, water, <span style="color:blue">tricordrazine</span>, banana juice, <span style="color:red">blood</span>, <span style="color:red">slime jelly</span>, or <span style="color:blue">imidazoline</span>.
| |
| |-
| |
| |[[File:phelmbiscuit.png|50px]]
| |
| |'''Plump Helmet Biscuit
| |
| | Microwave 1 plump helmet mushroom, 5 units water, 5 units flour.
| |
| | 5 nutriment, 10% chance of 8 nutriment and <span style="color:blue">5 tricordrazine</span>
| |
| |-
| |
| |[[File:mushroomsoup.png|50px]]
| |
| |'''Chantrelle Soup
| |
| | Microwave 5 units water, 5 units milk, 1 chantrelle mushroom.
| |
| | 8 nutriment
| |
| |-
| |
| |[[File:redcurry.gif|50px]]
| |
| |'''Red Curry
| |
| | Microwave 2 cutlets, 5 units cream, 2 units space spice, 5 units rice.
| |
| | 6 animal protein, 2 nutriment, 2 space spice
| |
| |-
| |
| |[[File:greencurry.gif|50px]]
| |
| |'''Green Curry
| |
| | Microwave 2 tofu, 1 chili pepper, 5 units cream, 2 units space spice, 5 units rice.
| |
| | 5 tofu, <span style="color:blue">2 capsaicin</span>, 1 nutriment, 2 space spice
| |
| |-
| |
| |[[File:yellowcurry.gif|50px]]
| |
| |'''Yellow Curry
| |
| | Microwave 2 peanuts, 1 potato, 5 units of cream, 2 units space spice, 5 units rice.
| |
| | 8 nutriment, 2 space spice
| |
| |-
| |
| |[[File:chawanmushi.png|50px]]
| |
| |'''Chawanmushi
| |
| | Microwave 5 units water, 5 units soy sauce, 6 units egg yolk, 1 chantrelle mushroom.
| |
| | 5 animal protein, 6 egg yolk
| |
| |-
| |
| |[[File:beetsoup.png|50px]]
| |
| |'''Borscht
| |
| | Microwave 10 units water, 1 white beet, 1 cabbage.
| |
| | "Wait, how do you spell it again..?"
| |
| 8 nutriment, 3 sugar
| |
| |-
| |
| |[[File:Herbsalad.png|50px]]
| |
| |'''Tossed Salad
| |
| | Microwave 2 cabbage, 1 tomato, 1 carrot, 1 apple.
| |
| | 8 nutriment, <span style="color:blue">5 imidazoline</span>, 2 tomato juice, 1 carrot juice
| |
| |-
| |
| |[[File:Aesirsalad.png|50px]]
| |
| |'''Aesir salad
| |
| | Microwave 1 ambrosia deus, 1 golden apple.
| |
| | 8 nutriment, <span style="color:blue">8 The Doctor's Delight</span>, <span style="color:blue">8 tricordrazine</span>, <span style="color:blue">1 bicaridine</span>, <span style="color:red">1 synaptizine</span>, <span style="color:blue">1 hyperzine</span>, <span style="color:blue">1 space drugs</span>, 3 gold.
| |
| |-
| |
| |[[File:Validsalad.png|50px]]
| |
| |'''Valid Salad
| |
| | Microwave 3 ambrosia vulgaris, 1 potato, 1 meatball.
| |
| | 6 nutriment, 5 animal protein, <span style="color:blue">3 space drugs</span>, <span style="color:blue">3 kelotane</span>, <span style="color:blue">3 bicaridine</span>, 2 potato juice
| |
| |-
| |
| |[[File:stuffing.png|50px]]
| |
| |'''Stuffing
| |
| | Microwave 1 Bread, 5 units water, 1 unit salt, 1 unit pepper.
| |
| | 3 nutriment, 1 animal protein, 3 egg yolk
| |
| |-
| |
| |[[File:tofurkey.png|50px]]
| |
| |'''Tofurkey
| |
| | Microwave 2 tofu, 1 Stuffing.
| |
| | 12 nutriment, <span style="color:blue">3 soporific</span>, 1 animal protein, 3 egg yolk
| |
| |-
| |
| |[[File:Taco.png|50px]]
| |
| |'''Taco
| |
| | Microwave 1 dough slice, 1 cutlet, 1 cheese wedge.
| |
| Alternatively, microwave 1 tortilla, 1 cutlet, 1 cheese wedge.
| |
| | 4 nutriment, 10.3 animal protein
| |
| |-
| |
| |[[File:chip_basket.png|50px]]
| |
| |'''Chip Basket
| |
| | Microwave 1 tortilla, 1 salt.
| |
| | 10 nutriment
| |
| |-
| |
| |[[File:nachos.png|50px]]
| |
| |'''Nachos
| |
| | Microwave 1 chip basket, 1 cheese wedge.
| |
| | 10 nutriment
| |
| |-
| |
| |[[File:salsadip.png|50px]]
| |
| |'''Salsa Dip
| |
| | Microwave 1 chili pepper, 1 tomato, 1 lime, 1 space spice, 1 salt, 1 pepper.
| |
| Dip chips or nachos in this!
| |
| | 20 nutriment
| |
| |-
| |
| |[[File:guacdip.png|50px]]
| |
| |'''Guacamole Dip
| |
| | Microwave 1 tofu, 1 chili pepper, 1 lime, 1 space spice, 1 salt, 1 pepper.
| |
| Dip chips or nachos in this!
| |
| | 20 nutriment
| |
| Don't tell anyone there's no avocado in it.
| |
| |-
| |
| |[[File:cheesedip.png|50px]]
| |
| |'''Cheese Sauce
| |
| | Microwave 1 cheese wedge, 1 chili pepper, 1 tomato, 1 space spice, 1 salt, 1 pepper.
| |
| Dip chips or nachos in this!
| |
| | 20 nutriment
| |
| |-
| |
| |[[File:burrito.png|50px]]
| |
| |'''Burrito
| |
| | Microwave 1 tortilla, 2 meatballs, 1 space spice.
| |
| | 6 nutriment, animal protein
| |
| |-
| |
| |[[File:veganburrito.png|50px]]
| |
| |'''Burrito (Vegan)
| |
| | Microwave 1 tortilla, 1 tofu.
| |
| | 6 nutriment, 4 tofu
| |
| |-
| |
| |[[File:spicyburrito.png|50px]]
| |
| |'''Burrito (Spicy)
| |
| | Microwave 1 burrito, 2 chili
| |
| | 6 nutriment, animal protein, capsaicin
| |
| |-
| |
| |[[File:cheesyburrito.png|50px]]
| |
| |'''Burrito (Cheesy)
| |
| | Microwave 1 burrito, 1 cheesewedge.
| |
| | 6 nutriment, animal protein
| |
| |-
| |
| |[[File:cheesyspicyburrito.png|50px]]
| |
| |'''Burrito (Cheesy/Spicy)
| |
| | Microwave 1 burrito, 1 cheesewedge, 2 chili.
| |
| | 6 nutriment, animal protein, capsaicin
| |
| |-
| |
| |[[File:hellburrito.png|50px]]
| |
| |'''Burrito (Hell)
| |
| | Microwave 1 burrito spicy, 10 chili.
| |
| | 6 nutriment, animal protein, capsaicin
| |
| While it may be a great Burrito, the peppers will still make it unpleasant.
| |
| |-
| |
| |[[File:mysteryburrito.png|50px]]
| |
| |'''Burrito (Mystery)
| |
| | Microwave 1 burrito, 1 mystery soup.
| |
| | 6 nutriment, ???
| |
| |-
| |
| |[[File:mint.png|50px]]
| |
| |'''Mint
| |
| | Microwave 5 units sugar, 5 units frost oil.
| |
| | 1 mint toxin
| |
| |-
| |
| |[[File:Breakfest_of_Guwandi.png|50px]]
| |
| |'''Breakfast of champions
| |
| | Microwave 1 sausage, 1 omelette, 1 meatsteak.
| |
| | 6 animal protein, 4 egg.
| |
| |-
| |
| |[[File:Moghresian Sea Delight.png|50px]]
| |
| |'''Moghresian Sea delight
| |
| | Microwave 3 eggs, 15 units blood.
| |
| | 4 egg.
| |
| |-
| |
| |[[File:Red Sun Special.png|50px]]
| |
| |'''Red Sun Special
| |
| | Microwave 1 sausage, 1 cheese wedge
| |
| | 2 animal protein.
| |
| |-
| |
| |[[File:Hatchling Surprise.png|50px]]
| |
| |'''Hatchling Suprise
| |
| | Microwave 1 poached egg, 3 bacon.
| |
| | 2 egg, 4 animal protein.
| |
| |-
| |
| |[[File:Meat Pancake.png|50px]]
| |
| |'''Meat Pancake
| |
| | Microwave 3 meatball, 1 omelette.
| |
| | 2 egg, 6 animal protein.
| |
| |-
| |
| |[[File:Chilied Eggs.png|50px]]
| |
| |'''Chilied Eggs
| |
| | Microwave 1 hotchili, 3 boiled egg.
| |
| | 6 egg, 2 animal protein.
| |
| |-
| |
| |[[File:Stuffed Meatball.png|50px]]
| |
| |'''Stuffed Meatball
| |
| | Microwave 1 meatball, 1 cheese wedge, 1 cabbage.
| |
| | 4 animal protein.
| |
| |-
| |
| |[[File:Seared Carp.png|50px]]
| |
| |'''Korlaaskak
| |
| | Microwave 6 carp meat, 1 cabbage, 1 lime, 1 units space spice.
| |
| | 12 seafood.
| |
| |-
| |
| |[[File:friedkois.png|50px]]
| |
| |'''Fried K'ois
| |
| | Microwave 1 k'ois spore
| |
| | <span style="color:red">6 k'ois paste</span>, <span style="color:red">9 phoron</span>
| |
| Poisonous to everything but Vaurca. Curiously, not fried in the fryer.
| |
| |-
| |
| |[[File:koiskebab3.png|50px]]
| |
| |'''K'ois Kebab
| |
| | Combine up to 3 Fried K'ois with 1 metal rod.
| |
| | <span style="color:red">6/12/18 k'ois paste</span>, <span style="color:red">9/12/15 phoron</span>
| |
| Poisonous to everything but Vaurca.
| |
| |-
| |
| |[[File:koissoup.png|50px]]
| |
| |'''K'ois Soup
| |
| | Use a rolling pin on 1 Fried K'ois.
| |
| | <span style="color:red">15 k'ois paste</span>, <span style="color:red">10 phoron</span>
| |
| Poisonous to everything but Vaurca.
| |
| |-
| |
| |[[File:koiswaffles.png|50px]]
| |
| |'''K'ois Waffles
| |
| | Microwave 1 K'ois Soup.
| |
| | <span style="color:red">25 k'ois paste</span>, <span style="color:red">12 phoron</span>
| |
| Poisonous to everything but Vaurca.
| |
| |-
| |
| |[[File:koisjelly.png|50px]]
| |
| |'''K'ois Jelly
| |
| | Microwave 1 K'ois Soup, 2 k'ois spores.
| |
| | <span style="color:red">25 k'ois paste</span>, <span style="color:red">20 phoron</span>, <span style="color:blue">20 imidazoline</span>
| |
| Poisonous to everything but Vaurca.
| |
| |-
| |
| |[[File:burnedmess.png|50px]]
| |
| |'''Burned Mess
| |
| | Created when you try to microwave an invalid recipe. It may also break or dirty the microwave.
| |
| | <span style="color:red">1+ toxin</span>, 3+ carbon
| |
| |-
| |
| |[[File:Baconburger.png|50px]]
| |
| |'''Bacon Burger
| |
| | Microwave a bun, meat, and three bacon
| |
| |
| |
| |-
| |
| |[[File:NT muffin.png|50px]]
| |
| |'''NT Muffin
| |
| | Microwave a plump helment biscuit, sausage, fried egg, and cheese wedge.
| |
| |
| |
| |-
| |
| |[[File:Fishtaco.png|50px]]
| |
| |'''Fish taco
| |
| | Microwave carp meat and a tortilla
| |
| |
| |
| |-
| |
| |[[File:BLT.png|50px]]
| |
| |'''BLT
| |
| | Microwave two bread, two bacon, one tomato and one cabbage.
| |
| |
| |
| |-
| |
| |[[File:Porkbowl.png|50px]]
| |
| |'''Porkbowl
| |
| | Microwave 10 rice, 5 water, 1 bacon.
| |
| | 4 protein, 6 rice.
| |
| |-
| |
| |[[File:Berrymuffin.png|50px]]
| |
| |'''Berrymuffin
| |
| | Microwave 5 sugar, 5 milk, 1 dough ball, 1 berry.
| |
| | 6 nutriment.
| |
| |-
| |
| |[[File:Mashedpotato.png|50px]]
| |
| |'''Nashed potato
| |
| | Microwave 1 potato.
| |
| | 4 nutriment.
| |
| |-
| |
| |[[File:Onionrings.png|50px]]
| |
| |'''Onion Rings
| |
| | Microwave 1 onion, 1 doughslice.
| |
| | 5 nutriment.
| |
| |-
| |
| |[[File:Onionsoup.png|50px]]
| |
| |'''Onionsoup
| |
| | Microwave 1 onion, 10 water.
| |
| | 5 nutriment.
| |
| |-
| |
| |}
| |
| </div></div>
| |
|
| |
|
| | Now that this is done, you’re finally ready to turn on the Particle Accelerator! Go back into the observation room, activate the Control Computer (Run Scan for parts if you haven’t already), turn the PA’s power up to 2, and turn it ON. It should look like this; |
|
| |
|
| <!-- overflow:auto; to fix collapsed display, because the toggle link has float:right; -->
| | [[File:Tesla_24.png|350px]] |
| <div class="toccolours mw-collapsible" style="width:99%; overflow:auto;">
| |
|
| |
|
| ===Oven===
| | (Note: I walked into the energy field and died so I had to respawn as a drone. BE CAREFUL!) |
| [[File:oven.gif|50px]]
| |
| <br>
| |
| *Before you can use the oven, it must be preheated. Right-click and select Toggle Power to turn it on. Preheating takes several minutes, but after a short while it can be used to cook even if not fully preheated. The food will cook more slowly until preheating is complete. Examine the oven while next to it to see how hot it is.
| |
| **You can alt+click the oven to open and close the oven door.
| |
| **If the oven door is left open, heat will escape. Make sure it's closed, especially when cooking and preheating!
| |
|
| |
|
| *To add a single food item to the oven, use the food directly on the oven, which will place it into an empty oven tray. If you want to cook a recipe that requires multiple ingredients, remove one of the oven trays, put all recipe ingredients into it, and then put the tray back in the oven.
| |
|
| |
|
| *The oven can cook any variety and quantity of recipes simultaneously, as long as you have all the ingredients in a single tray.
| | Once you enable the Particle Accelerator, it’ll take a minute or two for the engine to properly start up. Don’t worry if nothing happens for a bit, because that’s quite normal. You’ll know the engine is working when you suddenly hear a loud and repetitive sound of thunder, and see arcs of electricity flying around. You should keep it on for a little bit and watch the energy ball generate smaller ones that float around it. It’s worth keeping in mind that the more of these small balls there are, the more electricity the Tesla engine will produce, and the further the bolts can travel. However, if it produces too many, the Tesla will grow too powerful for containment and begin to melt the equipment to escape. Roughly 8 to 10 balls is a good target, as that will max out the amount of power the SMES can input, and it won’t be strong enough to escape its cage. |
| **Any leftover reagents will be absorbed into the cooked foods.
| |
| *When not making a recipe the oven can also be used to just bake any food, which will cook it, give it a nice brown colour.
| |
|
| |
|
| *The oven can also be used for Combination Cooking, which allows you to make custom bread, pies, cakes, and pizzas with whatever fillings/toppings you want. To do this, right click and Choose Output, select the combine target, and then insert an oven tray full of ingredients.
| | Now, turn the PA strength down to 0 and leave it on, this should stop it from gaining more energy and will keep it sustained. Now, there’s no need to worry, the Tesla is up and running and likely powering the station! Make sure to check up on it over the cameras every now and then, just to be sure things are running smoothly, or check on it in person. |
| **The quantity of stuff used to make it will determine the size of the result.
| |
| **Combination Cooking can only make one item at a time - whatever output is set will only work for the next item cooked.
| |
|
| |
|
| | A PA on 0 looks like this: |
|
| |
|
| <div class="mw-collapsible-content">
| | [[File:Tesla_25.png|350px]] |
|
| |
|
| {| class="sortable" border="1" cellspacing="0" cellpadding="2" align="center"
| | == TESLOOSE == |
| ! style='background-color:Red;'|
| | In the event that the Tesla gets loose, the most important thing you can do is keep calm. The ball is capable of jumping z-levels, and it will vaporize any walls, windows, machines or people in its path, while also shooting blasts of lightning as it does so. Luckily, located in Hard Storage is an emergency beacon that exists for this very event that will save the day, called the emergency singularity beacon. It’s called this because it also works for an escaped Singularity, too. |
| ! style='background-color:Red;'|Result
| |
| ! style='background-color:Red;'|Recipe
| |
| ! style='background-color:Red;'|Reagents & Notes
| |
| |-
| |
| |[[File:Ovenchips.png|50px]]
| |
| |'''Oven chips
| |
| | Bake 1 raw potato sticks.
| |
| | 4 nutriment
| |
| |-
| |
| |[[File:dionaroast.png|50px]]
| |
| |'''Diona Roast
| |
| | Bake 1 Diona nymph, 1 apple, 5 units polytrinic acid.
| |
| | 6 nutriment, <span style="color:red">2 radium</span>
| |
| |-
| |
| |[[File:ribplate.png|50px]]
| |
| |'''Rib Plate
| |
| | Bake 1 meat, 5 units honey, 2 units space spice, 1 unit black pepper.
| |
| Obtain honey from beehives, or small amounts by grinding up the Messa's tear plant.
| |
| | 6 animal protein, 5 honey, 2 triglyceride, 1 black pepper
| |
| |-
| |
| |[[File:Bacon.png|50px]]
| |
| |'''Oven-cooked Bacon
| |
| | 6 Raw Bacon, 1 spread
| |
| Mass baked Bacon.
| |
| | .3 animal protein, 1 unit Triglyceride
| |
| |-
| |
| |[[File:meatbread.png|50px]]
| |
| |'''Meatbread Loaf
| |
| | Bake 3 meat, 3 balls of dough, 3 cheese wedges.
| |
| | 10 nutriment, 20 animal protein
| |
| Sliceable: Makes 5 slices.
| |
| |-
| |
| |[[File:xbread.png|50px]]
| |
| |'''Xenomeatbread
| |
| | Bake 3 xeno-meat, 3 balls of dough, 3 cheese wedges.
| |
| | 10 nutriment, 32.5 animal protein, <span style="color:red">7.5 polytrinic acid</span>
| |
| Sliceable: Makes 5 slices.
| |
| |-
| |
| |[[File:meatbread.png|50px]]
| |
| |'''Synthbread
| |
| | Bake 3 synthmeat, 3 balls of dough, 3 cheese wedges.
| |
| | 10 nutriment, 20 animal protein
| |
| Sliceable: Makes 5 slices.
| |
| |-
| |
| |[[File:Bananabread.gif|50px]]
| |
| |'''Banana-nut Bread
| |
| | Bake 3 balls of dough, 5 units milk, 15 units sugar, 1 banana.
| |
| | 20 nutriment, 21 banana juice, 3 animal protein
| |
| Sliceable: Makes 5 slices.
| |
| |-
| |
| |[[File:bun.png|50px]]
| |
| |'''Bun
| |
| |Bake 1 dough.
| |
| |3 nutriment, 1 animal protein
| |
| |-
| |
| |[[File:honeybun.png|50px]]
| |
| |'''Honeybun
| |
| |Bake 1 dough, 5 honey.
| |
| |3 nutriment, 5 honey, 1 animal protein
| |
| |-
| |
| |[[File:tofubread.png|50px]]
| |
| |'''Tofu-Bread
| |
| | Bake 3 tofu, 3 cheese wedges, 3 balls of dough.
| |
| | 30 nutriment, 15 animal protein
| |
| Sliceable: Makes 5 slices.
| |
| |-
| |
| |[[File:baguette.png|50px]]
| |
| |'''Baguette
| |
| | Bake 2 balls of dough, 1 unit salt, 1 unit pepper.
| |
| | 6 nutriment, 1 pepper, 1 salt, 2 animal protein
| |
| |-
| |
| |[[File:Flatbread.png|50px]]
| |
| |'''Flatbread
| |
| | Bake 1 flat dough.
| |
| | 3 nutriment, 1 animal protein
| |
| |-
| |
| |[[File:creambread.png|50px]]
| |
| |'''Cream Cheese Bread
| |
| | Bake 2 balls of dough, 2 cheese wedges.
| |
| | 5 nutriment, 25 animal protein.
| |
| Sliceable: Makes 5 slices.
| |
| |-
| |
| |[[File:bread.png|50px]]
| |
| |'''Bread
| |
| | Bake 4 balls of dough, 1 unit salt.
| |
| | 6 nutriment, 1 animal protein, 3 egg yolk
| |
| Sliceable: Makes 5 slices. Bread slices can be turned into custom sandwiches by combining them with any food item.
| |
| |-
| |
| |[[File:bread.png|50px]]
| |
| |'''Bread
| |
| | Bake 4 balls of dough, 1 unit salt.
| |
| | 6 nutriment, 1 animal protein, 3 egg yolk
| |
| Sliceable: Makes 5 slices. Bread slices can be turned into custom sandwiches by combining them with any food item.
| |
| |-
| |
| |[[File:Pancakes.png|50px]]
| |
| |'''Pancakes
| |
| | Bake 2 flatdough, 2 berries.
| |
| | 8 nutriment
| |
| |-
| |
| |[[File:meatpies.png|50px]]
| |
| |'''Meat-Pie
| |
| | Bake 1 meat, 1 flat dough.
| |
| | 20 animal protein
| |
| |-
| |
| |[[File:meatpies.png|50px]]
| |
| |'''Tofu-Pie
| |
| | Bake 1 tofu, 1 flat dough.
| |
| | 10 nutriment, 1 animal protein
| |
| |-
| |
| |[[File:xpie.png|50px]]
| |
| |'''Xeno-Pie
| |
| | Bake 1 xeno-meat, 1 flat dough.
| |
| | 17 animal protein, <span style="color:red">6 polytrinic acid</span>
| |
| |-
| |
| |[[File:pie.gif|50px]]
| |
| |'''Banana Cream Pie
| |
| | Bake 1 flat dough, 1 banana, 5 units sugar.
| |
| | 4 nutriment, 6 banana juice, 1 animal protein
| |
| |-
| |
| |[[File:Cherrypie.png|50px]]
| |
| |'''Cherry Pie
| |
| | Bake 1 cherry, 1 flat dough, 10 units sugar.
| |
| | 4 nutriment, 1 sugar, 1 cherry jelly, 1 animal protein
| |
| |-
| |
| |[[File:Pumpkinpie.png|50px]]
| |
| |'''Pumpkin Pie
| |
| | Bake 1 pumpkin, 10 units flour, 3 units egg yolk, 5 units milk, 5 units sugar.
| |
| | 15 nutriment
| |
| Sliceable: Makes 5 slices.
| |
| |-
| |
| |[[File:gappletart.png|50px]]
| |
| |'''Golden Apple Streusel Tart
| |
| | Bake 10 units flour, 1 egg, 1 golden apple, 5 units milk, 5 units sugar.
| |
| | 8 nutriment, 8 gold, 3 egg yolk
| |
| |-
| |
| |[[File:keylimepie.gif|50px]]
| |
| |'''Key Lime Pie
| |
| | Bake 2 limes, 10 units flour, 3 units egg yolk, 5 units milk, 5 units sugar.
| |
| | 16 nutriment
| |
| Sliceable: Makes 5 slices.
| |
| |-
| |
| |[[File:Amapie.png|50px]]
| |
| |'''Amanita Pie
| |
| | Bake 1 flat dough, 5 units amatoxin.
| |
| | 5 nutriment, <span style="color:red">3 amatoxin</span>, <span style="color:blue">1 psilocybin</span>, 1 animal protein
| |
| |-
| |
| |[[File:Plumppie.GIF|50px]]
| |
| |'''Plump Pie
| |
| | Bake 1 flat dough, 1 plump helmet.
| |
| | 8 nutriment, 1 animal protein, 10% chance of <span style="color:blue">5 tricordrazine</span>
| |
| |-
| |
| |[[File:quiche.gif|50px]]
| |
| |'''Quiche
| |
| | Bake 9 units egg yolk, 10 units flour, 5 units milk, 1 cheese wedge
| |
| | 10 nutriment, 10 cheese
| |
| Sliceable: Makes 5 slices.
| |
| |-
| |
| |[[File:cookie.png|50px]]
| |
| |'''Cookie
| |
| | Bake 1 ball of dough, 1 chocolate bar, 10 units milk, 10 units sugar.
| |
| Makes four cookies.
| |
| | 5 nutriment, 2 sugar, 2 coco, 1 animal protein
| |
| |-
| |
| |[[File:fortunecookie.png|50px]]
| |
| |'''Fortune Cookie
| |
| | Bake 1 dough slice, 5 units sugar, 1 piece of paper.
| |
| Write something on the paper to serve as the fortune!
| |
| | 3 nutriment, .33 animal protein
| |
| |-
| |
| |[[File:poppypretzel.png|50px]]
| |
| |'''Poppy Pretzel
| |
| | Bake 1 ball of dough, 1 poppy.
| |
| | 10 nutriment, 1 animal protein, <span style="color:blue">3 bicaridine</span>
| |
| |-
| |
| |[[File:cracker.png|50px]]
| |
| |'''Cracker
| |
| | Bake 1 dough slice, 1 unit salt.
| |
| | 1 nutriment, .3 animal protein
| |
| You might also get these by gibbing a parrot! In that case, they have 5.4 nutriment, for some reason.
| |
| |-
| |
| |[[File:Cheese_Cracker.png|50px]]
| |
| |'''Supreme Cheese Toast
| |
| | Bake 1 spread, 1 breadslice, 1 unit space spice.
| |
| | 8 nutriment.
| |
| |-
| |
| |[[File:enchi.png|50px]]
| |
| |'''Enchiladas
| |
| | Bake 1 cutlet, 2 chilis, 1 corn.
| |
| Alternatively, bake 1 tortilla, 1 cutlet, 2 chili peppers.
| |
| | 9 animal protein, 2 nutriment, <span style="color:blue">20 capsaicin</span>, 3 corn oil
| |
| |-
| |
| |[[File:monkeydel.png|50px]]
| |
| |'''Monkey's Delight
| |
| | Bake 1 monkey cube, 10 units flour, 1 banana, 1 unit salt, 1 unit pepper.
| |
| | 20 animal protein, 6 banana, 1 pepper, 1 salt
| |
| |-
| |
| |[[File:regularcake.png|50px]]
| |
| |'''Vanilla Cake
| |
| | Bake 5 units milk, 15 units flour, 15 units sugar, 9 units egg yolk.
| |
| | 20 nutriment.
| |
| Sliceable: Makes 5 slices.
| |
| |-
| |
| |[[File:carrotcake.png|50px]]
| |
| |'''Carrot Cake
| |
| | Bake 5 units milk, 15 units flour, 15 units sugar, 9 units egg yolk, 3 carrots.
| |
| | 25 nutriment, <span style="color:blue">25 imidazoline</span>
| |
| Sliceable: Makes 5 slices.
| |
| |-
| |
| |[[File:cheesecake.png|50px]]
| |
| |'''Cheese Cake
| |
| | Bake 5 units milk, 15 units flour, 15 units sugar, 9 units egg yolk, 2 cheese wedges.
| |
| | 10 nutriment, 19 animal protein
| |
| Sliceable: Makes 5 slices.
| |
| |-
| |
| |[[File:orangecake.png|50px]]
| |
| |'''Orange Cake
| |
| | Bake 5 units milk, 15 units flour, 5 units sugar, 9 units egg yolk, 3 units orange juice, 1 orange.
| |
| | 20 nutriment, 1 orange juice
| |
| Sliceable: Makes 5 slices.
| |
| |-
| |
| |[[File:limecake.png|50px]]
| |
| |'''Lime Cake
| |
| | Bake 5 units milk, 15 units flour, 5 units sugar, 9 units egg yolk, 3 units lime juice, 1 lime.
| |
| | 20 nutriment, 1 lime juice
| |
| Sliceable: Makes 5 slices.
| |
| |-
| |
| |[[File:lemoncake.png|50px]]
| |
| |'''Lemon Cake
| |
| | Bake 5 units milk, 15 units flour, 5 units sugar, 9 units egg yolk, 3 units lemon juice, 1 lemon.
| |
| | 20 nutriment, 1 lemon juice
| |
| Sliceable: Makes 5 slices.
| |
| |-
| |
| |[[File:choccake.png|50px]]
| |
| |'''Chocolate Cake
| |
| | Bake 5 units milk, 15 units flour, 5 units sugar, 9 units egg yolk, 4 units coco, 1 chocolate bar.
| |
| | 20 nutriment, 4 sugar, 4 coco powder
| |
| Sliceable: Makes 5 slices.
| |
| |-
| |
| <!-- |[[File:birthday.png|50px]]
| |
| |'''Birthday Cake
| |
| | Bake 5 units milk, 15 units flour, 15 units sugar, 9 units egg yolk, 1 red candle.
| |
| | 20 nutriment, 10 sprinkles
| |
| Sliceable: Makes 5 slices.
| |
| |- -->
| |
| |[[File:applecake.png|50px]]
| |
| |'''Apple Cake
| |
| | Bake 5 units milk, 15 units flour, 15 units sugar, 9 units egg yolk, 2 apples.
| |
| | 15 nutriment
| |
| Sliceable: Makes 5 slices.
| |
| |-
| |
| <!-- |[[File:Braincake.png|50px]]
| |
| |'''Brain Cake
| |
| | Bake 5 units milk, 15 units flour, 15 units sugar, 9 units egg yolk, 1 brain.
| |
| | 5 nutriment, 20 animal protein, <span style="color:red">10 alkysine</span>, <span style="color:red">5 blood</span>
| |
| Sliceable: Makes 5 slices.
| |
| |- -->
| |
| |[[File:brownies.png|50px]]
| |
| |'''Brownies
| |
| | Bake 10 units brownie mix, 3 units egg yolk.
| |
| | 8 nutriment, 2 brownie mix
| |
| Sliceable: Makes 4 pieces.
| |
| |-
| |
| |[[File:cosmicbrownies.png|50px]]
| |
| |'''Cosmic Brownies
| |
| | Bake 10 units brownie mix, 3 units egg yolk, 1 ambrosia vulgaris.
| |
| | 8 nutriment, 4 brownie mix, <span style="color:blue">4 space drugs</span>, <span style="color:blue">2 bicaridine</span>, <span style="color:blue">2 kelotane</span>, <span style="color:red">2 toxin</span>
| |
| Sliceable: Makes 4 pieces.
| |
| |-
| |
| |[[File:Margheritapizza.png|50px]]
| |
| |'''Margherita
| |
| | Bake 1 flat dough, 4 cheese wedges, 1 tomato.
| |
| | 35 nutriment, 8 tomato juice, 7 animal protein
| |
| Sliceable: Makes 6 slices.
| |
| |-
| |
| |[[File:meatpizza.png|50px]]
| |
| |'''Meatpizza
| |
| | Bake 1 flat dough, 3 meat, 1 cheese wedge, 1 tomato.
| |
| Substituting synthetic meat from chemistry will also work.
| |
| | 40 animal protein, 10 nutriment
| |
| Sliceable: Makes 6 slices.
| |
| |-
| |
| |[[File:mushroompizza.png|50px]]
| |
| |'''Mushroom Pizza
| |
| | Bake 1 flat dough, 5 chantrelle mushrooms, 1 cheese wedge, 1 tomato.
| |
| | 35 nutriment, 10 animal protein, 2 tomato juice
| |
| Sliceable: Makes 6 slices.
| |
| |-
| |
| |[[File:vegepizza.png|50px]]
| |
| |'''Vegetable Pizza
| |
| | Bake 1 flat dough, 1 cheese wedge, 1 eggplant, 1 carrot, 1 corn, 1 tomato.
| |
| | 30 nutriment, 6 tomato juice, <span style="color:blue">9 imidazoline</span>, 5 animal protein
| |
| Sliceable: Makes 6 slices.
| |
| |-
| |
| |[[File:meatpizza.png|50px]]
| |
| |'''Synthflesh Pizza
| |
| | Bake 1 flat dough, 1 cheese wedge, 3 synthflesh, 1 tomato.
| |
| | 40 animal protein, 10 nutriment
| |
| Sliceable: Makes 6 slices.
| |
| |-
| |
| |[[File:Pineapple_pizza.png|50px]]
| |
| |'''Pineapple Pizza
| |
| | Bake 1 flat dough, 1 cheese wedge, 2 pineapple rings
| |
| |
| |
| |-
| |
| |[[File:Meat_pocket.png|50px]]
| |
| |'''Meat Pocket
| |
| | Bake 1 flat dough, 1 meat ball, 1 cheese wedge
| |
| | Results in 2 units
| |
| |
| |
| |-
| |
| |
| |
| |'''Bacon Flatbread
| |
| | Bake 1 flat dough, 1 cheese wedge, 4 bacon, 2 tomatoes
| |
| |
| |
| |-
| |
| |[[File:Truffle.png|50px]]
| |
| |'''Truffle
| |
| | Bake 1 chocolate bar, 2 coco powder, 5 cream
| |
| | Results in 4 units
| |
| |-
| |
| |[[File:Croissant.png|50px]]
| |
| |'''Croissant
| |
| | Bake 1 dough, 1 sodium chloride, 5 water, 5 milk
| |
| |
| |
| |-
| |
| |}
| |
| </div></div>
| |
|
| |
|
| | [[File:Tesla_27.png|350px]] |
| | [[File:Tesla_28.png|200px]] |
| | [[File:Tesla_29.png|350px]] |
|
| |
|
| <!-- overflow:auto; to fix collapsed display, because the toggle link has float:right; -->
| | Once screwed down, all you need to do is click on it with a free hand to turn it on, and it should light up. You should step behind it, not in between it and the raging lightning ball. |
| <div class="toccolours mw-collapsible" style="width:99%; overflow:auto;">
| |
|
| |
|
| ===Deepfryer===
| | When the Tesla ball gets close enough, it will shoot a lightning arc at the beacon - which will turn it to ash. Don’t panic, that’s supposed to happen! After that happens, the Tesla ball will disappear. |
| [[File:fryer.gif|50px]]
| |
| <br>
| |
| *Before you can use the fryer, it must be preheated. Right-click and select Toggle Power to turn it on. Heating up takes a while, so be sure to do it early. Prepare other ingredients while it warms up!
| |
| *The deep fryer has an oil level that you should keep an eye on - cooking efficiency will fall as it drops, and it starts off at a randomized level. For optimal cooking, keep the oil topped up to the maximum.
| |
| **You can sometimes find a spare tank of cooking oil in the maintenance behind the kitchen. Otherwise, you can order one from cargo.
| |
|
| |
|
| *To add a single food item to the fryer, use the food directly on it, which will place that item into an empty fryer basket. If you want to cook a recipe that requires multiple ingredients, remove one of the fryer baskets by clicking the fryer with an empty hand, and put all your ingredients into the basket. Once everything for the recipe is inside, put the basket back in the fryer.
| | [[File:Tesla_30.png|215px]] |
|
| |
|
| *The fryer can cook any variety and quantity of recipes simultaneously, as long as you have all the ingredients in a single basket.
| | Now that that’s handled; conduct repairs, and if necessary have evac called. You stopped the tesla, but depending on how long it has been rampaging, you might not have much of a station left. Survey the damage and pass on to the rest of command your opinion on the matter. |
| **Many fryer recipes require an ingredient to be coated in batter or beer-batter for the recipe to work. See the next section for an explanation of battering foods.
| |
| **Any leftover reagents will be absorbed into the cooked foods.
| |
| *When not making a recipe the fryer can also be used to just "deep fry" any food, which will cook it, give it a nice brown color, and add some extra nutrition to it.
| |
|
| |
|
| <div class="mw-collapsible-content">
| | == Final Notes == |
| | In the event that you need to start the Tesla due to an issue with the Supermatter -- most likely delamination, it’s important that you coordinate with the other engineers to get it set up as fast as possible, because starting the Tesla is not easy when you lack any power in the Tesla Bay APC, which is what the Particle Accelerator draws from. If you need to set it up, and power is low, make sure to bring some extra charged power cells to swap out with ones in the APC -- or bring along a PACMAN generator, and temporarily disconnect the cable that leads out into the station’s main grid, so that you can keep the APC powered, and the PA functioning, until the engine is properly up. Also remember: if someone tells you that setting up the Tesla is a bad idea, that you’re not allowed to without the Captain’s/CE’s permission (though please ask your CE’s permission if you do have one), that it’s dangerous, or that it can’t power the station; then politely inform them they’re wrong, and set it up anyway. It’s always a good idea to have a backup, you don’t need permission unless it’s explicitly prohibited by Command, and it can power the station, so don’t listen to them. Be the hero that the station needs. |
|
| |
|
| {| class="sortable" border="1" cellspacing="0" cellpadding="2" align="center"
| | Enjoy your much more interesting engine! |
| ! style='background-color:Red;'|
| |
| ! style='background-color:Red;'|Result
| |
| ! style='background-color:Red;'|Recipe
| |
| ! style='background-color:Red;'|Reagents & Notes
| |
| |-
| |
| |[[File:Batteredsausage.png|50px]]
| |
| |'''Battered Sausage
| |
| | Fry 1 Sausage, battered.
| |
| | 6 protein, 1.7 batter, 1.5 oil
| |
| |-
| |
| |[[File:Corndog.png|50px]]
| |
| |'''Corndog
| |
| | Fry 1 Sausage, 1 batter,
| |
| | 4 nutriment, 12 animal protein
| |
| |-
| |
| |[[File:Pizzacrunch.png|50px]]
| |
| |'''Crunchy Pizza
| |
| | Fry 1 Pizza Slice, battered.
| |
| | 25 nutriment, 6.5 batter, 4 oil
| |
| |-
| |
| |[[File:Cubancarp.png|50px]]
| |
| |'''Cuban Carp
| |
| | Fry 1 chili, 1 ball of dough, 1 carp meat.
| |
| | 3 seafood, 3 nutriment, <span style="color:red">3 carpotoxin</span>, <span style="color:blue">3 capsaicin</span>
| |
| |-
| |
| |[[File:Sweet and Sour.png|50px]]
| |
| |'''Sweet and Sour
| |
| | Fry 1 Bacon, 1 cutlet, 5 soysauce, 10 batter.
| |
| | 3 protein, 6 nutriment
| |
| |-
| |
| |[[File:donuts.png|50px]]
| |
| |'''Donut
| |
| | Fry 1 ball of dough, 10 units sugar.
| |
| | 3 nutriment, 1 sprinkles (3 if frosted), 1 animal protein
| |
| |-
| |
| |[[File:donuts.png|50px]]
| |
| |'''Donut (Chaos)
| |
| | Fry 1 ball of dough, 10 units sugar, 10 units Hot Sauce, 10 units Cold Sauce.
| |
| | Always: 2 nutriment, 1 sprinkles (3 if frosted), 1 animal protein
| |
| Chance of containing an additional 3 units of one of the following: nutriment, <span style="color:blue">capsaicin</span>, <span style="color:blue">frost oil</span>, sprinkles, <span style="color:red">phoron</span>, coco,<span style="color:red">slime jelly</span>, banana, berry juice, or <span style="color:blue">tricordrazine</span>
| |
| |-
| |
| |[[File:jdonut1.gif|50px]][[File:jdonut2.png|50px]]
| |
| |'''Donut (Jelly)
| |
| | Fry 1 ball of dough, 10 units sugar, 10 units of berry juice/cherry jelly/slime Jelly.
| |
| | 3 nutriment, 1 sprinkles (3 if frosted), 5 berry juice or cherry jelly or <span style="color:red">slime jelly</span>, 1 animal protein
| |
| |-
| |
| |[[File:friedmushroom.gif|50px]]
| |
| |'''Fried Mushroom
| |
| | Fry 1 plump helmet mushroom, beer-battered.
| |
| | 4 nutriment, 2 protein
| |
| |-
| |
| |[[File:funnelcake.gif|50px]]
| |
| |'''Funnel Cake
| |
| | Fry 10 batter, 5 sugar.
| |
| | 10 batter, 5 sugar
| |
| |-
| |
| |[[File:Jalapenopop.png|50px]]
| |
| |'''Jalapeno Popper
| |
| | Fry 1 chili, battered.
| |
| | 1.5 nutriment, 0.3 batter, 0.15 oil
| |
| |-
| |
| |[[File:Katsu.png|50px]]
| |
| |'''Katsu
| |
| | Fry 1 chicken meat, beer-battered.
| |
| | 6 protein, 2 beer batter, 1 oil
| |
| |-
| |
| |[[File:pisanggoreng.png|50px]]
| |
| |'''Pisang Goreng
| |
| | Fry 2 bananas, battered.
| |
| | 8 nutriment
| |
| |-
| |
| |[[File:risottoballs.png|50px]]
| |
| |'''Risotto Balls
| |
| | Fry 1 salt, 1 black pepper, 1 Risotto, battered.
| |
| | 2 nutriment, 4 rice, 1 black pepper
| |
| |-
| |
| |[[File:Fries.png|50px]]
| |
| |'''Space Fries
| |
| | Fry 1 raw potato sticks.
| |
| | 4 nutriment
| |
| |-
| |
| |}
| |
| </div></div>
| |
| | |
| | |
| <!-- overflow:auto; to fix collapsed display, because the toggle link has float:right; -->
| |
| <div class="toccolours mw-collapsible" style="width:99%; overflow:auto;">
| |
| | |
| ===Batter===
| |
| | |
| You can coat food in batter before putting it in the deepfryer!
| |
| *Nearly everything you can fry can be coated in batter.
| |
| *Put all of the ingredients of the batter in a container to create the batter, then use a food item on the container to cover it in batter.
| |
| *The ingredients for the batter can be mixed in any kind of container.
| |
| | |
| <div class="mw-collapsible-content">
| |
| | |
| {| class="sortable" border="1" cellspacing="0" cellpadding="2" align="center"
| |
| ! style='background-color:Red;'|
| |
| ! style='background-color:Red;'|Result
| |
| ! style='background-color:Red;'|Recipe
| |
| ! style='background-color:Red;'|Reagents & Notes
| |
| |-
| |
| |[[File:Condiment.png|50px]]
| |
| |'''Batter
| |
| | Mix 1 egg, 10 units flour, 5 units water, 2 units salt.
| |
| | TBA
| |
| |-
| |
| |[[File:Condiment.png|50px]]
| |
| |'''Beerbatter
| |
| | Mix 1 egg, 10 units flour, 5 units beer, 2 units salt.
| |
| | TBA
| |
| |}
| |
| | |
| </div></div>
| |
| | |
| | |
| <!-- overflow:auto; to fix collapsed display, because the toggle link has float:right; -->
| |
| <div class="toccolours mw-collapsible" style="width:99%; overflow:auto;">
| |
| | |
| ===Intermediate Ingredients===
| |
| These items are usually steps on the way to more complicated recipes. Try to prepare them while waiting on the oven and the fryer.
| |
| | |
| <div class="mw-collapsible-content">
| |
| | |
| | |
| {| width='100%' | style='text-align:left; background-color:#FFFFFF;' border=1 cellspacing=0
| |
| ! style='background-color:Red;'|
| |
| ! style='background-color:Red;'|Result
| |
| ! style='background-color:Red;'|Recipe
| |
| ! style='background-color:Red;'|Notes
| |
| |-
| |
| |[[File:Bun.png|50px]]
| |
| |'''Bun
| |
| | Bake 1 ball of dough in the oven.
| |
| | 4 nutriment, 1 animal protein
| |
| |-
| |
| |[[File:tortilla.png|50px]]
| |
| |'''Tortilla
| |
| | Microwave 5 flour, 5 water, 1 salt.
| |
| | 6 nutriment.
| |
| |-
| |
| |[[File:Flat Dough.png|50px]]
| |
| |'''Flat Dough
| |
| | Roll 1 ball of dough with a rolling pin.
| |
| | 3 nutriment, 1 animal protein
| |
| Sliceable: Makes 3 dough slices.
| |
| |-
| |
| |[[File:Dough Slice.png|50px]]
| |
| |'''Dough Slice
| |
| | Cut 1 flat dough with a kitchen knife.
| |
| | 2 nutriment, .33 animal protein
| |
| |-
| |
| |[[File:Spaghetti.png|50px]]
| |
| |'''Spaghetti
| |
| | Cut 1 dough slice with a kitchen knife.
| |
| | 3 nutriment, .33 animal protein
| |
| |-
| |
| |[[File:egg.png|50px]]
| |
| |'''Egg
| |
| | Found in kitchen storage, can be ordered at Cargo, gathered from a chicken that has been fed wheat, or harvested from a mutated eggplant plant.
| |
| | 3 egg yolk
| |
| |-
| |
| |[[File:egg.png|50px]]
| |
| |'''Egg Yolk
| |
| | Use an egg on any container to break 3 units of egg yolk into it. Eggs can also be ground up in the grinder. Be careful to check whether the a recipe needs egg yolk or whole eggs!
| |
| |
| |
| |-
| |
| |[[File:meat.png|50px]]
| |
| |'''Meat
| |
| | From butchering most animals and people. The gibber will not accept people unless emagged. Synthetic meat can be created from the Biogenerator in hydroponics, or made by mixing blood and clonexadone.
| |
| | Varying amounts of animal protein and nutriment.
| |
| |-
| |
| |[[File:Raw Cutlet.png|50px]]
| |
| |'''Raw Cutlet
| |
| | Cut 1 meat (any type) with a kitchen knife.
| |
| | 1 animal protein
| |
| |-
| |
| |[[File:Cutlet.png|50px]]
| |
| |'''Cutlet
| |
| | Microwave 1 raw cutlet.
| |
| | 3 animal protein
| |
| |-
| |
| |[[File:Raw_Bacon.png|50px]]
| |
| |'''Raw Bacon
| |
| | Cut 1 raw cutlet with a kitchen knife.
| |
| | .3 animal protein
| |
| |-
| |
| |[[File:carpfillet.png|50px]]
| |
| |'''Carp Meat
| |
| | Butcher a dead space carp (using the gibber yields three fillets, cutting with a knife yields one).
| |
| | 3-10 animal protein, <span style="color:red">3 carpotoxin</span>, ~9 nutriment
| |
| |-
| |
| |[[File:xenomeat.png|50px]]
| |
| |'''Xeno Meat
| |
| | Butcher a dead giant spider or a xenomorph.
| |
| | 6 animal protein, 6 <span style="color:red">polytrinic acid</span>, ~9 nutriment
| |
| |-
| |
| |[[File:bearmeat.png|50px]]
| |
| |'''Bear Meat
| |
| | Butcher a dead space bear.
| |
| | ~12 animal protein, 5 <span style="color:blue">hyperzine</span>, ~9 nutriment
| |
| |-
| |
| |[[File:mushroomslice.png|50px]]
| |
| |'''Huge Mushroom Slice
| |
| | Butcher a dead walking mushroom.
| |
| | ~7 nutriment, 3 <span style="color:blue">psilocybin</span>
| |
| |-
| |
| |[[File:tomatoslice.png|50px]]
| |
| |'''Tomato Slice
| |
| | Butcher a dead killer tomato.
| |
| | ~12 nutriment.
| |
| |-
| |
| |[[File:Raw_Sticks.png|50px]]
| |
| |'''Raw Potato Sticks'''
| |
| | Cut 1 potato with a kitchen knife.
| |
| | 3 nutriment
| |
| |-
| |
| |[[File:Carrotfries.png|50px]]
| |
| |'''Carrot Fries'''
| |
| | Cut 1 carrot with a kitchen knife.
| |
| | 3 nutriment, <span style="color:blue">3 imidazoline</span>
| |
| |-
| |
| |[[File:Soydope.png|50px]]
| |
| |'''Soy Dope
| |
| | Cut 1 soybean with a kitchen knife.
| |
| | 2 nutriment
| |
| |-
| |
| |}
| |
| | |
| | |
| </div></div>
| |
| | |
| | |
| <!-- overflow:auto; to fix collapsed display, because the toggle link has float:right; -->
| |
| <div class="toccolours mw-collapsible" style="width:99%; overflow:auto;">
| |
| | |
| ===Reagents/Condiments/Recipes from Blending or Mixing===
| |
| To mix reagents, put them in the same container. You will hear a bubbling sound if mixing is successful.
| |
| *To see exactly what you've mixed, use a beaker and then add it to a nearby All-In-One Grinder or ChemMaster machine.
| |
| *Grinding a completed food item in the grinder reduces it to the reagents inside.
| |
| | |
| <div class="mw-collapsible-content">
| |
| | |
| | |
| {| width='550' style='text-align:left; background-color:#FFFFFF;' border=1 cellspacing=0
| |
| ! style='background-color:Green;'|
| |
| ! style='background-color:Green;'|Reagent
| |
| ! style='background-color:Green;'|How to Obtain
| |
| |-
| |
| |[[File:Condiment.png|50px]]
| |
| |'''Animal Protein'''
| |
| | Process meat or protein-containing foods.
| |
| |-
| |
| |[[File:Condiment.png|50px]]
| |
| |'''Cherry Jelly'''
| |
| | Process cherries from the garden. Rarely, cargo may have containers that you can fill a dispenser with in their warehouse.
| |
| |-
| |
| |[[File:Coldsauce.png|50px]]
| |
| |'''Cold Sauce/Frost Oil'''
| |
| | Process ice peppers from the garden, or even Xenobotany. Lowers body temperature, causes shivering, and removes capsaicin from your body quickly.
| |
| |-
| |
| |[[File:Cornoil.png|50px]]
| |
| |'''Corn oil'''
| |
| | Process corn from the garden. Can be spread on the floor as a lubricant to slip people!
| |
| |-
| |
| |[[File:Marge.png|50px]]
| |
| |'''Nutri-spread'''
| |
| | Created in the biogenerator for 80 biomass.
| |
| |-
| |
| |[[File:Butter.png|50px]]
| |
| |'''Butter'''
| |
| | Created by mixing 20 cream and 1 salt.
| |
| |-
| |
| |[[File:Condiment.png|50px]]
| |
| |'''Brownie Mix'''
| |
| | Mix 5 units flour, 5 units cocoa, and 5 units sugar.
| |
| |-
| |
| |[[File:Condiment.png|50px]]
| |
| |'''Egg Yolk'''
| |
| | Process an egg, or crack an egg into a container.
| |
| |-
| |
| |[[File:Flour.png|50px]]
| |
| |'''Flour'''
| |
| | Process wheat from the garden, or pour directly from a flour sack.
| |
| |-
| |
| |[[File:Hotsauce.png|50px]]
| |
| |'''Hot Sauce/Capsaicin'''
| |
| | Process chili peppers from the garden. Capsaicin raises body temperature, causes discomfort, and removes frost oil from your body when eaten. Causes 0.5 toxin damage per unit if injected.
| |
| |-
| |
| |[[File:Ketchup.png|50px]]
| |
| |'''Ketchup'''
| |
| | Mix 2 parts tomato juice, 1 part water, and 1 part sugar.
| |
| |-
| |
| |[[File:Condiment.png|50px]]
| |
| |'''Nutriment'''
| |
| | Process almost any food.
| |
| |-
| |
| |[[File:pepper.png|50px]]
| |
| |'''Pepper'''
| |
| | Extra pepper mills are in the bar, or can be ordered in a Kitchen Supple Crate from cargo.
| |
| |-
| |
| |[[File:Condiment.png|50px]]
| |
| |'''Rice'''
| |
| | Process Rice. Ground rice is what is used in most recipes, rather than the whole plant.
| |
| |-
| |
| |[[File:Salt.png|50px]]
| |
| |'''Salt'''
| |
| | Found in salt shakers, or by mixing sodium and chlorine from the chem dispenser. If the chemist won't oblige, there are extra salt shakers in the bar, and they can also be ordered in a Kitchen Supply Crate from cargo.
| |
| |-
| |
| |[[File:spacespice.gif|50px]]
| |
| |'''Space Spice'''
| |
| | A large bottle is available in the kitchen storage locker. Additional spice can be ordered in a Kitchen Supple Crate from cargo.
| |
| |-
| |
| |[[File:Soysauce.png|50px]]
| |
| |'''Soy Sauce'''
| |
| | Mix 4 units of soy milk, 1 unit of sulphuric acid from chemistry.
| |
| |-
| |
| |[[File:Condiment.png|50px]]
| |
| |'''Sprinkles'''
| |
| | Process frosted donuts, found around the station or prepared yourself.
| |
| |-
| |
| |[[File:emptycondiment.png|50px]]
| |
| |'''Sugar'''
| |
| | Process white beet or sugarcane.
| |
| |-
| |
| |}
| |
| | |
| | |
| {| width='550' style='text-align:left; background-color:#FFFFFF;' border=1 cellspacing=0
| |
| ! style='background-color:Green;'|
| |
| ! style='background-color:Green;'|Food
| |
| ! style='background-color:Green;'|How to Obtain
| |
| ! style='background-color:Green;'|Contains
| |
| |-
| |
| |[[File:Cheesewheel.gif|50px]]
| |
| |'''Cheese Wheel'''
| |
| | Mix 40 units milk, 5 universal enzyme (catalyst).
| |
| Sliceable: Makes 8 slices.
| |
| | 20 animal protein
| |
| |-
| |
| |[[File:chocolatebar.gif|50px]]
| |
| |'''Chocolate Bar'''
| |
| | Mix 2 units coco, 2 units milk (or soymilk), 2 units sugar.
| |
| | 2 nutriment, 2 sugar, 2 coco
| |
| |-
| |
| |[[File:Tofu.gif|50px]]
| |
| |'''Tofu'''
| |
| | Mix 10 units soymilk, 5 units universal enzyme (catalyst).
| |
| | 3 nutriment
| |
| |-
| |
| |[[File:Dough.png|50px]]
| |
| |'''Dough
| |
| | Mix 3 units egg yolk, 10 units flour.
| |
| Can be made quickly by adding an egg directly to a flour sack, which counts as a reagent container.
| |
| | 3 nutriment, 1 animal protein
| |
| |-
| |
| |[[File:Meatball.png|50px]]
| |
| |'''Meatball'''
| |
| | Mix 3 units animal protein, 5 units flour.
| |
| | 3 Animal Protein
| |
| |-
| |
| |}
| |
| </div></div>
| |
| | |
| | |
| <!-- overflow:auto; to fix collapsed display, because the toggle link has float:right; -->
| |
| <div class="toccolours mw-collapsible" style="width:99%; overflow:auto;">
| |
| | |
| ==Junk Food==
| |
| | |
| When there's no chef, the chef is serving toxic glop, or the chef is trying to murder you and your friends, most people resort to one of two things: [[Guide to Hydroponics|grazing on produce]], or the vending machines.
| |
| | |
| <div class="mw-collapsible-content">
| |
| | |
| | |
| Junk food requires no chef or machinery, but it's generally not as filling or as interesting.
| |
| | |
| {| width='550' style='text-align:left; background-color:#FFFFFF;' border=1 cellspacing=0
| |
| ! style='background-color:Aqua;'|
| |
| ! style='background-color:Aqua;'|Item
| |
| ! style='background-color:Aqua;'|Source | |
| ! style='background-color:Aqua;'|Reagents & Notes
| |
| |-
| |
| |[[File:Candy.png|50px]]
| |
| |'''Candy'''
| |
| | Purchase from Getmore Chocolate Corp. vending machine.
| |
| | 1 nutriment, 3 sugar
| |
| |-
| |
| |[[File:Chips.png|50px]]
| |
| |'''Chips'''
| |
| | Purchase from Getmore Chocolate Corp. vending machine.
| |
| | 3 nutriment
| |
| |-
| |
| |[[File:Ramen.png|50px]]
| |
| |'''Cup Ramen '''
| |
| | Purchase from Getmore Chocolate Corp. vending machine.
| |
| | 30 dry ramen
| |
| |-
| |
| |[[File:Ramen.png|50px]]
| |
| |'''Hot Ramen'''
| |
| | Mix 3 parts Dry Ramen, 1 part water.
| |
| | Makes 3 parts Hot Ramen.
| |
| |-
| |
| |[[File:Ramen.png|50px]]
| |
| |'''Hell Ramen'''
| |
| | Mix 1 part capsaicin, 6 parts Hot Ramen.
| |
| Raises body temperature.
| |
| | Makes 6 parts Hell Ramen
| |
| |-
| |
| |[[File:Jerky.png|50px]]
| |
| |'''Scaredy's Private Reserve Beef Jerky'''
| |
| | Purchase from Getmore Chocolate Corp. vending machine.
| |
| | 4 animal protein
| |
| |-
| |
| |[[File:Raisins.png|50px]]
| |
| |'''4no Raisins '''
| |
| | Purchase from Getmore Chocolate Corp vending machine.
| |
| | 6 nutriment
| |
| |-
| |
| |[[File:Twinkie.png|50px]]
| |
| |'''Space Twinkie'''
| |
| | Purchase from Getmore Chocolate Corp. vending machine.
| |
| | 4 sugar
| |
| |-
| |
| |[[File:CheesieHonkers.png|50px]]
| |
| |'''Cheesie Honkers'''
| |
| | Purchase from Getmore Chocolate Corp. vending machine.
| |
| | 4 nutriment
| |
| |-
| |
| |[[File:breadtube.png|50px]]
| |
| |'''Bread Tube'''
| |
| | Purchase from Getmore Chocolate Corp. vending machine.
| |
| | 12 nutriment
| |
| |-
| |
| |[[File:Syndiecake.png|50px]]
| |
| |'''Syndi-Cake'''
| |
| | Hack a Getmore Chocolate Corp. vending machine to unlock these for purchase.
| |
| | 4 nutriment
| |
| |-
| |
| |[[File:SkrellSnax.png|50px]]
| |
| |'''SkrellSnax'''
| |
| | Purchase from Getmore Chocolate Corp. vending machine.
| |
| | 10 nutriment
| |
| |-
| |
| |[[File:Monkeycube.png|50px]]
| |
| |'''Monkey Cube'''
| |
| | Stocked in Science and Virology.
| |
| | 10 animal protein
| |
| Eating this will kill you as a monkey grows inside you. Also comes in Stok, Farwa, and Naera varieties, available through [[Cargo]].
| |
| |-
| |
| |[[File:liquidfood.png|50px]]
| |
| |'''LiquidFood Ration'''
| |
| | Can be found on the shuttle as emergency rations, or in the Mining reward vending machine.
| |
| | 10 nutriment, 3 iron
| |
| |-
| |
| <!-- |[[File:Honeycomb.png|50px]]
| |
| |'''Honeycomb'''
| |
| | From Beekeeping
| |
| | 10 Honey, 0.5 Nutriment, 2 Sugar
| |
| |-
| |
| -->
| |
| |[[File:Koisbar.png|50px]]
| |
| |'''K'ois Bar'''
| |
| | Purchase from Getmore Chocolate Corp. vending machine.
| |
| | <span style="color:red">10 K'ois Paste</span>, <span style="color:red">15 Phoron</span>
| |
| Poisonous to everything except Vaurca.
| |
| |-
| |
| |[[File:Breakfast_wrap.png|50px]]
| |
| |'''Breakfast Wrap'''
| |
| |
| |
| | 6 nutriment
| |
| |-
| |
| |}
| |
| | |
| </div></div>
| |
| | |
| | |
| <!-- overflow:auto; to fix collapsed display, because the toggle link has float:right; -->
| |
| <div class="toccolours mw-collapsible" style="width:99%; overflow:auto;">
| |
| | |
| ==Advanced Cooking==
| |
| | |
| Some reagents in finished recipes are poisonous or have undesirable effects. If you're a traitor that may be the point, but if you're just feeling fancy you may want to try and serve these items safely. A little creative chemistry or careful preparation can help get rid of the dangerous reagents in your food.
| |
| | |
| <div class="mw-collapsible-content">
| |
| | |
| | |
| Any piece of food can contain up to 50 units of reagents, including those that are created with it.
| |
| | |
| *When using medicines, be careful not to add too much to avoid triggering an overdose.
| |
| *Reagents that react inside the food to neutralize a poison may be dangerous themselves until they react. Using too much will leave poisonous leftovers.
| |
| *Reagents can be removed from food with a syringe, and separated using the CondiMaster in the kitchen. Get that Carpotoxin outta there!
| |
|
| |
| | |
| {| width='550' style='text-align:left; background-color:#FFFFFF;' border=1 cellspacing=0
| |
| ! style='background-color:Aqua;'|Reagent
| |
| ! style='background-color:Aqua;'|How to Neutralize
| |
| |-
| |
| | Blood
| |
| | Blood is not necessarily poisonous. It is always the same type as the person it was taken from, and if the type is incompatible with the recipient, it will cause a rejection reaction.
| |
| O-negative blood is always safe.
| |
| Add one unit of dylovene for every four units of blood.
| |
| Alcoholic drinks created with blood of any type are safe. Be sure there is no blood left over after the reaction.
| |
| Blood can also be neutralized with clonexadone (1 unit clonexadone to 5 units blood).
| |
| |-
| |
| | Carpotoxin
| |
| | Anything made with carp meat will have carpotoxin in it. Since it metabolizes very slowly, using dylovene in the food is ineffective.
| |
| | |
| Carpotoxin reacts with copper and cryptobiolin to form rezadone, a wonderful healing medicine with minor side effects. This is the best way to make carpotoxin safe.
| |
| |-
| |
| | Amatoxin
| |
| | Found in fly amanita mushrooms. Add 1 unit dylovene per 2 units amatoxin.
| |
| |-
| |
| | Toxin
| |
| | Add 1 unit dylovene per 2 units toxin.
| |
| |-
| |
| | Slime Jelly
| |
| | This jelly poison your customers no matter how much dylovene you add. Adding dylovene (No more than 30 units or so) will keep them from dying of the poisoning before they can get to Medical, but if you're not a traitor, do you want to serve them such a painful dish? (No, don't answer that. We know customers can be annoying, but that's still no excuse to poison them.)
| |
| |-
| |
| | Radium
| |
| | Found in roast diona. This will cause radiation poisoning. Add 1 unit of dylovene per unit of radium, which will react to form hyronalin.
| |
| |-
| |
| | Sulphuric Acid
| |
| | Dylovene won't cut it for sulphuric acid, which will burn as well as poison anyone unlucky enough to ingest it. Instead, neutralize each 1 unit of Sulphuric acid with either 3 units of corn oil (creates glycerol), 4 units of soymilk (creates soy sauce), or 5 units of wine (creates Acid Spit, an alcoholic cocktail).
| |
| |-
| |
| | Polytrinic Acid
| |
| | You're serious about serving that xeno meat, huh? Well, don't serve it plain; polytrinic acid will poison, burn, and generally kill your customers in a gruesome manner. Like with sulphuric acid dylovene isn't enough, but unlike sulphuric acid, it's not easy to neutralize. Polytrinic acid will react with foaming agent and either iron or aluminum to create metal foam, and 10 units of polytrinic acid with 20 units of plasticide will create plastic. When working out how to do this, remember that plasticide is poisonous, and metal foam can be chipped through with a kitchen knife.
| |
| |-
| |
| | Alcohol (Ethanol)
| |
| | An equal amount of ethylredoxrazine reacts with ethanol (including alcoholic drinks) to make water.
| |
| |-
| |
| | Synaptizine
| |
| | Synaptizine is poisonous, but the bigger problem is that it hangs around in the system for a long time. For every unit of synaptizine, you need 30 units of dylovene, which makes treating it this way impractical.
| |
| |-
| |
| | Phoron
| |
| | Really, now? You could neutralize phoron by adding 2 rum and 1 vermouth per unit, but eating phoron is still a bit of a waste....
| |
| |-
| |
| |}
| |


