|
|
| Line 1: |
Line 1: |
| {{JobPageHeader
| | == Introduction: Shields and you AKA How to not die a rocky/fishy death == |
| |headerbgcolor = #05A3A4
| |
| |headerfontcolor = white
| |
| |stafftype = SECURITY
| |
| |imagebgcolor = #9eb7ff
| |
| |img = Warden-nbt.png
| |
| |jobtitle = Warden
| |
| |access = [[Security_Officer#The_Equipment|Armory]], [[Job_Guides#Internal_Security|Security]], [[Security_Officer#The_Brig|Brig]] Timers, Warden's Office, [[Security_Officer#The_Brig|Prison Wing]], Maintenance
| |
| |difficulty = Hard
| |
| |qualifications = At least 25 years of age, applicable criminal justice degree or 7 years experience in Prisoner Management field.
| |
| |employers = [[Zavodskoi Interstellar]], [[Idris Incorporated]], [[Private Military Contracting Group | The Private Military Contracting Group]]
| |
| |duties = Ensure the arrested prisoners don't escape, issue weapons to security, manage the Brig.
| |
| |superior = [[Head of Security]]
| |
| |guides = [[Security_Officer#Standard_Procedure|The Standard Procedure]], [[Corporate Regulations]], [[Guide to EVA]]
| |
| }}
| |
| The '''Warden''' is a member of the security staff and is responsible for the brig and the prisoners. They also have access to the armory and are responsible for handing out equipment. They have control over the [[Security_Officer#The_Brig|Brig]] and the [[Security_Officer#Processing|Processing]]. Much like the rest of the department, wardens are expected to have EVA training.
| |
|
| |
|
| ==''Intra''departmental Relations==
| |
| === Head of Security ===
| |
| The [[Head of Security]] holds authority over the entire department. The main priorities of the Head of Security (often shortened to HOS or Commander) are to organize and manage Security such that the ship and crew remain safe and that anyone who breaks regulations is dealt with swiftly and properly. Because of the coordination required in Security, and the Head of Security being one person, they need the best and most up-to-date information. As a Warden, you are expected to assist the Head of Security in handling of equipment, warrants, and communication about new and current prisoners in the brig.
| |
|
| |
|
| === Security Officer ===
| | '''''(This guide assumes a basic knowledge of current station layout (layout as of 10/04/2019). If you need location terms explained, feel free to send an AHelp during the round, or ask on Discord.''''' |
| [[Security Officer|Security Officers]] are the bulk of Security's manpower, and are who you will be working with the most. In normal operations, Officers find and arrest wanted crew members based on warrants which you authorize. The Officers then bring the arrested crew member to the Brig for you to process into a prisoner. Remember that you are '''NOT''' the superior of the Officers. Only the Head of Security holds a higher rank.
| |
|
| |
|
| === Investigator ===
| | So you’ve been tasked with setting the shields, and you have no idea what to do, huh? What are these shields and why should we care? It’s important to understand first off, that there are two types of shields involved. We’ll touch on what each type does, so you have an idea of their use. |
| The [[Investigator]] is the primary crime investigation force aboard the ship. During standard operations, the Investigator and Warden remain relatively isolated from each other. Outside of reviewing evidence to apply certain charges and coordinated warrants to end or further a case, the interaction between Investigator and Warden is outside of normal job duties.
| |
|
| |
|
| Investigators are not exempt from the Warden's authority in the brig, however are equal in authority and rank to the Warden beyond this.
| |
|
| |
|
| === Cadet === | | {| class="sortable" border="1" cellspacing="0" cellpadding="2" align="center" |
| The Cadet is the learner of the department. While their experience may vary, each cadet is here to learn about the department in some way. Not all cadets are learning exclusively to become an officer. Some are being oriented to later become an Investigator or Warden. Find out what a cadet is aiming for and help them in their journey to one day shift into that role with experience. The Cadet is only position which all other positions in Security have authority over.
| | ! style='background-color:Chocolate;'|Type of Shield |
| | ! style='background-color:Chocolate;'|Style of Projection |
| | ! style='background-color:Chocolate;'|Common Usage |
| | |- |
| | !Hull Shield |
| | |Project shields on the surface of the station hull, like a skin surrounding it. |
| | |Carp Migrations, Lost Drones from NDV Icarus, Hostile Forces |
| | |- |
| | !Bubble Shield |
| | |Project shields around the station in a bubble, protecting the station and anything else within. |
| | |Meteor Showers |
| | |} |
|
| |
|
| === Problematic Colleagues ===
| |
| While the Warden does '''NOT''' hold authority over other Security members except when in the Brig, there is a expectation of the Warden, as well as fellow Security staff, to hold problematic coworkers accountable. This can go from warnings up to a full arrest. No one in Security is above the regulations with some regulations, such as illegal detention, being targeted towards Security itself. If you see a coworker breaking a regulation, hold them accountable. You can authorize an arrest warrant should the issue escalate to a level requiring an arrest. Letting issues slide is a negative for both the ship and the department.
| |
|
| |
|
| ==Watch Hound==
| | With that said, let’s get to what we’re going to need to set up the shields, and where they’re stored. |
| Half of your job is to look after the prisoners; make sure they [[NanoTrasen_Liaison#Submitting_an_Incident_Report|aren't abused]] or given [[Corporate Regulations|unfair sentences]] and that they [[Traitor|don't escape]]. The other half of your job is to arm security with weapons in [[Captain#Alerts_and_SOP|emergencies]]. You are not a [[Security Officer]] and '''should not leave the brig if possible.''' However, you may operate as an officer shall the need arise, under the permission of your [[Head of Security]].
| |
|
| |
|
| If you have no prisoners to watch out for, you can be helpful to your team by coordinating with officers over your radio channel, checking cameras when people call for help, and updating arrest records. You can also do roll call every so often, to make sure that the officers are still alive and well. You have the opportunity to make Security run like a well-oiled machine, but don't start acting like [[Head of Security|your boss.]]
| | == Tools of the Trade: What you’ll need to set up the Hull and Bubble Shields, and where can you find it? == |
|
| |
|
| Also make sure you keep track of what's in the armory. While you do not start with a list of everything in the armory, it is the same between shifts. You should keep track of who and what is being taken and their reason why. Moreoever, make sure the armory stock is well-balanced. Sometimes, the people at Central forget to stock a certain type of weaponry, whether lethal or non-lethal; and it is your job to make sure the [[Job_Guides#Supply|situation is remedied]] before it's too late. It is important to note though, that the crew armory is '''not''' your responsibility. Leave it and it's operations to command staff.
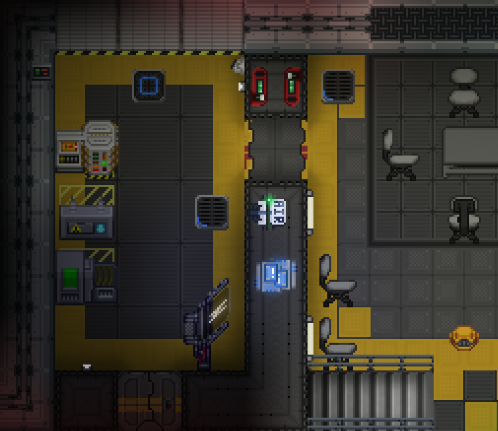
| | Shields are now automatically set up on the surface, and simply require wrenching down and configuring, so walk up to the surface via the main elevators, and head to just below the garden, through the blue doors. |
|
| |
|
| Remember to follow [[Corporate Regulations]] and not abuse your prisoners. Some may get rowdy or hostile, but make sure to use appropriate force. You don't need to stun baton a mouthy prisoner. Keep in mind the Brig is outfitted with flashes throughout the cells, communal cell, and solitary. Use them when needed, alongside using the solitary cell, to keep overly aggressive prisoners from causing too many issues.
| | [[File:SetupShields-ShieldRoom.png]] |
|
| |
|
| ==Running the Brig== | | == Setting up the Shield Generators == |
| As a Warden, you have full control over the entirety of the [[Security_Officer#The_Brig|Brig]]. Other than that, you are on the same level as [[Investigator|everyone else]] [[Security Officer|in Security]]. You report to the [[Head of Security]] just like every other officer.
| |
|
| |
|
| Unlike every other officer, you have the independent authority to issue arrest and search warrants as long as there is sufficient cause to. This responsibility is not an indicator of elevated rank - it just allows security to function appropriately when the Command Staff normally responsible are missing. '''You should not be issuing warrants unless your normal oversight''' (in the form of a [[Head of Security]] or the [[Captain]]) '''is not present.''' Even then, it's a good idea to ask or inform any present command staff if the warrant is a for a crime of level 200 and above. Any warrants you issue independently will be subject to review by either of these people later on.
| | *Step 1: Ensure both the generators and both the capacitors are bolted down to the floor. Use the wrench to bolt them down if they're not. |
|
| |
|
| Have an advanced knowledge of [[Corporate Regulations]] and [[Guide to Station Procedure|ship procedure]], and also be aware of all [[Guide to Station Procedure|CCIA Notices]]. There aren't many people who want to be brigged for no reason, and ''nobody'' wants to be held until transfer without due cause. If necessary, you might even need to release a prisoner for being held unlawfully.
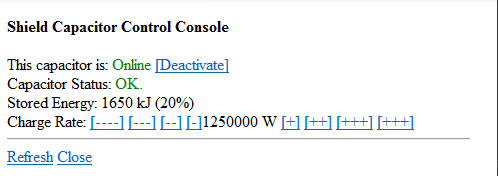
| | *Step 2: Click on both capacitors, and set them to click the [Activate] button. Additionally, if danger is imminent, set the charge rate higher; make sure the engine can take it. The maximum is 400000 W. |
|
| |
|
| ===Equipment===
| | [[File:Shieldguide24.png]] |
| All of the necessary equipment needed to be a warden can be found in the Warden's Locker within the Warden's office. It carries the expected array of equipment, including a disruptor, police tape, body armor, duty belt, and so on. This equipment is the same as what the Security Officers receive. There are additional items, however, that assist in running the brig.
| |
|
| |
|
| The Warden receives two boxes of grenades in their locker; one box contains flashbangs and the other contains pepperspray grenades. These grenades are not for routine use, however are available to hand out to officers as needed to deal with certain situations aboard the vessel.
| | [[File:Shieldguide25.png]] |
|
| |
|
| In order to service fines, the Warden receives an EFTPOS. This device is essentially a card reader that charges an inputted amount from whichever card is swiped. The device comes with a list of instructions on use alongside the access code needed to set-up the scanner.
| | *Step 4. Set the settings of the shield generators properly. The Coverage Radius (restart required) for '''both generators''' should be 100m. Use the “<font color=blue>+++</font>” button to quickly raise it to the maximum. The Charge Rate for '''both generators''' should be 0.3 Renwick/s. Use the “<font color=blue>++</font>” button to raise it up by one point (the default is 0.2 Renwick/s). Finally, the Maximum Field Strength for '''both generators''' should be 3 Renwick. Use the “<font color=blue>[min]</font>” button, followed by two presses of the “<font color=blue>+</font>” button to set it properly. The settings are shown correctly below. |
|
| |
|
| In some cases, there is not an ID available for a prisoner. In these situations, there is a box of blank id-cards in your closet.
| | '''''Default Setup''''' |
| These can be used to process prisoners who have "lost" their own id-cards.
| | [[File:Shieldguide27.png]] |
| To do so, get one of the blank id-cards from the box in your closet, remove any gloves the prisoner might be wearing, then target their hands and click on them with the blank id-card in hand.
| |
| This is done to imprint the biometric details of the prisoner onto the id-card.
| |
| Once you have done that, you can use the id-card to sentence them as usual.
| |
|
| |
|
| ===Processing===
| | '''''Correct Setup''''' |
| One of the main duties of the Warden is to process incoming criminals for their charges. This process can be quick or excruciatingly long. Either way, spend as little time processing while still being thorough, otherwise you risk [[Guide to Standard Procedure#Processing Time|breaking the regulations yourself]]. The following are the general steps to processing new prisoners.
| | [[File:Shieldguide28.png]] |
|
| |
|
| ====The Hand-Off====
| | These settings allow for a low strength field that covers almost all of the station. |
| The first step of processing any new prisoner is the hand-off from the Officers to you. In some cases, especially those where there isn't an on-going situation, it can be incredibly useful to ask the Officer to remain for the duration of processing. Beyond this, the Officer will bring the prisoner to a processing cell, buckle them to the chair within, and typically give a summary of charges or of the incident itself over radio, then return to patrolling. In this time you are expected to make your way to the processing cells.
| |
|
| |
|
| ====Evidence and Charges====
| | In the unlikely event that you have a specific area that needs shielding, you can unwrench the capacitor and shield, move them to the danger zone, and engage them there. If you are doing this, it's suggested to set the "Maximum Field Strength" to max, and the coverage radius to a relatively low value. |
| The next step of the process is searching the prisoner and determining the charges. The former is simple: Search every bag, jacket, and pocket the prisoner possesses. Make sure to grab their ID as well as it will be useful later. If the prisoner is wearing boots, it may be useful to check the boots for a hidden knife as well. Any [[Guide to Contraband|contraband]] or evidence can be set aside and bagged for storage while the remaining items are set aside to be returned after the prisoner's sentence is over. Remember, anything that isn't contraband is the property of the arrested crew member. You cannot withhold it without a good reason, otherwise it is [[Corporate Regulations|theft]].
| |
|
| |
|
| '''Helpful tip:''' To make quick work of searching bags, you can click on a bag that is in your active hand to dump all of its contents onto the floor.
| | Congratulations! The shields are now properly set up for an emergency. Remember to leave them <font color=red>Offline</font> unless there’s a need for them, as they drain massive amounts of power. |
|
| |
|
| Next, ask the arresting officer for a summary of the incident. This summary will be used for both record keeping and for determining the exact charges that will be applied. In some cases, having an informal interview with the prisoner can be useful as well, especially if the situation leading to their arrest was unclear and multiple parties involved are present in security. Once you have determined the charges being applied, inform the prisoner. If the charges have applicable fines, make sure to ask whether the prisoner would rather brig time or a fine instead. If they lack enough credits to pay a fine, the prisoner must serve the brig time instead.
| | {{Gameplay_Guides}} |
| | |
| ====Applying the Charges====
| |
| Now comes the final step involving the processing cell. Take the prisoner's ID, any evidence in the case, and witness IDs if available. Open the processing terminal on the wall opposite of the prisoner and start a "new report". Swipe the prisoner's ID to register them as the target for the charges, then scan in each witness ID and piece of evidence into their respective categories. Then write a summary of the incident. This summary should be brief as a way to get an idea across of what caused the charges. Now the charges can be applied. There are individual categories for the different levels of charges, make sure to select the correct level for a given charge. After the charges have been selected, the brig time or fine can be chosen. The terminal automatically sets the range of time or credits for the applied charges, however it is up to you to determine how high or low the punishment is within this range.
| |
| | |
| With the charges prepared and everything ready, all that needs to be done is to render the prisoner guilty. This can be done by pressing the "render guilty" button. There is a second button that applies the fine rather than the brig time. Make sure to select the appropriate one.
| |
| | |
| ====Serving the Consequences====
| |
| Now with the charges applied, you can finish processing and hand out the chosen punishment. If the guilty crew member must pay a fine, prepare your EFTPOS within your office for the amount listed and swipe their ID. This should transfer the credits and service the fine. After this, the crew member in question can be released back to the ship with their belongings and ID.
| |
| | |
| If the crew member is to serve brig time, a decision needs to be made based on the length of their sentence. If the sentence is long enough, or even a Hold Until Transfer, it may be worth spending the time to change their clothing into prisoner oranges. This orange jumpsuit has its sensors permanently on allowing easy tracking should the prisoner attempt escape or self-harm. If the sentence is too short, however, simply letting the prisoner serve their time in their normal clothes is fine.
| |
| | |
| After this decision has been made, the prisoner and their belongings should be transferred to an open cell. The belongings should be placed within the cell's locker with that locker then locked. The prisoner should be buckled to the bed, their handcuffs removed, and the cell timer started. To begin the cell timer, insert the encryption paper created by the processing terminal when the charges were applied and select "start timer". After the brig timer has passed, the cell door will open and allow the crew member to leave. When this happens, security will receive an alert. You should attempt to be present and assist the crew member in leaving.
| |
| | |
| ===Don't Sit Around===
| |
| Sitting at your desk is alright, but you should make sure to scan the cell blocks every once in a while to make sure no one is hurt in the cells, or there are any areas of break in. Your job is to protect all of security from people busting in, or out. A quick sweep every few minutes should be fine, being a warden is a mostly relaxing job, just make sure to stun anyone who is behaving suspiciously in security and hold them till the Head of Security comes. Remember, talk first, disarm second, kill if that's your only option (it never is).
| |
| | |
| If you are going to sit around, it may be worthwhile to update the security records for your prisoners. Seriously. Update the security records. Alternatively, you can help coordinate officers by taking the role of dispatch. Listen for calls for security over the radio and direct officers to these situations. Help with information or suggestions when it's necessary. Just remember to not start taking the roll of [[Head of Security|your boss]].
| |
| | |
| {{Guides}} | |
| {{Jobs}}
| |
Introduction: Shields and you AKA How to not die a rocky/fishy death
(This guide assumes a basic knowledge of current station layout (layout as of 10/04/2019). If you need location terms explained, feel free to send an AHelp during the round, or ask on Discord.
So you’ve been tasked with setting the shields, and you have no idea what to do, huh? What are these shields and why should we care? It’s important to understand first off, that there are two types of shields involved. We’ll touch on what each type does, so you have an idea of their use.
| Type of Shield
|
Style of Projection
|
Common Usage
|
| Hull Shield
|
Project shields on the surface of the station hull, like a skin surrounding it.
|
Carp Migrations, Lost Drones from NDV Icarus, Hostile Forces
|
| Bubble Shield
|
Project shields around the station in a bubble, protecting the station and anything else within.
|
Meteor Showers
|
With that said, let’s get to what we’re going to need to set up the shields, and where they’re stored.
Tools of the Trade: What you’ll need to set up the Hull and Bubble Shields, and where can you find it?
Shields are now automatically set up on the surface, and simply require wrenching down and configuring, so walk up to the surface via the main elevators, and head to just below the garden, through the blue doors.
Setting up the Shield Generators
- Step 1: Ensure both the generators and both the capacitors are bolted down to the floor. Use the wrench to bolt them down if they're not.
- Step 2: Click on both capacitors, and set them to click the [Activate] button. Additionally, if danger is imminent, set the charge rate higher; make sure the engine can take it. The maximum is 400000 W.
File:Shieldguide24.png
- Step 4. Set the settings of the shield generators properly. The Coverage Radius (restart required) for both generators should be 100m. Use the “+++” button to quickly raise it to the maximum. The Charge Rate for both generators should be 0.3 Renwick/s. Use the “++” button to raise it up by one point (the default is 0.2 Renwick/s). Finally, the Maximum Field Strength for both generators should be 3 Renwick. Use the “[min]” button, followed by two presses of the “+” button to set it properly. The settings are shown correctly below.
Default Setup
File:Shieldguide27.png
Correct Setup
File:Shieldguide28.png
These settings allow for a low strength field that covers almost all of the station.
In the unlikely event that you have a specific area that needs shielding, you can unwrench the capacitor and shield, move them to the danger zone, and engage them there. If you are doing this, it's suggested to set the "Maximum Field Strength" to max, and the coverage radius to a relatively low value.
Congratulations! The shields are now properly set up for an emergency. Remember to leave them Offline unless there’s a need for them, as they drain massive amounts of power.
Template:Gameplay Guides

