Guide to Shields
Introduction: Shields and you. Why bother?
(Please note that this guide assumes you have basic knowledge of the station layout, but limited knowledge of the engineering department layout specifically, and as such, will assume you can do things like “go to the surface level” without being told exactly what steps to take. If you need more help, please ask for help in-character.)
So you’ve been tasked with setting the shields and you have no idea what to do, huh? What even are these ‘shields’ you’ve heard of? Why should you set them up anyways? It’s important to understand first off, that there’s two types of shields involved. We’ll quickly touch on what each type does, so you have an idea of what they should be used for.
| Type of Shield | Style of Projection | Common Usage |
|---|---|---|
| Hull Shield | Project shields on the surface of the station hull, like a skin surrounding it. | Carp Migrations, Lost Drones from NTV Icarus, Hostile Forces |
| Bubble Shield | Project shields around the station in a bubble, protecting the station and anything else within. | Meteor Showers |
With that said, let’s get to what we’re going to need to set up the shields, and where they’re stored.
Tools of the Trade: What you’ll need to set up the Hull and Bubble Shields, and where can you find it?
You begin by spawning in the Engineering Foyer. Let’s head to our left through the double doors and into the Engineering Storage room.
Once you are inside the Engineering Storage room, now what? The table below will list everything you need, as well as steps following that to gather each item.
| Image of Item | Item Name | Item Usage | Where you can find it |
|---|---|---|---|
| File:Yellowgloves.png | Insulated Gloves | For protecting your precious hands from electrical shock. Note: DO NOT use Budget Insulated Gloves. Ever. | Electrical Supplies Locker( Red Circle ) |
| Steel Sheets | For creating Steel Rods (See steps below) | Supplies Rack( Blue Circle ) | |
| Glass Sheets | For creating Reinforced Glass Sheets (See Steps below) | Supplies Rack( Blue Circle ) | |
| File:Airlock electronics.png | Airlock Electronics | For creating Airlocks/Windoors. | Engi-Vend( Green Circle) |
- Step 1. Grab Insulated Gloves from the Electrical Supplies Locker and put them on your hands. This step is important, as you may lose your hands if you play with the power grid without protection.
- Step 2. Walk to your right and grab two Airlock Electronics by dispensing them from the Engi-Vend. Put them in your bag for now, we’ll come back to them later.
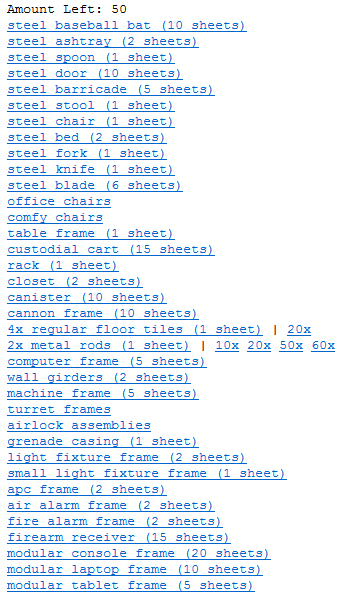
- Step 3. Walk over to your left and pick up the Steel Sheets. Use them in your hand and it should
pull up a menu (Shown below).
The Menu
After you’ve opened the menu, you’re going to want to create thirty Metal Rods. You can do so by pressing the buttons “20x” and “10x”. You’ll get a message in your chat box that lists how many metal rods are in the stack.
- Step 4. Take your freshly created Metal Rods (they should be on the floor below you), and use them on the Glass Sheets to create fourteen Reinforced Glass Sheets. A message will once again be in the chat box to inform you of how many you’ve made so far.
- Step 5. Store the fourteen Reinforced Glass Sheets and remaining sixteen Metal Rods in your backpack for later. This is all the items we’ll need to complete shields setup.
When you’re done, your backpack inventory should look something like this. Congratulations, you’re prepared to start work on the shields themselves.
The Shields Themselves: Where are they?
After you’ve gotten all of your materials, it’s time to grab the shield generators and their accompanying capacitors. They can be found North of the Engineering Storage room, inside Engineering Hard Storage. The image to the left shows exactly how to get to Engineering Hard Storage from where you were in the previous step.
Below is what you’ll find inside of an unmolested Hard Storage room. It’s important to remember that other engineers may have moved things around, so it may not look exactly the same.
The Red Circle is the Bubble Shield, while the Blue Circle is the Hull Shield. We’ll want to go ahead and drag all four pieces to the surface level. It is recommended that you have someone help you do this, as dragging all four to the surface level will take quite some time. When you reach the surface on the lifts, you’ll want to head to the area below the garden. The Bubble Shield will barely reach the Surface Command Dock, so it’s very important to put it in the correct place. The Hull Shield can go wherever, but it’s more efficient to put it right next to the Bubble Shield incase of emergency.
