|
|
| Line 1: |
Line 1: |
| == Introduction: Shields and you. Why bother? == | | == Introduction: Shields and you AKA How to not die a rocky/fishy death == |
|
| |
|
|
| |
|
| '''''(Please note that this guide assumes you have basic knowledge of the station layout, but limited knowledge of the engineering department layout specifically, and as such, will assume you can do things like “go to the surface level” without being told exactly what steps to take. If you need more help, please ask for help in-character.)''''' | | '''''(This guide assumes a basic knowledge of current station layout (layout as of 10/04/2019). If you need location terms explained, feel free to send an AHelp during the round, or ask on Discord.''''' |
|
| |
|
| [[File:Shieldguide1.png]]
| | So you’ve been tasked with setting the shields, and you have no idea what to do, huh? What are these shields and why should we care? It’s important to understand first off, that there are two types of shields involved. We’ll touch on what each type does, so you have an idea of their use. |
| | |
| So you’ve been tasked with setting the shields and you have no idea what to do, huh? What even are these ‘shields’ you’ve heard of? Why should you set them up anyways? It’s important to understand first off, that there’s two types of shields involved. We’ll quickly touch on what each type does, so you have an idea of what they should be used for. | |
|
| |
|
|
| |
|
| Line 28: |
Line 26: |
| == Tools of the Trade: What you’ll need to set up the Hull and Bubble Shields, and where can you find it? == | | == Tools of the Trade: What you’ll need to set up the Hull and Bubble Shields, and where can you find it? == |
|
| |
|
| You begin by spawning in the Engineering Foyer. Let’s head to our left through the double doors and into the Engineering Storage room.
| | Shields are now automatically set up on the surface, and simply require wrenching down and configuring, so walk up to the surface via the main elevators, and head to just below the garden, through the blue doors. |
| | |
| [[File:Shieldguide2.png]]
| |
| | |
| | |
| [[File:Shieldguide3.png]]
| |
| | |
| Once you are inside the Engineering Storage room, now what? The table below will list everything you need, as well as steps following that to gather each item.
| |
| | |
| {| class="sortable" border="1" cellspacing="0" cellpadding="2" align="center"
| |
| ! style='background-color:Chocolate;'|Image of Item
| |
| ! style='background-color:Chocolate;'|Item Name
| |
| ! style='background-color:Chocolate;'|Item Usage
| |
| ! style='background-color:Chocolate;'|Where you can find it
| |
| |-
| |
| ![[File:Yellowgloves.png]]
| |
| |Insulated Gloves
| |
| |For protecting your precious hands from electrical shock. Note: DO NOT use Budget Insulated Gloves. Ever.
| |
| |Electrical Supplies Locker(<b><font color=red> Red Circle </font></b>)
| |
| |-
| |
| ![[File:Metal.png]]
| |
| |Steel Sheets
| |
| |For creating Steel Rods (See steps below)
| |
| |Supplies Rack(<b><font color=blue> Blue Circle </font></b>)
| |
| |-
| |
| ![[File:Glass.png]]
| |
| |Glass Sheets
| |
| |For creating Reinforced Glass Sheets (See Steps below)
| |
| |Supplies Rack(<b><font color=blue> Blue Circle </font></b>)
| |
| |-
| |
| ![[File:Circuit_board.png]]
| |
| |Airlock Electronics
| |
| |For creating Airlocks/Windoors.
| |
| |Engi-Vend(<b><font color=green> Green Circle)
| |
| |}
| |
| | |
| | |
| *Step 1. Grab Insulated Gloves from the Electrical Supplies Locker and put them on your hands. This step is important, as you may lose your hands if you play with the power grid without protection.
| |
| | |
| *Step 2. Walk to your right and grab two '''Airlock Electronics''' by dispensing them from the Engi-Vend. Put them in your bag for now, we’ll come back to them later.
| |
| | |
| *Step 3. Walk over to your left and pick up the '''Steel Sheets'''. Use them in your hand and it should pull up a menu (Shown below).
| |
| | |
| | |
| '''The Menu'''
| |
| | |
| | |
| [[File:Shieldguide4.png]]
| |
| | |
| | |
| After you’ve opened the menu, you’re going to want to create thirty Metal Rods. You can do so by pressing the buttons “20x” and “10x”. You’ll get a message in your chat box that lists how many metal rods are in the stack.
| |
| | |
| *Step 4. Take your freshly created Metal Rods (they should be on the floor below you), and use them on the Glass Sheets to create fourteen Reinforced Glass Sheets. A message will once again be in the chat box to inform you of how many you’ve made so far.
| |
| | |
| *Step 5. Store the fourteen Reinforced Glass Sheets and remaining sixteen Metal Rods in your backpack for later. This is all the items we’ll need to complete shields setup.
| |
| | |
| When you’re done, your backpack inventory should look something like this. Congratulations, you’re prepared to start work on the shields themselves.
| |
| | |
| [[File:Shieldguide5.png]]
| |
| | |
| == The Shields Themselves: Where are they? ==
| |
| | |
| [[File:Shieldguide6.png]]
| |
|
| |
|
| | [[File:SetupShields-ShieldRoom.png]] |
|
| |
|
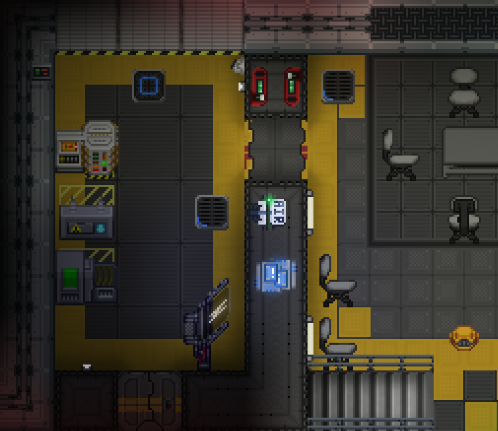
| After you’ve gotten all of your materials, it’s time to grab the shield generators and their accompanying capacitors. They can be found North of the Engineering Storage room, inside Engineering Hard Storage. The image to the left shows exactly how to get to Engineering Hard Storage from where you were in the previous step.
| | == Setting up the Shield Generators == |
|
| |
|
| Below is what you’ll find inside of an unmolested Hard Storage room. It’s important to remember that other engineers may have moved things around, so it may not look exactly the same.
| | *Step 1: Ensure both the generators and both the capacitors are bolted down to the floor. Use the wrench to bolt them down if they're not. |
|
| |
|
| [[File:Shieldguide7.png]]
| | *Step 2: Click on both capacitors, and set them to click the [Activate] button. Additionally, if danger is imminent, set the charge rate higher; make sure the engine can take it. The maximum is 400000 W. |
| | |
| The <font color=red>Red Circle</font> is the '''Bubble Shield''', while the <font color=blue>Blue Circle</font> is the '''Hull Shield'''. We’ll want to go ahead and drag all four pieces to the surface level. It is recommended that you have someone help you do this, as dragging all four to the surface level will take quite some time. When you reach the surface on the lifts, you’ll want to head to the area below the garden. The '''Bubble Shield''' will barely reach the Surface Command Dock, so it’s very important to put it in the correct place. The '''Hull Shield''' can go wherever, but it’s more efficient to put it right next to the Bubble Shield incase of emergency.
| |
| | |
| ==Setting Up Shield Containment: Looking Pretty==
| |
| | |
| | |
| Now that we’ve made it to the surface level, it’s time to begin working on our containment area for the shields. While not necessary, it keeps unauthorized crewmembers from tampering with the controls. This can be critical during an emergency when one assistant hitting the OFF switch can result in catastrophic damage to the station. Below, the area where we’ll set up the shields is shown. Let’s get down to business.
| |
| | |
| [[File:Shieldguide8.png]]
| |
| | |
| [[File:Shieldguide9.png]]
| |
| | |
| *Step 1. Use a crowbar to remove the floor tiles in the indicated pattern.
| |
| | |
| [[File:Shieldguide10.png]]
| |
| | |
| *Step 2.Use a cable coil to wire the ground in the indicated pattern. '''Warning: Be sure you are wearing your insulated gloves!''' | |
| | |
| [[File:Shieldguide11.png]]
| |
| | |
| *Step 3. Use four of your fourteen '''''Reinforced Glass Sheets''''' to create the single-pane reinforced windows as shown. Secure them to the floor (apply screwdriver, crowbar, screwdriver).
| |
| | |
| [[File:Shieldguide12.png]]
| |
| | |
| *Step 4. Use the remaining '''''Reinforced Glass Sheets''''' to create two windoors.
| |
| | |
| [[File:Shieldguide13.png]]
| |
| | |
| *(Optional) Step 4.5. Right click the right windoor and click “Flip Windoor Assembly” to satisfy your OCD.
| |
| | |
| [[File:Shieldguide14.png]]
| |
| | |
| *Step 5. Secure the windoor assemblies with a wrench.
| |
| | |
| [[File:Shieldguide15.png]]
| |
| | |
| *Step 6. Use your remaining Metal Rods to reinforce the floor and windoor assemblies (do this simply by clicking on each floor tile once, as well as each windoor assembly once).
| |
| | |
| [[File:Shieldguide16.png]]
| |
| | |
| *Step 7. Replace the remaining missing floor tiles with the floor tiles you crowbarred up earlier.
| |
| | |
| [[File:Shieldguide17.png]]
| |
| | |
| *Step 8. Wire the windoor assemblies with your cable coil.
| |
| | |
| Before we continue, we’ll have to set up the '''''Airlock Electronics'''''. You’ll need to take them out of your backpack one at a time. Hold it in one hand, with your ID in the other. It should look something like this.
| |
| | |
| [[File:Shieldguide18.png]]
| |
| | |
| You’ll want to open the menu of your electronics. While it’s open, you’ll want to click “Swipe ID” with your ID in your active hand.
| |
| | |
| [[File:Shieldguide18.1.png]]
| |
| | |
| Click the 'Swipe ID' button.A new menu will pop up. It is very long, but we only care about a couple of buttons, listed below.
| |
| | |
| The first step is to change the Access Requirement to “<font color=green>ONE</font>” instead of “<font color=red>ALL</font>”. You can do this by clicking the “<font color=red>ALL</font>” button. You’ll also want to select the following three access requirements: “<font color=green>Atmospherics</font>”, “<font color=green>Bridge</font>”, and “<font color=green>Engine Room</font>”. This will ensure that only people with the correct knowledge to operate the shields can access it (Certain jobs, such as Janitor, for example, have access to the “Engineering” access requirement, but are not qualified to run the shield generators). Make sure you do this to both electronics. The correct setup is shown below, beside the default setup.
| |
| | |
| [[File:Shieldguide19.png]] [[File:Shieldguide20.png]]
| |
| | |
| Congratulations! You’ve set up the '''''Airlock Electronics'''''! With that covered, we’ll finish with our containment setup.
| |
| | |
| [[File:Shieldguide21.png]]
| |
| | |
| *Step 9. Install the '''''Airlock Electronics'''''. Be sure not to put both into one door, or you’ll be out of luck. This is a bug.
| |
| | |
| [[File:Shieldguide22.png]]
| |
| | |
| *Step 10. Use a crowbar to complete the reinforced windoors. Using an empty hand on them will open/close them.
| |
| | |
| This concludes the containment cell for our Shield Generators. We’ll continue from here with how to set up the generators themselves.
| |
| | |
| == Setting up the Shield Generators: The final steps ==
| |
| | |
| From here on out it’s fairly straight-forward. We want to begin by dragging both capacitors into the containment area. Be sure to rotate them so that they’re facing the correct directions (pictured below). Use a wrench to bolt them to the floor.
| |
| | |
| [[File:Shieldguide23.png]]
| |
| | |
| *Step 1. Wrench the capacitors into place like so. Be sure they are facing the correct direction (right click and select “Rotate Capacitor Clockwise” to change its direction).
| |
|
| |
|
| [[File:Shieldguide24.png]] | | [[File:Shieldguide24.png]] |
|
| |
|
| [[File:Shieldguide25.png]] | | [[File:Shieldguide25.png]] |
|
| |
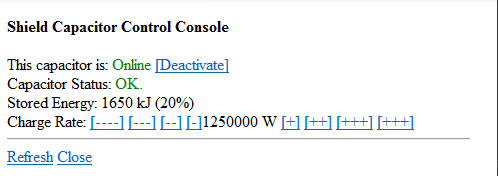
| *Step 2. Set the capacitor settings correctly. You’ll want to raise the Charge Rate to maximum using the far right “<font color=blue>[++++]</font>” button. The maximum is 400000 W. Be sure to “<font color=green>[Activate]</font>” the capacitor so it is <font color=green>Online</font>, otherwise it won’t actually do anything.
| |
|
| |
| [[File:Shieldguide26.png]]
| |
|
| |
| *Step 3. Wrench in the shield generators. The '''''Bubble''''' Shield should be on the '''RIGHT''', while the '''''Hull Shield''''' should be on the '''LEFT'''. While this is not mandatory, it allows the Bubble Shield to cover the Surface Command Dock by an additional meter.
| |
|
| |
|
| *Step 4. Set the settings of the shield generators properly. The Coverage Radius (restart required) for '''both generators''' should be 100m. Use the “<font color=blue>+++</font>” button to quickly raise it to the maximum. The Charge Rate for '''both generators''' should be 0.3 Renwick/s. Use the “<font color=blue>++</font>” button to raise it up by one point (the default is 0.2 Renwick/s). Finally, the Maximum Field Strength for '''both generators''' should be 3 Renwick. Use the “<font color=blue>[min]</font>” button, followed by two presses of the “<font color=blue>+</font>” button to set it properly. The settings are shown correctly below. | | *Step 4. Set the settings of the shield generators properly. The Coverage Radius (restart required) for '''both generators''' should be 100m. Use the “<font color=blue>+++</font>” button to quickly raise it to the maximum. The Charge Rate for '''both generators''' should be 0.3 Renwick/s. Use the “<font color=blue>++</font>” button to raise it up by one point (the default is 0.2 Renwick/s). Finally, the Maximum Field Strength for '''both generators''' should be 3 Renwick. Use the “<font color=blue>[min]</font>” button, followed by two presses of the “<font color=blue>+</font>” button to set it properly. The settings are shown correctly below. |
| Line 196: |
Line 48: |
| [[File:Shieldguide28.png]] | | [[File:Shieldguide28.png]] |
|
| |
|
| Congratulations! The shields are now properly setup for an emergency. Remember to leave them <font color=red>Offline</font> unless there’s a need for them, as they drain massive amounts of power.
| | These settings allow for a low strength field that covers almost all of the station. |
|
| |
|
| [[File:Shieldguide29.png]]
| | In the unlikely event that you have a specific area that needs shielding, you can unwrench the capacitor and shield, move them to the danger zone, and engage them there. If you are doing this, it's suggested to set the "Maximum Field Strength" to max, and the coverage radius to a relatively low value. |
|
| |
|
| | Congratulations! The shields are now properly set up for an emergency. Remember to leave them <font color=red>Offline</font> unless there’s a need for them, as they drain massive amounts of power. |
|
| |
|
| {{Gameplay_Guides}} | | {{Gameplay_Guides}} |
Introduction: Shields and you AKA How to not die a rocky/fishy death
(This guide assumes a basic knowledge of current station layout (layout as of 10/04/2019). If you need location terms explained, feel free to send an AHelp during the round, or ask on Discord.
So you’ve been tasked with setting the shields, and you have no idea what to do, huh? What are these shields and why should we care? It’s important to understand first off, that there are two types of shields involved. We’ll touch on what each type does, so you have an idea of their use.
| Type of Shield
|
Style of Projection
|
Common Usage
|
| Hull Shield
|
Project shields on the surface of the station hull, like a skin surrounding it.
|
Carp Migrations, Lost Drones from NTV Icarus, Hostile Forces
|
| Bubble Shield
|
Project shields around the station in a bubble, protecting the station and anything else within.
|
Meteor Showers
|
With that said, let’s get to what we’re going to need to set up the shields, and where they’re stored.
Tools of the Trade: What you’ll need to set up the Hull and Bubble Shields, and where can you find it?
Shields are now automatically set up on the surface, and simply require wrenching down and configuring, so walk up to the surface via the main elevators, and head to just below the garden, through the blue doors.
Setting up the Shield Generators
- Step 1: Ensure both the generators and both the capacitors are bolted down to the floor. Use the wrench to bolt them down if they're not.
- Step 2: Click on both capacitors, and set them to click the [Activate] button. Additionally, if danger is imminent, set the charge rate higher; make sure the engine can take it. The maximum is 400000 W.
File:Shieldguide24.png
- Step 4. Set the settings of the shield generators properly. The Coverage Radius (restart required) for both generators should be 100m. Use the “+++” button to quickly raise it to the maximum. The Charge Rate for both generators should be 0.3 Renwick/s. Use the “++” button to raise it up by one point (the default is 0.2 Renwick/s). Finally, the Maximum Field Strength for both generators should be 3 Renwick. Use the “[min]” button, followed by two presses of the “+” button to set it properly. The settings are shown correctly below.
Default Setup
File:Shieldguide27.png
Correct Setup
File:Shieldguide28.png
These settings allow for a low strength field that covers almost all of the station.
In the unlikely event that you have a specific area that needs shielding, you can unwrench the capacitor and shield, move them to the danger zone, and engage them there. If you are doing this, it's suggested to set the "Maximum Field Strength" to max, and the coverage radius to a relatively low value.
Congratulations! The shields are now properly set up for an emergency. Remember to leave them Offline unless there’s a need for them, as they drain massive amounts of power.
Template:Gameplay Guides

