Difference between revisions of "Guide to Shields"

From Aurora Information Uplink
Jump to navigation Jump to search
m (Mine now)
(Updates values and pictures.)
Line 1: Line 1:
{{WIP|assign=William Murdoch}}
== Introduction: Shields and you AKA How to not die a rocky/fishy death ==


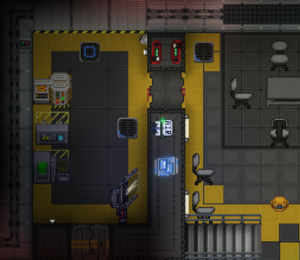
[[File:SetupShields-ShieldRoom.png|thumb|The shield room in engineering.]]


'''''(This guide assumes a basic knowledge of current station layout (layout as of 10/04/2019). If you need location terms explained, feel free to send an AHelp during the round, or ask on Discord.'''''
The shields, as the name implies, protects the [[SCCV Horizon]] from all manner of outer space hazards, such as carp, dust, meteors, and rarely, enemy fire. The shield room is located next to [[Engineering]]'s break room, on deck three.


So you’ve been tasked with setting the shields, and you have no idea what to do, huh? What are these shields and why should we care? It’s important to understand first off, that there are two types of shields involved. We’ll touch on what each type does, so you have an idea of their use.  
== Setting It Up ==
Setting the shields is one of the easiest jobs that an [[Engineer]] is tasked with. It's simply a matter of knowing the values to set the SMES, capacitor, and generator to.


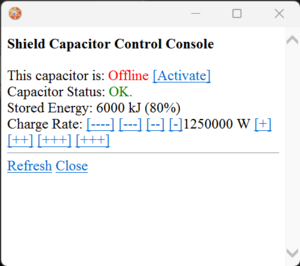
[[File:Shield capacitor.png|thumb|The shield capacitor.]]
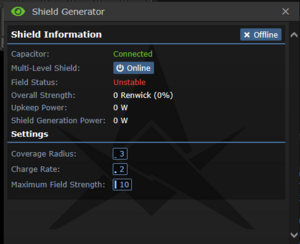
[[File:Shield gen.png|thumb|The shield generator.]]


{| class="sortable" border="1" cellspacing="0" cellpadding="2" align="center"
# Set the SMES in the shield room to maximum input (1,500,000 watts), and the outpit to 1,400,000 watts. This is not a hard rule, and you can lower the values a bit if you want.
! style='background-color:Chocolate;'|Type of Shield
# Using the <code>+++</code> button, set the '''shield capacitor''' to 1,250,000 watts. Click <code>Activate</code>.
! style='background-color:Chocolate;'|Style of Projection
# Now, check out the '''shield generator'''. Set the coverage radius to 100. A coverage radius of 100 will cover all of the Horizon in a mostly-skintight blue bubble.
! style='background-color:Chocolate;'|Common Usage
# The '''charge rate''' can be set anywhere from 3 to 5.
|-
# The '''maximum field strength''' can be set from 3 to 6. Using higher values is reserved for rounds where both engines are running, and there's an immediate external danger to the Horizon.
!Hull Shield
|Project shields on the surface of the station hull, like a skin surrounding it.
|Carp Migrations, Lost Drones from NDV Icarus, Hostile Forces
|-
!Bubble Shield
|Project shields around the station in a bubble, protecting the station and anything else within.  
|Meteor Showers
|}


Congrats! Shields should be spooling up. Assuming you have used a three-megawatt [[Supermatter]] setup, the shields will run mostly stable for the entire round.
With that said, let’s get to what we’re going to need to set up the shields, and where they’re stored.
 
== Tools of the Trade: What you’ll need to set up the Hull and Bubble Shields, and where can you find it? ==
 
Shields are now automatically set up on the surface, and simply require wrenching down and configuring, so walk up to the surface via the main elevators, and head to just below the garden, through the blue doors.
 
[[File:SetupShields-ShieldRoom.png]]
 
== Setting up the Shield Generators ==
 
*Step 1: Ensure both the generators and both the capacitors are bolted down to the floor. Use the wrench to bolt them down if they're not.
 
*Step 2: Click on both capacitors, and set them to click the [Activate] button. Additionally, if danger is imminent, set the charge rate higher; make sure the engine can take it. The maximum is 400000 W.
 
[[File:Shieldguide24.png]]
 
[[File:Shieldguide25.png]]
 
*Step 4. Set the settings of the shield generators properly. The Coverage Radius (restart required) for '''both generators''' should be 100m. Use the “<font color=blue>+++</font>” button to quickly raise it to the maximum. The Charge Rate for '''both generators''' should be 0.3 Renwick/s. Use the “<font color=blue>++</font>” button to raise it up by one point (the default is 0.2 Renwick/s). Finally, the Maximum Field Strength for '''both generators''' should be 3 Renwick. Use the “<font color=blue>[min]</font>” button, followed by two presses of the “<font color=blue>+</font>” button to set it properly. The settings are shown correctly below.
 
'''''Default Setup'''''
[[File:Shieldguide27.png]]
 
'''''Correct Setup'''''
[[File:Shieldguide28.png]]
 
These settings allow for a low strength field that covers almost all of the station.
 
In the unlikely event that you have a specific area that needs shielding, you can unwrench the capacitor and shield, move them to the danger zone, and engage them there. If you are doing this, it's suggested to set the "Maximum Field Strength" to max, and the coverage radius to a relatively low value.
 
Congratulations! The shields are now properly set up for an emergency. Remember to leave them <font color=red>Offline</font> unless there’s a need for them, as they drain massive amounts of power.


{{Gameplay_Guides}}
{{Gameplay_Guides}}
[[Category:Guides]]
[[Category:Guides]]

Revision as of 10:12, 3 August 2023

This section or article is a Work in Progress.
Assigned to: William Murdoch

Please discuss changes with assigned users. If no one is assigned, or if the user is inactive, feel free to complain on the forums or try summoning another staff member.

The shield room in engineering.

The shields, as the name implies, protects the SCCV Horizon from all manner of outer space hazards, such as carp, dust, meteors, and rarely, enemy fire. The shield room is located next to Engineering's break room, on deck three.

Setting It Up

Setting the shields is one of the easiest jobs that an Engineer is tasked with. It's simply a matter of knowing the values to set the SMES, capacitor, and generator to.

The shield capacitor.
The shield generator.
  1. Set the SMES in the shield room to maximum input (1,500,000 watts), and the outpit to 1,400,000 watts. This is not a hard rule, and you can lower the values a bit if you want.
  2. Using the +++ button, set the shield capacitor to 1,250,000 watts. Click Activate.
  3. Now, check out the shield generator. Set the coverage radius to 100. A coverage radius of 100 will cover all of the Horizon in a mostly-skintight blue bubble.
  4. The charge rate can be set anywhere from 3 to 5.
  5. The maximum field strength can be set from 3 to 6. Using higher values is reserved for rounds where both engines are running, and there's an immediate external danger to the Horizon.

Congrats! Shields should be spooling up. Assuming you have used a three-megawatt Supermatter setup, the shields will run mostly stable for the entire round.
Template:Gameplay Guides