Sandbox:WilliamMurdoch: Difference between revisions
No edit summary |
Most of the content is updated. Still needs updated images and a proof-read |
||
| Line 1: | Line 1: | ||
== | == Shields, a "wait, did we set those?" tale == | ||
On the SCCV Horizon, and practically any other vessel, shields perform a simple but important goal. They are the first line of defense between the crew and the cold menacing death of space. They protect the outer hull of a vessel from any number of dangerous entities whether they be laser fire, bullets, carp, meteors, so on. While the vast majority of the time the shields are not immediately needed, in some situations their status can be the difference between life and death. | |||
The term "shields" can be confusing as the SCCV Horizon only has one shield generator. This lone generator is a hull shield which wraps the entire vessel in a blue wall of hexagonal energy that deflects physical and energy based objects. Thankfully, this simplifies an already simple process. | |||
== Tools of the Trade: What you’ll need to set up the Hull Shield, and where can you find it? == | |||
Finding and preparing the machinary needed for the vessel's shields is quick and easy. The shield room is right next to the conference room that all engineers spawn in on deck three. In case you are coming from another part of the ship, follow the stairs by the blue Portable Air Pumps and go through the yellow and red engineering door in the top left corner of the room. | |||
All of the machines in this room have already been bolted and connected, so all that is left is simply turning them on and setting the correct values. | |||
[[File:SetupShields-ShieldRoom.png]] | [[File:SetupShields-ShieldRoom.png]] | ||
| Line 32: | Line 15: | ||
== Setting up the Shield Generators == | == Setting up the Shield Generators == | ||
*Step 1: Ensure both the | *Step 1: Ensure both the generator and the capacitor are bolted down to the floor. Use the wrench to bolt them down if they're not. | ||
*Step 2: Click on | *Step 2: Click on the capacitor, and set the charge to max. This should be around 125000000 W. Then, press activate. | ||
[[File:Shieldguide24.png]] | [[File:Shieldguide24.png]] | ||
| Line 40: | Line 23: | ||
[[File:Shieldguide25.png]] | [[File:Shieldguide25.png]] | ||
*Step 4. Set the settings of the shield | *Step 4. Set the settings of the shield generator properly. The Coverage Radius (restart required) should be 100m. Click and drag the number and/or blue bar to change it's value. Alternatively, double click the number and enter 100. The Charge Rate should be 5. Finally, the Maximum Field Strength should be 10. The settings are shown correctly below. | ||
'''''Default Setup''''' | '''''Default Setup''''' | ||
| Line 48: | Line 31: | ||
[[File:Shieldguide28.png]] | [[File:Shieldguide28.png]] | ||
These settings allow for | These settings allow for an average strength field to cover the entire hull of the vessel. It's not recommended to increase field strength past 7, as a higher field strength might require more energy than the capacitor can provide. | ||
In the unlikely event that you have a specific area that needs shielding, you can unwrench the capacitor and shield, move them to the danger zone, and engage them there. If you are doing this, it's suggested to set the "Maximum Field Strength" to max, and the coverage radius to a relatively low value. | In the unlikely event that you have a specific area that needs shielding, you can unwrench the capacitor and shield, move them to the danger zone, and engage them there. If you are doing this, it's suggested to set the "Maximum Field Strength" to max, and the coverage radius to a relatively low value. | ||
Congratulations! The shields are now properly set up for an emergency | Congratulations! The shields are now properly set up for an emergency. | ||
{{Gameplay_Guides}} | {{Gameplay_Guides}} | ||
Revision as of 19:01, 15 July 2023
Shields, a "wait, did we set those?" tale
On the SCCV Horizon, and practically any other vessel, shields perform a simple but important goal. They are the first line of defense between the crew and the cold menacing death of space. They protect the outer hull of a vessel from any number of dangerous entities whether they be laser fire, bullets, carp, meteors, so on. While the vast majority of the time the shields are not immediately needed, in some situations their status can be the difference between life and death.
The term "shields" can be confusing as the SCCV Horizon only has one shield generator. This lone generator is a hull shield which wraps the entire vessel in a blue wall of hexagonal energy that deflects physical and energy based objects. Thankfully, this simplifies an already simple process.
Tools of the Trade: What you’ll need to set up the Hull Shield, and where can you find it?
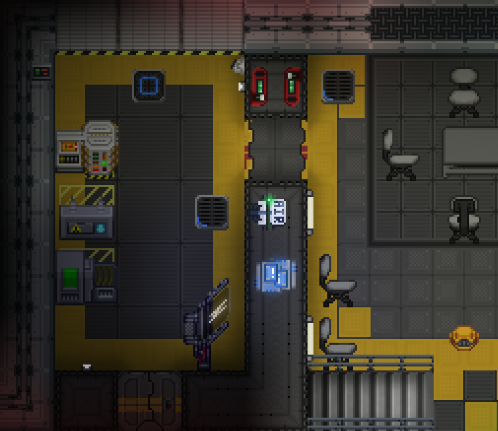
Finding and preparing the machinary needed for the vessel's shields is quick and easy. The shield room is right next to the conference room that all engineers spawn in on deck three. In case you are coming from another part of the ship, follow the stairs by the blue Portable Air Pumps and go through the yellow and red engineering door in the top left corner of the room.
All of the machines in this room have already been bolted and connected, so all that is left is simply turning them on and setting the correct values.
Setting up the Shield Generators
- Step 1: Ensure both the generator and the capacitor are bolted down to the floor. Use the wrench to bolt them down if they're not.
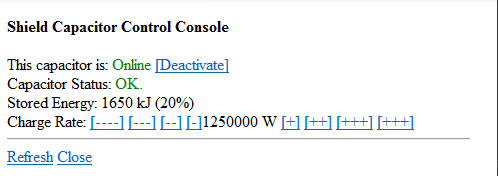
- Step 2: Click on the capacitor, and set the charge to max. This should be around 125000000 W. Then, press activate.
- Step 4. Set the settings of the shield generator properly. The Coverage Radius (restart required) should be 100m. Click and drag the number and/or blue bar to change it's value. Alternatively, double click the number and enter 100. The Charge Rate should be 5. Finally, the Maximum Field Strength should be 10. The settings are shown correctly below.
Default Setup File:Shieldguide27.png
Correct Setup File:Shieldguide28.png
These settings allow for an average strength field to cover the entire hull of the vessel. It's not recommended to increase field strength past 7, as a higher field strength might require more energy than the capacitor can provide.
In the unlikely event that you have a specific area that needs shielding, you can unwrench the capacitor and shield, move them to the danger zone, and engage them there. If you are doing this, it's suggested to set the "Maximum Field Strength" to max, and the coverage radius to a relatively low value.
Congratulations! The shields are now properly set up for an emergency.

