Guide to Atmospherics
This section or article is a Work in Progress.
Assigned to: Burrito Justice
Please discuss changes with assigned users. If no one is assigned, or if the user is inactive, feel free to complain on the forums or try summoning another staff member.
Atmospherics: The Department
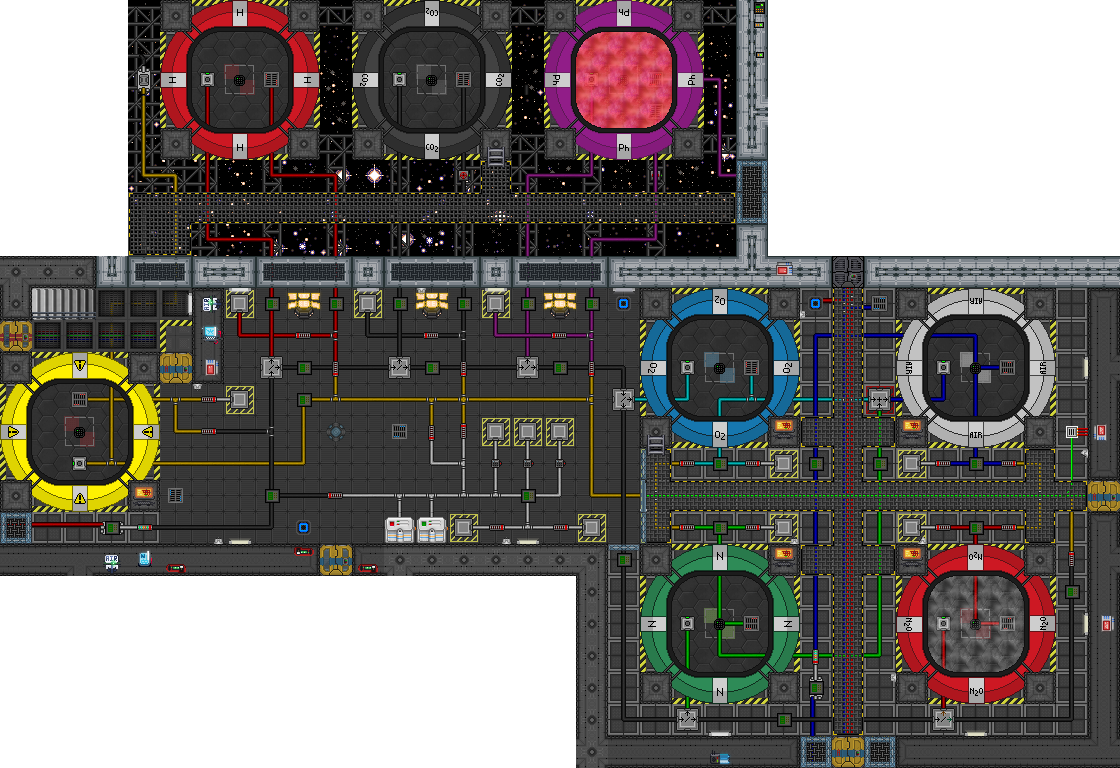
Welcome to Atmospherics, the place where Dreams Come True™. Or at least the place that can partially sustain the ability to dream... y'know, by allowing you to breathe and stuff. Breathing is important, and the primary function of this maze of pipes and gas is to distribute breathable air throughout the station efficiently, and to restore air to depressurized - but hopefully air-tight - rooms. Its secondary function is to process contaminant gases captured by the scrubber network and sort the gas accordingly into one of many chambers.
If you're new to all of this - or even just someone who's never really given Atmos a fair shake - then this will all look very complex and downright intimidating to look at. This mostly stems from just how much stuff can get on screen at once, but there's a few things put in place to make pipe-readability easier on the user if they just take the time to truly examine what each pipe network is meant to do. Alongside that will be this guide to help you out. You are by no means required to read all of this to start messing around with pipes, or even to join as an Atmos Tech. The goal of this guide is to elaborate on how every device works, allowing you to use this as a reference to determine what pipe does what and what pipe might be best to use in your setup.
What Do These Colors Mean?
So there's a lot of pipes with a bunch of colors and they all look really important. It's true that all of the colored pipes - which represent different pipe networks - have their place in the department, but not all of them are strictly necessary to produce gas. Here's all of the important colors, though note that the colored pipes beneath the catwalks aren't to be taken into account:
Air Mix: This is the air mix loop, and these pipes are the most important: they're the ones that contain the air mix, which is combined at a mixer set to specific percentages to ensure that the gas everyone breathes is, in fact, breathable. Tampering with the mixer is ill-advised, as is modifying this network in such a way that it will not be able to reach the distribution network.
Distribution: Equally important is this blue network, offset pipes to the south alongside the scrubber pipes. This massive network of pipes is what will actually distribute the air that it receives from the air mix loop and send it all towards vents placed all around the station, ensuring every room remains at optimal pressure.
Filtering: These pipes are part of the filtering network, a pipe line connected to the scrubber network that leads to filtering devices which will filter a select gas out of the line and output it into a large storage chamber full of that same gas. If the gas type does not match then it'll continue down the line until it eventually does reach where it's meant to go. If, somehow, it reaches the end of the line and doesn't match any of the filtering criteria then it will just be output into the mix loop.
Scrubber: You'll probably notice some pipe adapters and pipes that aren't centered towards the south of Atmos proper. These pipes are part of the scrubber network and, as you can imagine, much of this network is comprised of scrubbers. The end of this line - where all of the scrubber pipe contents are pumped out towards - is the filtering line.
Mix: This line is a bit odd, but its intended function is to provide a pipe network that you can pump any of the gases in atmos into, allowing you to make custom mixes and letting you warm them up or cool them down. Using this line isn't necessary for Atmos to function, but it's good to use as a test bed of sorts if you'd like to experiment with how devices interact with pipe networks. Note that part of this network is colorless.
- Misc Mix: These pipes aren't actually part of a network, they just pipe oxygen and nitrogen into a mixer which outputs into the air chamber which later outputs into the air mix line.
- Waste: These are the black pipes, as few as they are, towards the southern end of Atmos proper. It's intended function is to eject undesirable gas out into space harmlessly, usually by pumping gas you don't want filtered into it from either the mix line or the filter line by way of pumps, and turning a valve open to space.
Principles and Concepts
Gas is surprisingly complex, and it should be in a game that's been dedicated to gas simulations since its inception. On the surface level it doesn't really seem like there's a lot going for it; the station is filled with air, sometimes that air disappears, and there's crazy numbers on the wacky gas canisters that hold stuff. Here we'll describe what makes gas, gas, so that you know exactly what you're breathing!
Pressure
Pressure, put simply and in the context of atmos, is the amount of force exerted by a gas on its surroundings/container: a canister, an oxygen tank, a hallway... these are all containers. More commonly, pipes are usually what will contain and distribute gas throughout the station. High pressure gas inside a container that is allowed access to another container at a lower pressure - no matter how significant - will always try to balance itself across the two containers and make them both equal.
There are a number of things that go into calculating pressure, but for the most part, every programmed gas is considered an "ideal gas" (the molecules that make up the gas do not interact with each other), therefore 200 moles of Phoron will pressurize a canister to the same level as 200 moles of any other gas at the same temperature. Just because a large room maintains an air pressure of 1 atm doesn't mean it has less gas than a canister with 3 atm of air. On the contrary, depending on the size of the room and the canister, the room can have significantly more gas molecules than the canister.
Almost everything that takes readings of gas will measure it in Kilopascals (kPa), or one thousand Newtons of force exerted upon one square meter. Another potential unit of measurement will be the Standard Atmosphere (atm), which is 101.325 kPa. One Atmosphere represents the standard pressure of Earth's air pressure at sea level, and is the pressure that all vents connected to the distro loop will try to maintain by default. 2 atm will be roughly 202 kPa, for example.
Fun fact: though not simulated in SS13, lower pressures reduce the boiling point for a lot of matter. Water can boil if exposed to an atmosphere of 10 kPa or lower while only sitting at room temperature. Blood can also boil this way. Don't get exposed to vacuum in real life!
Delta P
Delta P, also known as the difference in pressure, is something one should always be aware of when dealing with hard vacuum and/or high pressures. Delta P can be dangerous in situations both big and small, namely when attempting to access a room at a much lower pressure than the one you are accessing it from, and attempting to modify pipes containing high pressure gas respectively. As mentioned above, a gas that is allowed access to a medium at a lower pressure will always try to balance itself across the two mediums, but what wasn't mentioned is how violent this can get: two rooms with an open door and very little pressure difference will suffer a small breeze at worst, but opening a door to space in a pressurized environment can be downright explosive, that is to say, you will almost definitely get ejected into space at a very high speed. If you're lucky then you'll be knocked over at a minimum, and maybe slam into a wall or two.
This same principle applies to pipes as well, in a way. While airlocks have powerful motors that can force themselves open during pretty much any circumstance as long as they're allowed to open and powered, you do not; a pipe pressurized to the extreme cannot be modified in any way, it is stuck, and the force of the pressure is too great to knock the pipe away from the rest of the network. Unless you have a pipe wrench, you won't be able to modify a pipe unless the pipe's internal pressure (the pressure of the gas inside the pipe) is brought closer to the pipe's ambient pressure (the pressure of the room around the pipe). The exact point where a pipe cannot be modified without a pipe wrench is when the difference between the pipe's pressure and its surroundings exceeds 202 kPa (2 atm). For the sake of example, a pipe pressurized to 2 atm cannot be modified if the pipe is exposed to vacuum (0 atm).
Temperature
Temperature is another important factor in determining how a gas behaves. Its most basic factor is that hotter gases will expand - or increase in pressure - while cooler gases will contract - or decrease in pressure. Remember that pressure does not equal mass; there is nothing being taken away when you heat or cool a gas, there is still a set amount of gas molecules in play. Interestingly enough, temperature's relationship with pressure is linear as long as the volume is kept constant; they're proportional to each other. You can calculate this change with Gay-Lussac's Law down below.
All temperature readings are given in either Celsius (C) or Kelvin (K). The two are easily interchangeable since Kelvin is just Celsius plus 273.15. Celsius is easy to use because its upper and lower bounds are easy to remember: 0C is the freezing point for water while 100C is the boiling point for water. Kelvin, on the other hand, is used for more precise measurements; 0K (also known as Absolute Zero) is the minimum theoretically possible temperature, that is to say, it cannot physically be reached.
Obviously a lot more comes into play with temperature: most sentient beings inhabiting the station don't like temperatures that can boil or freeze water, and would prefer to breathe room temperature air maintained at 20 Celsius, or 293.15 Kelvin, the temperature that most atmospheric devices are set to by default. Temperatures that deviate greatly from this can have an undesirable effect on the crew.
Molar Heat Capacity
Temperature is kinda crazy, but did you know that different forms of matter heat up at different speeds when exposed to thermal energy? In our case, a room full of Phoron being heated up by an energized Supermatter crystal will take longer to reach a temperature of 5000K versus that same room and Supermatter filled with Nitrogen instead because Phoron has a specific heat value of 200 while nitrogen only has a value of 20. Conversely, Phoron heated up to 5000K will take much longer to cool down versus Nitrogen heated to the same temperature undergoing the same process.
As a real life example, compare a spoon made of aluminum versus a small glass of water, pretending that the glass itself doesn't factor into any of this besides being a storage medium and the water is the same mass as the spoon. If you held a lighter to the spoon for five minutes and touched it, you would probably burn yourself. Conversely, if you did the same thing to that glass of water, it would only feel warm by comparison. This is because H2O has a much higher molar heat capacity than something like aluminum, and is why water is often used to put simple fires out; because the energy required to heat that water up far outweighs the energy that can be produced by that fire, assuming its fuel is susceptible to getting wet.
Volume
| Container | Volume |
|---|---|
| Emergency Oxygen Tank | 2L |
| Extended Emergency Tank | 6L |
| Double Emergency Tank | 10L |
| Oxygen/Anesthetic Tank | 70L |
| Jetpack | 70L |
| Hydrogen/Phoron Tank | 70L |
| Hydroponics Tray | 100L |
| Portable Scrubber | 750L |
| Portable Air Pump | 1000L |
| Canister | 1000L |
| Turf | 2500L |
Volume, put simply, is a container's capacity, more specifically just how much gas the container can hold. A container with a volume of 70L can hold more gas molecules than a container that only holds 20L. Even if the container with the smaller volume has a higher pressure, that doesn't necessarily mean it has more gas, it just means there's more force being exerted inside the smaller container. You can look into this specific relationship by using Avogadro's Law down below. Volume is always measured in Liters (L) unless it's a liquid, then it's measured in some mystery units or something. There's really not much else to explain here, but to the right is a table showing the volume of every gas container besides pipes, which can be referenced here.
Moles
The only true way to measure how much gas is actually in a container, Moles (n) will tell you how many gas molecules are in a medium. Moles, as you've hopefully learned in chemistry or physics class, is 6.022*10^23 molecular objects (Avogadro's Constant). Unless you're still stuck in biology, in which case, they're just wacky subterranean mammals to you. Unlike pressure and volume, moles are the surefire way to determine exactly how much gas is in a container since it, in itself, is unaffected by pressure (and temperature by extension) or volume.
Besides this, the molar mass of a gas only really plays into how fast a pump will operate with the gas in question. Higher molar mass means that the pump will operate slower. Does this actually matter? No, not really.
Math
Everything under this heading assumes that pressure (P) is measured in kilopascals, volume (V) in liters, moles (n) in... well, moles, and temperature (T) in Kelvin. The ideal gas constant (R) will always be 8.314 as dictated in the code.
- Boyle's Law: PV=R or Pressure * Volume = 8.314, basically this law represents the relationship between pressure and volume. For example, if you were to double the volume of a canister, you would get half the pressure.
- Charles's Law: V=RT or Volume = 8.314 * Temperature, simply put temperature is proportional to volume if moles and pressure are kept at a constant.
- Avogadro's Law: V=Rn or Volume = 8.314 * Moles, volume is proportional to moles when temperature and pressure are held constant.
- Gay-Lussac's Law: P/T=R or Pressure / Temperature = 8.314, temperature and pressure are proportional to each other assuming the other factors are constant.
All of the above can combine into the following equation:
- Ideal Gas Law: PV=nRT or Pressure * Volume = Moles * 8.314 * Temperature, the end-all to the most basic of gas calculations to determine the behavior of gas factoring in a number of things. If you know all of these numbers but one then you can do some simple cross division to figure it out.
Simulated vs Unsimulated Turf
In SS13's code there is a distinction made between two types of turf: simulated turf and unsimulated turf. Simulated turf enables a lot of things, like lighting and construction, but most importantly it allows for gas calculations, meaning that this turf can be manipulated pretty much any way you want. This comes at the cost of being slightly resource intensive, at least when compared to its unsimulated counterpart, which does not process lighting, doesn't let you construct anything, and does not process gas; the gas that it's programmed is the gas that it maintains, and it has an infinite supply of this gas. The most obvious example of unsimulated turfs is centcomm: almost everything there, in order to save memory, is unsimulated since it's not a normal playspace. Another example is the asteroid, except an exception was made to allow it to process lighting and allow construction. It's vacuum state, however, will never change.
Getting to the point here, if an unsimulated turf is adjacent to simulated turf (namely floors), and that unsimulated turf isn't vacuum, then the unsim turf will keep the sim turf pressurized forever, resulting in an infinite supply of that gas. How likely you are to find unsim turf with special gas properties is very unlikely, but now you know.
ZAS
ZAS stands for Zone Atmospherics System, and is the atmos model that Aurora (and many other Baystation forks) use. It's primary distinction versus LINDA (the atmos model that most TG Station forks use) and FEA (Finite Element Analysis, only Goonstation uses it now) is that instead of performing atmospheric calculations for every single turf and generally being slow to the point that you can literally outrun a room depressurizing, ZAS will group turfs together based on whether or not air is allowed to flow between all of them and designate them as separate zones. This allows for larger and faster changes in atmosphere while being rather resource friendly. It also behaves a bit more realistically when it comes to rapid pressure changes. The tradeoff is that something like a canister of gas being opened in a room will flood the entire room with that gas instantly instead of spreading out over time. If you come from a non-Baystation forked server then this information may be privy to keep in mind.
Gas Gas Gas

This section here covers every possible gas that can enter the atmosphere. These are the only ones you have to worry about since there's no other gases programmed!
![]() Oxygen (O2): Oxygen is some crazy gas that most living things decided would be necessary to actually live, so now we're forced to breathe it, but not too much of it or you'll suffer oxygen poisoning and seizures. It's also evil, and it's required to start fires. Has a heat capacity value of 20, and a molar mass of 0.032 kg/mol.
Oxygen (O2): Oxygen is some crazy gas that most living things decided would be necessary to actually live, so now we're forced to breathe it, but not too much of it or you'll suffer oxygen poisoning and seizures. It's also evil, and it's required to start fires. Has a heat capacity value of 20, and a molar mass of 0.032 kg/mol.
![]() Nitrogen (N2): Nitrogen is a gas that pretty much no one cares about and our bodies don't metabolize it, yet it makes up about 79% of our atmosphere and is inert. Interesting! Has a heat capacity value of 20, and a molar mass of 0.028 kg/mol.
Nitrogen (N2): Nitrogen is a gas that pretty much no one cares about and our bodies don't metabolize it, yet it makes up about 79% of our atmosphere and is inert. Interesting! Has a heat capacity value of 20, and a molar mass of 0.028 kg/mol.
![]() Air (Air): Actually just a mix of two gases at a concentration of 79% N2 and 21% O2, but it's this exact mixture that allows us to breathe normally. Theoretically you could replace the nitrogen with another inert gas and we'd still breathe just fine. If you want to sound like a nerd then call it nitrox.
Air (Air): Actually just a mix of two gases at a concentration of 79% N2 and 21% O2, but it's this exact mixture that allows us to breathe normally. Theoretically you could replace the nitrogen with another inert gas and we'd still breathe just fine. If you want to sound like a nerd then call it nitrox.
![]() Carbon Dioxide (CO2): Carbon Dioxide is well known for being what we exhale out of our lungs, and it also usually comes about from a lot of combustion reactions. CO2 is toxic to crew in partial pressure concentrations of 7 kPa or greater. Has a heat capacity value of 30, and a molar mass of 0.044 kg/mol.
Carbon Dioxide (CO2): Carbon Dioxide is well known for being what we exhale out of our lungs, and it also usually comes about from a lot of combustion reactions. CO2 is toxic to crew in partial pressure concentrations of 7 kPa or greater. Has a heat capacity value of 30, and a molar mass of 0.044 kg/mol.
![]() Nitrous Oxide (N2O): No, it's not N20, it's N2O. Jamming twenty nitrogen atoms together would be stupid. Regardless, nitrous is often seen as a "sleep agent" in that its effect on most biological bodies is anesthetic. It is also an oxidizer, so it is capable of starting fires. Has a heat capacity value of 40, and a molar mass of 0.044 kg/mol.
Nitrous Oxide (N2O): No, it's not N20, it's N2O. Jamming twenty nitrogen atoms together would be stupid. Regardless, nitrous is often seen as a "sleep agent" in that its effect on most biological bodies is anesthetic. It is also an oxidizer, so it is capable of starting fires. Has a heat capacity value of 40, and a molar mass of 0.044 kg/mol.
![]() Hydrogen (H2): Hydrogen is an extremely light gas that is inert and pretty much safe to breathe. It also happens to be a fuel, and its combustion leads to the formation of water. Isn't that interesting? Water can be described as the ashes of hydrogen combusting! Sadly water vapor isn't actually coded here so it just produces CO2 instead, which may make you question reality itself. Has a heat capacity value of 100, and a molar mass of 0.002 kg/mol.
Hydrogen (H2): Hydrogen is an extremely light gas that is inert and pretty much safe to breathe. It also happens to be a fuel, and its combustion leads to the formation of water. Isn't that interesting? Water can be described as the ashes of hydrogen combusting! Sadly water vapor isn't actually coded here so it just produces CO2 instead, which may make you question reality itself. Has a heat capacity value of 100, and a molar mass of 0.002 kg/mol.
![]() Phoron (PH): The mystery magic space gas. What does it do? Who knows, find out yourself! A few things that it does do, though, is poison biologics, contaminate clothing, and make you go blind. It's also a fuel, and an expensive one at that given the scarcity crisis. Has a heat capacity value of 200, and a rather chunky molar mass of 0.405 kg/mol.
Phoron (PH): The mystery magic space gas. What does it do? Who knows, find out yourself! A few things that it does do, though, is poison biologics, contaminate clothing, and make you go blind. It's also a fuel, and an expensive one at that given the scarcity crisis. Has a heat capacity value of 200, and a rather chunky molar mass of 0.405 kg/mol.
Relevant Tools
It's said that tools are only as good as the person using them, but what if you have no tools? Well, you probably can't do much, then. Be sure to have some of these tools on your person if you plan to mess around with gas outside of breathing it.
 Impact Wrench: The impact wrench (or power drill, if you prefer) is a tool that condenses a screwdriver and wrench down into one tool. As you've probably found out by now, activating the item in hand will change its bit. For pipes you'll want a wrench bit in order to either secure or unsecure pipe sections and other devices. It cannot unwrench a pipe if its internal pressure exceeds 2 atm over ambient pressure.
 Wrench: If you're missing an impact wrench then you probably have this instead. When it comes to pipe interaction there is no difference between this tool and its powered counterpart.
 Pipe Wrench: As the name might imply this tool is specialized towards dealing with pipes. The pipe wrench's biggest advantage over other wrenches is that it can unsecure a pipe at any pressure. It's also able to
 manglebend or straighten simple pipe segments if they are not already secured. This comes at the price of being unable to function like a normal wrench for anything other than pipes and atmospheric devices. Gas Analyzer: This tool is invaluable to any aspiring atmos tech. Though some may argue you should already have an innate sense of exactly what's inside a pipe via telepathy (you're the person in charge of that gas, you put it in that pipe!!!) this shouldn't stop you from deciding to use a tool like the analyzer. Once upon a time this device did pretty much nothing but now it can be used to measure the following:
It can also be used to analyze gas on the turf you're standing in by activating it in hand, and it can analyze tanks and other atmos devices as well.
 Pipe Dispenser: Despite the fact that this object cannot be held, it is still a tool. Put simply, when secured to the floor (with a wrench) in a powered area, this device will vend pretty much anything under the pipes subheading, giving you plenty of options. Oddly enough securing this to the floor is faster than unsecuring it. The more you know.
 Rapid Fabrication Device - Pipes: The handheld version of the pipe dispenser, the RFD-P is capable of... well, pretty much everything its bigger cousin can do, though with a smaller list of pipes and devices that can be created, heat exchange pipes most notably having gone missing. Activating the item in hand will bring up a list of pipes, and alt-clicking it will swap through device categories. The RPD requires matter cartridges in order to operate, but thankfully the ones that can be found in lockers are already loaded.
- File:Extinguisher.pngFire Extinguisher: Yes, most fires come about from wacky gas interaction. Will this tool actually stop fires? Probably not, since this server uses Zone Atmospherics System instead of LINDA, but it can cool down superheated rooms significantly. Significantly. By several thousand degrees even. That's kind of nuts. Make sure to toggle the safety by activating it in hand before use!
- File:Multitool.pngMultitool: Perhaps an unexpected addition, but the multitool actually does have a use in the land of pipes, as niche as it is. It is used to flip which overlapping pipe network a meter observes. For instance, if one network crosses from east to west and another network crosses from south to north on the same turf, and a pipe meter is secured over these pipes, using a multitool on it will swap between both pipe nets. Figuring out which is which is as simple as waving your gas analyzer over a network and comparing the readings.
 Gas Mask: Gotta have some PPE around here. This mask is capable of filtering out nitrous and phoron from the air, allowing you to breathe safely... assuming there's also oxygen in the air, since you kind of need that to live. Gas masks can also be used to setup an internal atmosphere. Older versions of this mask can be found in maintenance, though their filters are only effective against N2O.
 Atmos Voidsuit: A rather interesting piece of equipment, besides shielding you from the terrible effects of vacuum and other pressure-related hazards, it can also withstand considerable amounts of heat, up to 30000 Kelvin! Why? Who knows, but it trades radiation hardening for this feat.
 Inflatable Barriers: Easily one of the most important sets of tools to have at your disposal whenever you're dealing with atmospheric anomalies or hazards. If setup correctly in conjunction with emergency shutters, you can ensure that the room that you're entering a hazard zone from will remain safe and unaffected, provided you also use the inflatables correctly and don't just leave them open like a ding dong.
 Emergency Shutters: Important installations setup around every major doorway, these special shutters will fall shut whenever an air or fire alarm is tripped, shielding rooms from drastic atmospheric changes. They aren't perfect, and they won't shut immediately, so adjacent zones will still be effected, but it prevents further damage nonetheless. Shutters can be opened and closed freely if you have the correct ID requirements, or if there's no obvious danger on the other side of the door. You will otherwise have to crowbar it open. Shutters also have indicator lights representing the status of the room behind it. You can also examine shutters when you're close to them to see what the pressure and temperature is like on the other side.
 Air Alarms: Stationary devices setup in almost every room on the station, these idly wait for significant changes in atmosphere before sounding the alarm and slamming their shutters closed. Besides this their behavior can actually be programmed based on atmospheric qualities, and the vents and scrubbers that they control can be programmed from here as well. They can also be accessed and programmed remotely if their alarm is tripped. A tripped fire alarm will also allow this.
- File:Alarm.gifFire Alarms: A bit more rudimentary compared to the air alarm, the fire alarm will only
be a bastard at people smoking nearbytrip if a fire shows up right in front of the alarm. No, not even a room with scorching temperatures will trip it; a fire has to be right in front of the alarm to go off. In spite of how useless this makes it, fire alarms can drop shutters if triggered, which can be useful if you're precognizant of any potential atmos anomalies, or if you see carp trying to break into the station and risk depressurizing the room or something.
Pipes and Devices
Gas exists in the space around us. That space, in the context of SS13, is usually a bunch of rooms. What is a room but an exceptionally large container for gas? Similarly, pipes like to contain gas as well among other similar gas storage mediums. Some of these pipes and devices also help to get gas from one place to another easier! Below is basically every pipe and device you can get your hands on.
Basic Pipes

Many of these pipes have distro and scrubber variants. You will need a pipe adapter to transition between pipe types. Note that almost all devices do not fit with non-standard pipes.
 Straight: The most common type of pipe you will see. It goes straight from one direction to another. It holds up to 70L.
 Corner: Effectively the same as the straight pipe, except it's not straight. Wow!
 Manifold: A pipe with three ends on it instead of two. Holds up to 105L.
 Four Way: Even better than the previous entry, this one has four ends. Whooooaaaa. Holds up to 140L.
- Cap: A bit that simply closes off the end of a pipe with a cap. There's no real reason to use this, especially since pipes don't leak, but it holds up to 35L regardless.
- Z-Pipe: A pipe piece that connects one level to another. Holds 70L, but since you need at least two to make this work it's effectively 140L.

Universal Pipe Adapter: This special piece of work will connect different pipe types together, namely normal, distro, and scrubber pipes. This can make for some rather creative pipe setups if you don't mind a few pipes being colored red or blue. Holds up to 70L.
- Heat Exchange: Special pipe designed in a way to equalize heat with the gas inside and the environment that it's in. In other words, if you pipe super cooled gas into heat exchange pipes winding around a room that's normally at room temperature, then the room will cool down and the gas will heat up. Holds up to 70L.
- Junction: Weirdly enough, pipe adapters cannot connect heat exchangers to normal pipes, requiring the use of this special pipe. On one end goes normal pipes and on the other goes heat exchange pipes. You can figure it out.
- Insulated: Extremely niche pipes, these have no special use other than reinforcing pipes well beyond what's necessary. Only consists of straight pipes, meaning there's no manifolds or four-ways. Holds up to 70L.
Devices and Utilities
Every device available to you. This ranges from something as simple as a meter to a high power pump. Devices in green do not require power in order to function. Most devices that are powered will consume up to 150 watts when they are idle.
Non-Pipe
Pipe Meter: A device that will observe whatever pipe network it is secured onto. It will tell you the temperature and pressure of the network, even from a distance, and it even gives visual indicators of the pressure! This won't replace gas analyzers, though, since it can neither determine how many moles are in a net nor can it determine what gases are in the network. You can use a multitool to switch which network a meter pays attention to assuming it's secured over overlapping pipes.
 Turf Meter: The pipe meter's slightly awkward cousin, this will measure the gas on the turf that it is secured upon. It's functionally similar to the pipe meter otherwise.
 Gas Sensor: What could be considered an advanced turf meter, minus the visual indicators. In fact, this device requires a specific console in order to see what it's reading. It can determine pressure, temperature, and gas concentrations. You'll probably see these in the large gas chambers.
Unary
Connector: Definitely one of the most important utilities in any atmos setup, this will allow you to connect any portable atmospheric device to to a pipe network with a wrench, typically canisters. Anything connected to one of these will automatically balance the gases between the connected device and the connected pipe network.
 Heat Exchanger: Not to be confused with the heat exchange pipes seen above, this radiator is designed to face another heat exchanger in order to balance heat between two networks without actually mixing the gases together.
Tank: A massive, immobile tank of gas that has a capacity of 10000L. They can neither be built nor deconstructed. They're only found in the command bunker, emergency atmos substation near the docks, and in telecomms. Not to be confused with canisters or small handheld tanks.
 Gas Cooler: A large device that is capable of cooling the contents of a pipe network to near-Absolute Zero values. How fast it cools and how large its volume is depends on upgrades made to it. Holds 600L by default.
 Gas Heater: A large device that is capable of heating the contents of a pipe network to rather high values. How fast it heats and how large its volume is depends on upgrades made to it. Holds 600L by default.
 Air Injector: A device whose whole purpose is to pump gas (not just air, like the name implies) onto a turf, similar to a vent pump, except it's rated to pressurize up to 15000 kPa. Usually controlled from a special console. Holds 700L, allows a flow rate of up to 700L/s, rated to pressurize up to 15000 kPa, can consume up to 15 kW at max operational capacity.
Vent Pump (Unary Vent): The device that you'll probably see the most around the station, these vents are typically controlled by an air alarm to determine what pressure to target. Special versions of this vent allow it to siphon gas indiscriminately instead, a notable example being the vent pump in the SM core. Vents performing both functions can be found in airlocks. Holds up to 200L, allows a flow rate of up to 200L/s, rated to pressurize to 7500 kPa, can consume up to 7.5 kW at max operational capacity.
Scrubber: Where a vent pump (usually) pumps a gas (typically air) into a room, scrubbers do the opposite, with a twist: they can be controlled by an air alarm to target and collect any type of gas and pump it into a pipe network while leaving other gases alone. It can also be set to forcefully siphon gas indiscriminately, giving it a lot more power. Holds up to 200L, allows a flow rate of up to up to 200L/s, 2500L/s on siphon, rated to pressurize to 7500 kPa, can consume 7.5 kW at max operational capacity.
 Cryo Cell: Maybe not immediately concerning to your average pipe enthusiast, the cryo cell is nonetheless an atmospheric utility. It's connected to a pipe network that hopefully has chilled oxygen, which can be used to put a patient in stasis and heal some of their wounds. See the guide to medicine for more info.
Binary
 Pressure Regulator: An often overlooked device, this programmable gate allows for a number of tasks. It can be programmed to allow gas through until the output end is greater than or equal to the target pressure, or it can be programmed to allow gas through when its input end reaches the target pressure, and will stay open until the input end is less than or equal to the target pressure. All of this comes at the cost of being unable to pump gas; if its input is at a lower pressure than the output, gas cannot flow through. In order to allow the regulator to do its job the valve must be unlocked. The end with the bright red valve is the output end. Both ends of the regulator hold 500L, making this effectively 1000L, allows a flow rate of up to 500L/s.
Manual Valve: A simple gate that allows you to connect two networks together or shut them off from each other. Note that neither the AI nor its borgs can operate these valves. It also contains no volume, oddly enough.
 Digital Valve: Exactly the same as the manual valve, except it cannot be unsecured, for reasons beyond comprehension. It also cannot be vended from a pipe dispenser. If you carefully observe where these valves are located you might be able to determine what their true purpose is. They can also be operated by the AI and its borgs.
 TEG Circulator: This is just one part of a thermoelectric generator. Basically it takes gas in on one end and outputs it on another end. Which end is what can be determined by examining the circulator. Each end holds 200L, making this effectively 400L, allows a flow rate of up to 200L/s (probably).
Gas Pump: A strong staple in any pipe setup, this will attempt to force gas on its input end into the output end for as long as the gas on the output end is at a lower pressure than target, and there is gas in the input end. The pump is smart and will just let gas through if the output end is at a lower pressure than the input end, but the pump's effectiveness will decrease dramatically if the pressure on the input end is well below the pressure of the output pipe. The output end is the bit with the red stripe on it. Each end holds 200L, making this effectively 400L, allows a flow rate of up to 200L/s, rated to pressurize to 15000 kPa, can consume up to 7.5 kW at max operational capacity.
 High Power Pump: The big sister of the gas pump, the high power pump can force gas from one network into another a bit faster. The output end is the bit with the red stripe on it. Each end holds 200L, making this effectively 400L, allows a flow rate of up to 200L/s, rated to pressurize to 15000 kPa, can consume 15 kW at max operational capacity.
Ternary/Quaternary
 T-Valve: A bit of an odd specimen, this valve has one input and two potential outputs, but at least one of them will always be closed, and neither of them can be open or closed at the same time. The indicator lights will tell you which side is open and which is closed, and turning the valve will toggle which output is opened. The AI and its borgs cannot operate the valve. There is also a mirrored variant.
 Digital T-Valve: Functionally identical to its manual sister, but it cannot be unsecured from the floor wherever it is found, and it cannot be vended from the pipe dispenser. The AI and its borgs are able to operate the valve. There is also a mirrored variant.

(Omni) Gas Filter: The gas filter is an impressive device that is capable of pumping gas through to another network while scrubbing a target gas out into a different, perpendicular network. A series of these set to different gases is what allows the filtering line of Atmospherics to function. There is a mirrored variant of this device as well. There is also a much more flexible omni variant, which allows you to set which side is the input, output, and allows you to set two more sides as filters. Each programed side holds 200L, making this effectively 800L assuming an omni filter is set to have all four sides in use, allows a flow rate of up to 200L/s, rated to pressurize up to 7500 kPa, can consume up to 7.5 kW at max operational capacity.
(Omni) Gas Mixer: As the name implies, this device mixes gas together, usually by taking two input gases (which can already have been mixed up by something else) and outputting the combined result into a pipe with programmed concentrations. One of these devices is what allows the air line of Atmospherics to maintain a strict 79% N2 21% O2 air mix. There is a mirrored variant of this device as well. There is also a much more flexible omni variant, which allows you to set up to three inputs and one output. Each programmed side holds 200L, making this effectively 800L assuming an omni mixer is set to have all four sides in use, allows a flow rate of up to 200L/s, rated to pressurize up to 7500 kPa, can consume up to 7.5 kW at max operational capacity.
Portables

Everything here (with the exception of the space heater) can be connected to a connector to balance gas contents between the portable and the pipe network that the connector is secured to. None of these devices need to be turned on or have their settings altered in order for this to be accomplished.
 Canisters: Probably the most common form of portable atmospherics, a canister can hold up to 1000L of gas, and (miraculously) can withstand an infinite amount of pressure and temperature. This doesn't mean they're indestructible - they can rupture due to explosions nearby... or just because a random event told it to rupture. Canisters are typically pressurized to 4560 kPa as a standard. They have their own internal pressure regulator rated up to 1013 kPa, and can either be allowed to pressurize its turf and surroundings up to that pressure (assuming it has enough gas) or it can be used to fill handheld tanks up to that pressure. You can also change the color of the canister by emptying it and pressing the "Label" button. Not to be confused with handheld tanks or the much larger tanks which sort of accomplishes the same goal.
 Portable Air Pump: Basically a fancier canister, but with a pump, rated to pressurize up to 1013 kPa, at a rate of a whopping 1000L/s! Air pumps are typically pressurized as high as possible with room temperature air (about 6157 moles of air) to facilitate refilling depressurized rooms. This is capable of pumping gas out into surrounding turfs or pumping gas into itself from surrounding turfs. Pumps, of course, require power, hence this device possessing a power cell. The cell can be retrieved by screwing it out. The pump can both fill or empty a tank inserted into it. Can hold up to 1000L.
 Portable Scrubber: This particular curio is basically a non-programmable scrubber that will scrub anything that isn't nitrogen or oxygen from the air. Its pump is rated to pressurize up to 1013 kPa at a rate of 200L/s. It will not use power if it is turned on and there are no gases to scrub. It will scrub contaminants (anything that isn't oxygen or nitrogen) from any connected tank while turned on. Like the portable air pump, this too requires power, and has a power cell that can be replaced by screwing it out. Holds up to 750L, allows a flow rate of up to 200L/s.
 Hydroponics Tray: Bet you weren't expecting to see this here. It's true, plant trays do have gas interactions which can be controlled by hooking it into a connector and flipping the lid down. The plants (assuming they're mutated and not dead) will passively generate gas, and are capable of outputting this into pipes if the tray is connected to a pipe network. The tray is capable of holding up to 100L.
 Space Heater: Not something that contains gas, and it cannot be connected to a connector anyway, but it is an atmospheric utility nonetheless. It can be programmed to either heat up or cool down rooms in a range between 0 and 90 Celsius. The power cell can be removed by screwing it out.
Handhelds
Any handheld item that can store gas will be under this heading. This is usually in the form of tanks, but jetpacks are also here. Tanks can only be pressurized up to 30 atm (3039 kPa) before its pump/regulator begin to involuntarily leak gas out. 40 atm (4052 kPa) will result in a rupture. You can tell how much pressure is inside by activating the object in hand. You can also examine the item to determine how hot it is.
- Oxygen Tank: Probably the most common tank seen on the Aurora, this simply holds pure oxygen. It can hold up to 70L, and its release pressure is set to 21 kPa by default. It can be worn on your back. This tank may be seen in multiple colors, such as yellow, red, or more rarely brown.
- Anesthetic Tank: General anesthetic in gas form, filled with nitrous oxide and oxygen. Using these as internals will probably put you to sleep. Medical won't use these too often.
- Air Tank: Similar to the oxygen tank, but it contains an air mix instead. Because the O2 is in a lower concentration, the release pressure is set to 101 kPa, meaning this tank will not last as long as a pure oxygen tank.
- Emergency Oxygen Tank: The small tank that almost everyone spawns with in their emergency internals box. This, too, contains pure oxygen, but it can only store up to 2L of gas, making this a very, very small tank. There is a yellow version that is slightly bigger and holds 6L, and an even bigger version that holds 10L. These can be worn on your belt or put in your pocket.
- Jetpack: These jetpacks can be used to maneuver in zero gravity environments freely, and can even traverse z-levels if used correctly. They can also be used as internals. They can be filled with anything, but usually only oxygen or carbon dioxide is used. Holds up to 70L.
- Phoron Tank: A tank full of Phoron. Who could've guessed? Can be used as internals, so beware. Holds up to 70L.
- Hydrogen Tank: A tank full of hydrogen. Holds up to 70L.
Unimplemented
Everything in this category exists in the code but can neither be seen anywhere on the current map nor can they be created by normal means. This list may change, but for posterity's sake all unimplemented devices will have their basic functions described in case they do, in fact, return to use.
- Passive Vent: Effectively just a pipe that's allowed exchanging gas contents with the turf it's secured upon. As you can imagine, a passive vent connected to an empty pipe exposed to a turf of air will fill the pipe with air. While it does have its uses, it's not seen in the pipe dispenser list for some reason.
- Binary Vent Pump: Basically a vent pump, except it has two ends where you can connect pipes. One end is the input - for when it's pumping gas into a room -, and the other end is the output - for when the vent siphons gas instead. Not seen anywhere on the Aurora and otherwise unobtainable.
- Oxygen Generator: An absolute dinosaur, this device hasn't been used since ye olden days. As the name implies it produces pure oxygen... from nothing. Normally connected to a pipe on one end. There's a pretty good chance that this doesn't work anymore.
- Thermal Plate: One may believe that this was a precursor to the heat exchange pipe, but this was actually created after. Anyway this was connected to a pipe on one end and would exchange heat with the turf it was secured on. You would need dozens of these with some awkward pipe work to accomplish what simple spaghetti HE pipes can accomplish now.
- Thruster: Probably related to overmap functions. Assuming that's the case, this would just eject gas to produce thrust for overmap shuttles.
- Pipe Turbine: This was effectively a condensed version of the gas turbine. It would produce energy by piping extremely high pressure gas (usually superheated) to turn a turbine in order to generate power, assuming it was connected directly to a special generator. Even when this was developed way back when, it was never really used that much, and it's not seen anywhere on the Aurora. It probably doesn't work anymore, even if you manage to find a setup.
Air Alarm Operation

Air alarms. They alarm when there's no air... sometimes. The fact of the matter is that air alarms are a lot more flexible than you think, and it's this flexibility that propels their potential to be a very powerful tool to greater heights. By default, an air alarm's purpose in a regular old hallway is to make sure that the air pressure is okay, that there's enough oxygen concentration, there aren't dangerous quantities of toxins or fuel in the air, and that the temperature isn't extremely hot or cold. If any of that fails to meet the programmed criteria then the alarm will trip, dropping the emergency shutters that it's in charge of, and informing nearby alarms to do the same in order to localize the damage to a specific set of rooms, protecting the rest of the station from atmospheric hazards. If the emergency involves depressurization then it'll also shut off its vents and scrubbers to conserve resources.
An air alarm can be accessed either in person or remotely via an air alarm monitoring console. If you are accessing it in person then you will need to swipe your ID over it to unlock its controls. If accessing remotely then all you need is a console with the atmosphere control program (and a valid atmos tech ID to open that program, but you don't need it if it's already open) and for the air alarm to not have its remote control setting set to "Off". With that out of the way, here are the intricacies to operating an air alarm:
Basic Interface
The first thing you'll see towards the top of the interface - and you will always see this no matter what menu you navigate to - is the gas composition that the alarm is reading. In particular, it will tell you the following:
- Pressure: How pressurized the room is, simple enough. By default, pressures below 81 kPa and above 122 kPa are deemed harmful and will trip the alarm.
- Oxygen: The concentration of oxygen in the room. It won't tell you exactly how much is in the room, but it does give you a percentage, and since you already know the pressure, you can probably guess how much is there. Partial pressure values below 16 kPa and above 140 kPa are deemed harmful and will trip the alarm.
- Carbon Dioxide: The concentration of CO2 in the room. Ideally this should be zero, but some is harmless anyway. Larger concentrations, however, are harmful to breathe. Partial pressure values above 10 kPa will trip the alarm.
- Phoron: If this is in the air then something has probably gone wrong. Trace amounts of Phoron are safe to breathe and are a negligible threat to most crew, but it doesn't take much more to make it harmful. Partial pressure values above 0.5 kPa will trip the alarm.
- Hydrogen: By contrast to Phoron, hydrogen is actually completely safe to breathe and is inert. It is, however, still a fuel and will start fires if exposed to heat and oxygen (which air has plenty of), so it is a hazard all the same. Partial pressure values above 0.5 kPa will trip the alarm.
- Other: Since nitrogen is ignored by air alarm thresholds outside of calculating pressure, "Other" is nitrous oxide by process of elimination. This category is hidden from the rest of the list until it is made relevant. Nitrous, while not terrible harmful to crew, still possesses anesthetic properties and can force people to fall asleep, even in small concentrations. Partial pressure values above 1 kPa will trip the alarm.
- Temperature Put simply, temperature of the air measured in both Kelvin and Celsius. 20 Celsius is usually what you'll find most rooms at, aided in part by the air alarm's thermostat. Temperatures below 247 Kelvin (-26 Celsius) and above 339 Kelvin (66 Celsius) will trip the alarm.
- Local Status: The quick and simple way to check if everything is within acceptable, programmed bounds. Does this mean the room is actually safe? Not always!
- Area Status: If an air alarm in a nearby room has tripped an alarm then this value will say so. If this value reports that there is an alarm nearby then it, too, will also assume that there is something wrong and shut its shutters.
Other interface buttons are the remote control buttons, which allow you to allow or deny remote access to the air alarm, good if someone's being a dummy with the controls in Atmospherics. You can also adjust the thermostat between 0 and 40 Celsius, though heating and cooling the room takes a while to accomplish, and is handled by the air alarm itself and not the vents.
Scrubber Control
If there's wacky atmospheric anomalies that are making the air the crew breathes something that the crew would rather not breathe, then scrubbers have you covered, assuming they're present in the room affected by bad gas of course. This menu shows you every scrubber under the alarm's control, and it will allow you to turn specific scrubbers on or off, set specific scrubbers to assume normal operation or indiscriminately siphon gas immediately, and they can be programmed to scrub any gas from the atmosphere. By default, carbon dioxide is the default setting on all scrubbers. With careful manipulation you can solve a lot of atmos crises with simple scrubber programming. Canister of nitrogen ruptured and ended up overpressurizing a room and upsetting the air balance? Why set the scrubber to panic siphon when you can just turn on nitrogen scrubbing instead? Much cleaner that way.
Vent Control
A menu similar to the scrubber menu in that it lists every vent pump under the alarm's control, but vents are a bit different in how they can be programmed. First off, individual vents can be turned on or off, so there's that. Secondly, there are a few rather esoteric toggles and values here that do the following:
- External Pressure: This setting will have the vent check the pressure of the room that it is in and attempt to pressurize it to what's programmed in the external pressure bound variable. This is the default setting.
- Internal Pressure: This setting, by contrast, will check the pressure of the pipe network that the vent is connected to, and the vent will pump gas out until it reaches the pressure programmed in the internal pressure bound variable. This setting is not recommended for normal life support functions.
- External Pressure Bound: This coincides with the external pressure check. If the pressure of the room is lower than this value then the vent will open. Otherwise it will remain closed. This is set to 101.3 kPa by default, and this value can be reset easily with the "Reset" button.
- Internal Pressure Bound: THIS VARIABLE CANNOT BE MODIFIED. In theory this would allow a vent to remain open until the network it's connected to reaches the target pressure, otherwise it remains closed. This is set to 0 kPa by default, and because it cannot be modified, the vent will remain open until the pipe it's connected to is vacuum. Using this setting on the distro network will functionally keep the vent open forever.
Environmental Modes
This menu provides some quick premade settings that make the air alarm and its connected devices function in particular ways. Most have their uses, one is completely useless. Here they are:
- Filtering: The default setting of pretty much every air alarm, this turns on all vents and scrubbers. Rooms are pressurized with air and contaminants are scrubbed. Vents are reset to default values, but scrubbers preserve all but the CO2 setting.
- Replace Air: This will set the scrubbers to siphon and indiscriminately scrub all gas from the atmosphere, but will keep vents open. Depending on the ratio of vents to scrubbers, the room can easily depressurize due to the flow rate of a siphoning scrubber. Can be useful as a lazy way to regulate a room's temperature.
- Panic: This shuts of all vents and forces all scrubbers to siphon gas. It will continue to siphon until it is told to stop by a user. The scrubber loop probably won't enjoy this. There is also a big yellow button on the main menu that lets you select this option.
- Cycle: This will turn off all vents and set the scrubbers to siphon until the room is down to 5 kPa, at which point it will flip over to Fill mode.
- Fill: This will turn off all scrubbers and enable all vents. Unless the scrubbers have been programed incorrectly (a problem that is easily fixed), there is no real reason to use this mode: it does not make vents operate faster. Just use Filtering instead.
- Off: What is says on the tin. All vents and scrubbers will switch off and do nothing until the user says otherwise. This option is selected automatically if a depressurization event occurs.
Sensor Settings
The last menu, this is the screen that determines when and for what the air alarm will trip. You'll notice that all of the thresholds listed here are also represented by the air status at the top of the interface. Each category possesses four categories: minimum warning (min1), maximum warning (max1), minimum alarm (min2), and maximum alarm (max2). Warning thresholds will alert alarm consoles that something is beginning to exceed programmed thresholds and the alarm will flash yellow. Alarm thresholds will shut all emergency shutters and seal off rooms in an attempt to prevent atmospheric hazards from spreading. Many of these thresholds represent partial pressure, and can be modified with the fact that they are pressure values in mind. The temperature value, on the other hand, is programmed based on Kelvin.
Some thresholds also report that they are "Off", or otherwise not concerning themselves with measuring minimum/maximum thresholds. You can set this yourself by setting a value to "-1", which will turn that specific sensor off. You can also turn minimums and maximums off by setting that same value on the "min2" and "max2" values. Doing this for everything can keep an alarm from tripping in spite of changes in atmosphere.
Engineering Department
| |
| Head of Department | Chief Engineer |
| Personnel | Engineer - Atmospheric Technician |
| Useful Guides | Guide to Atmospherics - Supermatter Engine - Guide to the INDRA - Guide to Thrusters - Telecommunications - Integrated Electronics |