Xenoarcheologist: Difference between revisions
m Removed useless categories |
removed the xenoarch/anomalist section because not enough people play xenoarch for it to matter (i've never seen xenoarch and anomalist together in a shift). remade the page to be a job page. |
||
| Line 1: | Line 1: | ||
{{ | {{JobPageHeader | ||
|headerbgcolor = lightblue | |||
|headerfontcolor = black | |||
|stafftype = RESEARCH | |||
|imagebgcolor = #eeeeff | |||
|img = Scientist.png | |||
|jobtitle = Xenoarcheologist | |||
|access = [[Research Division]] | |||
|difficulty = Medium | |||
|qualifications = At least 25 years of age, PhD in Archaeology or Xenoarchaeology. | |||
|education = [[Mars University]] - [[Solis Cognito University]] - [[The Gliutip’lyaz University]] | |||
|superior = [[Research Director]] | |||
|duties = Retrieve various artifacts from the asteroid, and figure out their effects and applications. | |||
|guides = This is the guide. | |||
}} | |||
A '''Xenoarcheologist''' is a professional Scientist specialized in researching the remains of Alien Civilizations. Their gameplay is centered around unearthing Artifacts and Anomalies and linking them together to form coherent stories. They play more similar to Mining than a regular Scientist, in contrast to an Anomalist who plays much closer to the other roles in the Science department. | |||
A Xenoarcheologist is a professional Scientist specialized in researching the remains of Alien Civilizations. Their gameplay is centered around unearthing Artifacts and Anomalies and linking them together to form coherent stories. They play more similar to Mining than a regular Scientist, in contrast to an Anomalist who plays much closer to the other roles in the Science department. | |||
==== Gearing Up ==== | ==== Gearing Up ==== | ||
Revision as of 18:23, 1 January 2019
| RESEARCH STAFF | |
 Xenoarcheologist |
Access: Research Division Qualifications: At least 25 years of age, PhD in Archaeology or Xenoarchaeology. Employers: Not defined Supervisors: Research Director Duties: Retrieve various artifacts from the asteroid, and figure out their effects and applications. Guides: This is the guide. |
A Xenoarcheologist is a professional Scientist specialized in researching the remains of Alien Civilizations. Their gameplay is centered around unearthing Artifacts and Anomalies and linking them together to form coherent stories. They play more similar to Mining than a regular Scientist, in contrast to an Anomalist who plays much closer to the other roles in the Science department.
Gearing Up
You start in the Research department. You however work within the Research sublevel and will have to take a lift down. You should stock up on anything you believe you need in preparation for your work. However most essential tools and devices are present within the Sub-level so you will not need to gather anything. Be sure to put on your Mesons goggles, gloves, breath mask and your Magboots before you exit. There are some less crucial tools there that can be used, such as a Camera, Folder, and multiple Gas types.
If you wish, you may still be creative: What do you think a Xenoarcheologist would use on an excavation? You will work in quite a large place, so do not worry about space, and impress your department with very complicated procedures and the like. A Universal Recorder and labeled Folder with Paper inside tends to create a believable atmosphere for a Scientist.
Now, it is time to speak about the proper Xenoarcheology equipment. All of these things are available in the Xenoarcheology department, within the Anomaly and Xenoarcheology equipment rooms, so look in the lockers, on the tables, and the racks.
- Measuring Tape: Tells you how deep you already dug into your site. Useful when you lose track of your excavation.
- GPS: Tells you your position on the asteroid. Not of major importance, but can be useful if you want to keep track of that too. You can get a callsign using this, and it increases your chance of being found when dead.
- Excavation Pick Set: Absolute necessity. Contains the small picks you need to excavate your artifacts, they all dig a different distance, detailed later in this guide.
- Tracking Beacon: When activated, allows locator devices to locate it by tuning on its frequency. Useful if you are in trouble, or if you simply lost your suspension field generator. Not a necessity at all and mostly a waste of space.
- Core Sampler: Absolute necessity. Needed to take the rock samples you need for spectrometer analysis.
- Wrench: Needed to set the suspension field generator, which is necessary to collect artifacts.
- Hand Pickaxe: The largest excavation pick, does not fit in the Excavation Pick Set. Digs 30cm.
- Locator Device: Locates Tracking Beacons by tuning to their frequency. As useless as the Beacon.
- Depth Analysis Scanner: Absolute necessity. Tells you if the tile of rock in front of you, contains something, and gives you information about it if it is the case. Detailed later in this guide.
- Alden Saraspova Counter: Absolute necessity. You click this and it tells you how far the closest Anomaly is from you. Use this information to progressively move closer. Make sure to scan rocks using the Analysis Scanner when within 20m. The last thing you want is to destroy the anomaly and the artifacts along with it.
- Lantern: A very useful light source. Helpful, but not necessary. Activate your excavation hood.
- Excavation Gear-Belt: The belt that will allow you to carry most of your equipment.
- Optical Meson Scanner: Absolute necessity. Allows you to see through the rock, and locate your precious dig sites.
- Excavation Suit Hood Comes with a built-in flashlight. Click in the top left.
- Excavation Suit: Both the suit and hood are absolute necessities. Needed to go EVA, protects you against radiations and partially against exotic particles, should you find an activated anomaly.
Note: Anomaly Suits are not vacuum proof. Excavation suits are the only non-space suits on the Station that allow you to go EVA.
Now, you probably know the rest: An oxygen tank, available in the prep room, a breath mask also available there, and the gloves you were told to take earlier. You’ll notice we also have a camera, which is generally used to take photos of anomalies, and other rare things like skeletons (a combination of alien fossils) and the like. If you organize your equipment properly, you have enough space in your inventory to carry some equipment of your choice.
I, however, advise you to leave free slots in your backpack, to carry the artifacts you find back to your camp or the Station. Once outside, you will need to use the Alden Saraspova Counter to locate a digsite.
Clearing The Way
As for how you will mine, you will not have a mining drill unless Research prints you one from R&D. Instead, Xenoarcheology is outfitted with Mining pickaxes.
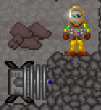
To mine efficiently, you will need to wield your pickaxe in two hands. (Pictured below)
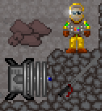
You can achieve this by clicking the icon at the top left corner of your screen while holding a Pickaxe, the Pickaxe will have to be selected. When wielded, it will look like this. (Pictured above)
Further, to avoid destroying the very artifacts you intend to excavate, you will want to carry a Depth Analysis Scanner along with you. When you are in range by 10, you should scan Rocks before you clear them. If you fail to do this, you will get a message that says 'Object shatters!' where object is replaced with whatever item it was, which means you have destroyed an artifact. There is a small chance for it to survive this, however.
Excavating
At last, you have found a dig site, or your Depth Analysis Scanner pinged while you were looking for one. It is time to be precise and thorough.
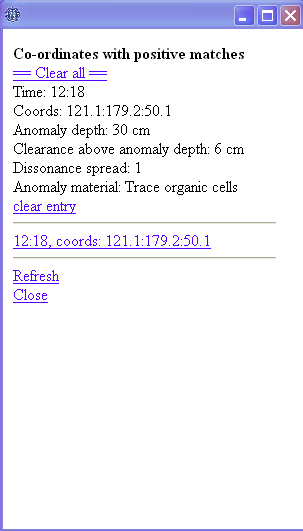
If you click on your Depth Analysis Scanner, a screen similar to this one will appear.
Time: The time at which the scan was made. Only for paperwork purposes.
Coords: Coordinates of the dig site. Paperwork purposes too.
Anomaly depth: The depth at which your artifact resides.
Clearance above anomaly depth: The size of the cavity in which the artifact is. If you dig in it, you will get a strange rock, which I will talk about later.
Dissonance spread: Quite useless, a 1 means it is an artifact, other numbers indicate an anomaly, but in this case, the scan is different enough to render this information useless.
Anomaly material: Tells you roughly what your artifact is. Depending on this information, you will activate a specific field on your suspension field generator to collect the artifact.
Now that you have this information, bring the Suspension Field Generator to the dig site. You need two free tiles around the site, so that you can put your generator on one, and be on the other one. Fix it to the ground, and do not activate it yet. For now, what we need is a rock sample.
For that purpose, you will need to dig just before the cavity starts. It means you need to subtract the Clearance from the anomaly depth, and dig at this distance. In the case of the image below, the artifact is at 30 cm and the clearance is 6 cm, so I need to dig 24 cm. Now that you have dug this distance, take your Core Sampler and click on the dig site. The red light will turn green, meaning that a sample was taken.
Note: You only need one sample per dig site.
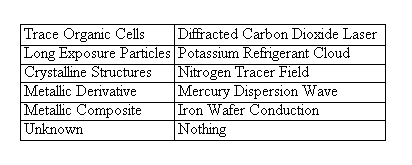
Now you can focus on the excavation. You will need to strike at the exact anomaly depth if you want to directly collect the artifact. Here, the Depth Analysis Scanner tells me the artifact contains traces of Organic Cells, so I activate a Diffracted Carbon Dioxide Laser, and I dig 6 cm to reach the anomaly. I turn the suspension field generator off, and...
Here is your artifact, excavated in the most efficient way possible.
Then, repeat the same procedure minus the sample until your Depth Analysis Scanner stops pinging.
Note: This example is for a precise excavation. If you dig too far, the artifact breaks. But, if you dig too short, and you end up in the cavity of the artifact, you will get this.
This is a strange rock. While not being a total failure, a strange rock is bad. First, because you need to open it with a welder, which is one unnecessary step in the process. But the most important point here is that opening strange rocks quite often breaks the artifact itself, so, try to dig at the exact anomaly depth to avoid these kinds of issues.
When you are done with the excavation, bring your sample and findings back to the Camp, where you will organize them in the way you see fit, like I explained in the Camp chapter.
Now, here are the two lists for the various excavation picks and the different fields of the generator.
You’ll notice some of the fields are missing: It is because they are useless. The last line, Unknown, is linked to anomalies, which means it's safe to clear with your handpick without breaking Artifacts.
Anomalist
An Anomalist is a professional Scientist. They specialize in researching ancient alien technology and other abnormal Scientific subjects. They work in the Xeno-Science wing alongside the Xenobiologist and Xenoarcheologist. Their gameplay is more similar to the Phoron Researcher in that they mainly stay in their lab and experiment with what the Xenoarcheologist brings to the Station.
A lot of the same rules apply to the Xenoarcheologist as to the Anomalist when it comes to roleplay. you should still be creative: What do you think an Anomalist would keep notes with? You will work in quite a large place, so do not worry about space, and impress your department with very complicated procedures and the like. A Universal Recorder and labeled Folder with Paper inside tends to create a believable atmosphere for a Scientist in general.
Anomalies
An Anomaly is an ancient piece of technology unearthed on the Asteroid. No Station personnel knows their origin-- That's what you are meant to research and find out. There are multiple types of Anomalies, I'll classify them as; Static, Dynamic. Static Anomalies are always the same, they serve one purpose and have no random effects at all. Dynamic Anomalies have their effects determined by RNG. I will explain the Dynamic Anomalies, you will have to find the Static ones ingame and research them yourself.
During your work researching Anomalies, you will have to activate the Anomaly to know what effect it has. These effects are numerous and vary from extremely dangerous to extremely helpful. Or both. This will be influential in deciding how to explain the Anomalies function in Alien society and its origin. These Triggers and Effects will be graphed below.
As for equipment, you will use multiple objects for the below testing, but the most important is to wear Gloves and an Anomaly suit.
Triggers
Here is a graph of the random Anomaly triggers.
| Triggers | I suggest you keep a list and go through all of these. Trial and error is part of your job. |
|---|---|
| Touch: | Touching the Anomaly with an ungloved hand. It's important to wear gloves when handling Anomalies. |
| Water: | Splash some water on it and see if it activates. |
| Acid: | Splash some acid on it and see if it activates. |
| Volatile: | Try percussive experimentation, hit it with blunt objects. Maybe a crowbar? |
| Energy: | Try to hit it with an activated Stunbaton, and try to shoot it with an Emitter. See if it activates from either. |
| Heat: | Increase the temperature in one of the Anomaly Isolation Chambers. |
| Cold: | decrease the temperature in one of the Anomaly Isolation Chambers. |
| Plasma: | Put it in a room with Plasma in the air. Concentration level is unknown. |
| Oxygen: | Put it in a room with Oxygen in the air. Concentration level is unknown. |
| Carbon Dioxide: | Put it in a room with CO2 in the air. Concentration level is unknown. |
| Nitrogen: | Put it in a room with Nitrogen in the air. Concentration level is unknown. Whether this is N2O or just N2 is uncertain. |
Effects
Here is a graph of the random Anomaly effects.
| Effects | When you finally trigger an Anomaly then you receive at least one, maybe two effects from the Anomaly. If you are lucky it won't kill you immediately. |
|---|---|
| EMP: | The Anomaly releases an Electromagnetic Pulse and is one of the worst (Or best) finds due to it's damaging nature. Bad for Synthetics and anyone with a mechanical organ. |
| Cold: | Makes the room colder. |
| Cell Charge: | Charges all Battery cells within range, very good for Synthetics. |
| Cell Drain: | Drains all Battery cells within range, very bad for Synthetics. |
| Radiation Emitter: | Emits large amounts of radiation which will irreversibly alter your DNA. |
| CO2: | Releases CO2 Gas in to the air. |
| Nitrogen: | Releases Nitrogen Gas in to the air. |
| Oxygen: | Releases Oxygen in to the air. |
| Phoron: | Releases Plasma Gas in to the air. |
| Good Feelings: | Emits brain altering waves that make you happy. |
| Bad Feelings: | Emits brain altering waves that give you anxiety. |
| Heal: | Heals People. |
| Hurt: | Hurts People. |
| Robot Heal: | Heals Synths. |
| Robot Hurt: | Hurts Synths. |
| Sleepy: | Makes everyone Sleepy. May also release N2 sleepy time gas. |
| Stun: | Temporarily Stuns people. |
| Teleport | Randomly Teleports people within the vicinity of the Anomaly. |
Harnessing An Anomaly
Anomalists are able to siphon effects from an Anomaly into an 'Anomaly Power Battery', when slotted into a device capable of utilizing this battery called an Anomaly Power Utilizer, it will discharge the effect. Creating these tools are where the trigger and effect comes into play beyond the roleplay elements. To begin charging an Anomaly Power Battery, you will have to activate the Anomaly and put it into the Exotic Particle Harvester pad, place the Battery into the Harvester as well, and then activate it. It will fill the Battery with the effect. However, many Anomaly effects will drain the Battery at an extremely quick rate, you may have to use them carefully, and they work best for demonstrating the Anomaly to your coworkers.
Study
Now that you have analyzed all your samples, it is time to bring all of this to the Station and stow it away. Put your Artifacts in labeled crates, put your valuables into a locked briefcase, etc, and drag it back there. Then, put them on their respective locations, so that you have all the information you need available.
Now you have organized all your findings… think, look at the reports, be creative! Look at your 800 years old weapons of Dig Site 4. Maybe they belonged to the species depicted on this 850 year old bowl, in Dig Site 2? Basically, make logical links between the findings, invent stories around them, entire civilizations, wars, religions, the possibilities are massive. Maybe when you have enough data, you could write a book about it? Xeno-research may be a very lonely job, but it still gives you plenty of occasions to make great RP, so just go crazy.
Analysis: Spectrometry
So! You have spent some time digging and excavating, and now, you have around 6 different dig sites, maybe more. That’s good. Hopefully you organized and labeled them all according to a memorable pattern. Now, take all the samples, put them in your crate, and head back to the Station, for the Spectrometer analysis.
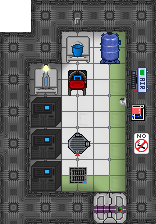
Here is the Spectrometry Laboratory. In the room, you see a coolant tank, a bucket, some nanopaste, and three spectrometers. In order to have an organized analysis, I suggest you only use one, most particularly, the upper one, since it avoids the usual back & forth to provide it with coolant. Once it is filled with coolant, take your first sample, take the rock sample from inside it, and put it in the spectrometer.
Note: Once again, use only one Spectrometer, and start with your Dig Site 1, then 2, etc. The results of the analysis are chronologically numerated, so, that way, you will have correspondence between your samples and your results.
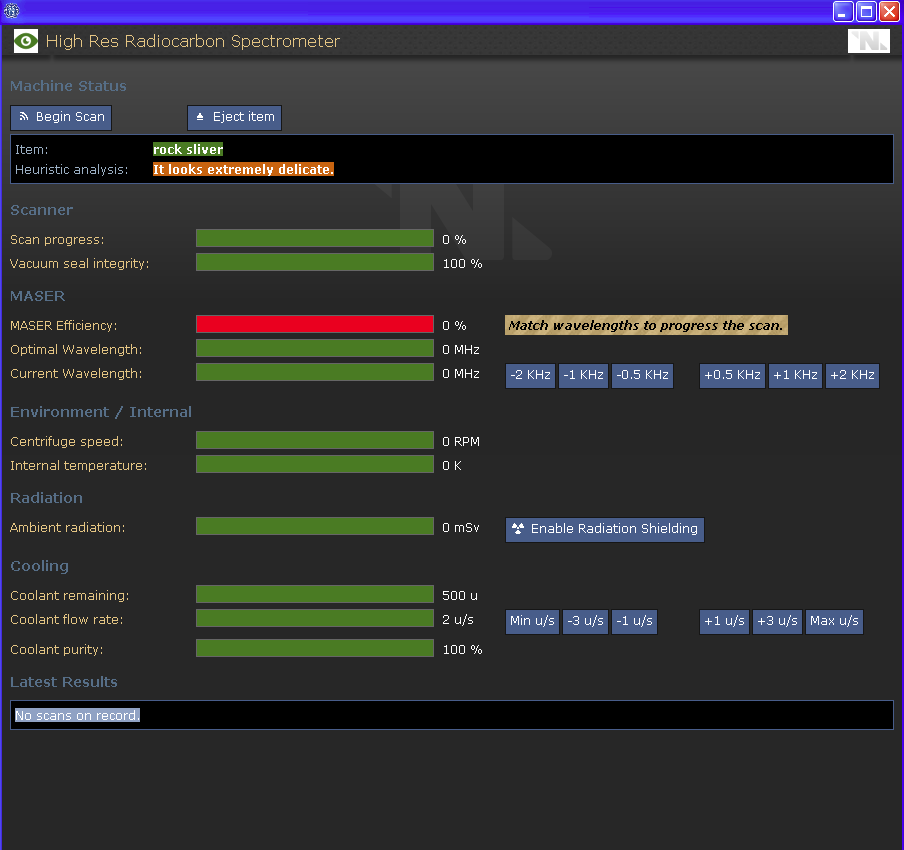
Now, you have opened the Spectrometer menu. Big scary screen at first, but simple to understand.
Scanner: Indicates the progress of the scan, and the "health" of the spectrometer. When it is too low, use nanopaste to fix it.
MASER: The most important stuff. Try to match you Current Wavelength with the Optimal Wavelength best as you can, since it is what makes the scan progress.
Environment / Internal: The speed at which the machine functions, and the heat it endures. The faster it goes, the hotter it is.
Radiation: Sometimes, radiation outbursts happen during the scan. You can enable the Radiation Shielding, but it stops the scan, so I rather suggest you keep your excavation suit on yourself, since it protects you against it. That way, you can totally ignore this factor.
Cooling: Rather simple to understand. It is what keeps the Internal Temperature low. On this screen, you see I put the flow rate at 2 u/s : It is best to keep it that way, 2 u/s gives you plenty of time before emptying it, and avoids overheat in almost every case.
If you followed these instructions, the only part you need to focus on is the MASER field, since it is the only one that will necessitate you to fiddle with during the scan.
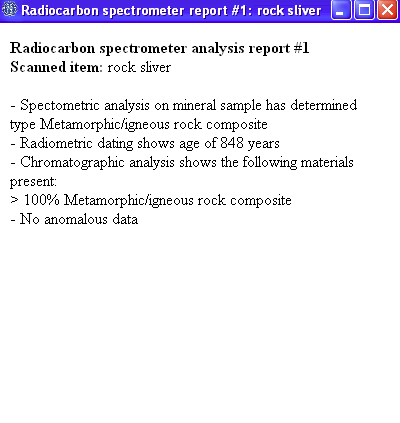
Now, you begin your scan, keep the Wavelength in check, and normally, the scan goes very well without any trouble. The machine pings, ejects your rock sample, and prints the result of the scan.
Now, you have some techno-babbling informations that will allow you to RP-study your artifacts later.
Analysis: Chemistry
Of course, the coolant in the tank is not enough to last a particularly busy shift. It is generally empty after three spectrometer scans. You can still use water as a less efficient coolant, but the real stuff is a better solution.
If you run out, you can ask for access to the Research Chemistry dispenser, they should have no reason to refuse. The formula is quite simple:
Tungsten + Acetone + Water
Now, if you get afew beakers of that, you should have plenty of Coolant to keep your spectrometer working!
The Anomalist will also have need of Sulfuric Acid for testing Anomalies, this is where you will get it.
Research Department
| |
| Head of department | Research Director |
| Personnel | Scientist - Xenobiologist - Xenoarcheologist - Roboticist |
| Useful guides | Guide to Research and Development - Guide to Xenobiology - Guide to Xenobotany - Guide to Xenoarchaeology - Integrated Electronics - Guide to Telescience - Guide to Modular Weaponry |

